

Create fun holiday yo-yo ornaments for a homemade gift for a teacher, music instructor or bus driver. A nice sewing craft for older children to learn some basic sewing skills, even how to sew a button. You can make it even faster with some hot glue at the finish. Plan an afternoon to put these together for holiday gifts or your own homemade decorations.
Materials needed:
- 1 giant yo-yo (6 inch circle)
- 1 large yo-yo (4 1/2 inch circle)
- 1 button
- 12 inches of ribbon
- Thread
- Needed
- (hot glue optional)
Directions:


- First make your yo-yos. Take the 6 inch circle of holiday fabric.

- Carefully fold over the raw edge (wrong sides together) about 1/4″ and baste all around. You can use pretty large basting stitches – yo-yos are pretty forgiving.
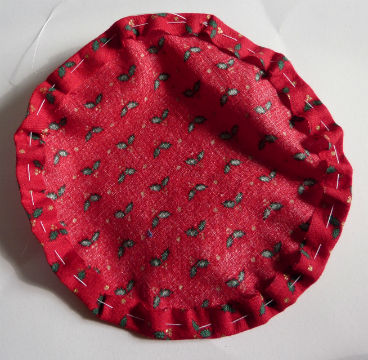

- Once you have basted the whole circle, pull the thread to gather the yo-yo tight.

- Tie a sturdy knot and bury the end of the thread in one of the folds of the yo-yo.
- Make the 4 1/2″ smaller yo-yo in the same way.

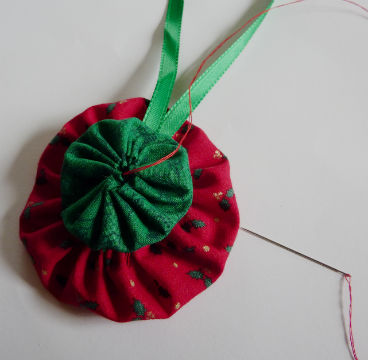
- Assemble the ornament together. Loop the ribbon to form a hanger and tack it in place with thread at the center of the giant yo-yo.

- Layer the large yo-yo on top of the giant yo-yo and tack or sew it to the center of the giant yo-yo.

- Finish the ornament by sewing a button to the center of the large yo-yo.


Tip: You could have ready made yo-yo’s and just hot glue the ribbon, yo-yos and button together to make them up in a jiffy.
CAUTION: Hot glue is HOT! Protect your fingers and have an adult help and supervise children.


Hope to assist local Girl Scout troop with this project.
Hope it works well. I would love to see pictures!
SEW Cute and will have a wonderful craft day with granddaughter and her friends making these! Thanks for sharing!