Quilt the World 2022

Hello Quilting friends!  I wanted to share with you my Charity Quilt for the Pay It Forward Campaign called Covering the World: One Quilt at a Time 2022.  This is my charming Quilt of Valor Quilt.

I am an AccuQuilt Go!Getter and I have teamed up with other quilters and designers from AccuQuilt, Moda Fabrics, and Brother to create and donate our time and quilts to a charity of our choice.  Every week in 2022, one person from our teams will be donating a quilt to our favorite charity.  My chosen charity is the Quilt of Valor Foundation.

The Mission of the Quilt of Valor Foundation is to cover Service Members and Veterans touched by war with comforting and healing Quilts of Valor.  I have many friends and family members who have served our country and I have a special place in my heart for the veterans and members of the military who have given so much of themselves.

I belong to my local group, Stitching Sisters Quilts of Valor in Clawson, Michigan.  We get together monthly to sew quilts in fellowship and fun.  Here is a picture of our group showing some of the blocks we were making for our quilts.

This picture showing the completed quilt made with our blocks being awarded to a deserving veteran.

This is a picture of our latest group of veterans to receive their Quilts of Valor.

We often get fabric donated to our group from the local community.  All of the fabrics in the quilt I made were donated.  I had a selection of chambrays and red and blue cotton fabrics with tiny stars printed on them.

I used the AccuQuilt GO! Blazing Star 12” Finished die (55051) by Eleanor Burns for my quilt blocks.  The contrast of the prints and chambray really make the Blazing Star stand out.  I used sashing and cornerstones to pull it all together.  My friend, Sue Baker, did a beautiful job of completing the long arm quilting.  She was one of the sisters who founded our Stitching Sisters QOV group.

Do you make quilts for Quilt of Valor? I have a FREE TUTORIAL to make this GO! Rising Star Quilt of Valor quilt on the Accuquilt Blog.

I hope you enjoyed seeing my Quilt of Valor charity quilt.  Would you like to join us in making a quilt for charity?  For more information on making and donating a charity quilt as part of the Quilt the World 2022 project, visit AccuQuilt.

New GO! Friendly Pattern – Honey Bee Hive

Honey Bee Hive by Lori Miller Designs

Introducing Honey Bee Hive, this pattern has been all of the buzz. This is an AccuQuilt GO! Friendly pattern. It uses the Storm at Sea Block on Board Die and several strip dies.

Honey Bee Block by Lori Miller Designs

This little quilt has a special place in my heart. My Dad was a beekeeper for over 50 years. I used to go and help him work the bees and take off the honey. The honey was so delicious.

Honey Bee Hive – Baby or Wall Hanging by Lori Miller Designs

I designed my quilt using Electric Quilt Design software. Honey Bee Hive comes in three sizes, Baby or Wall hanging, Throw Size and Queen, of course.

This pattern only comes with AccuQuilt GO! Cutter instructions. You will need the following dies:

  • GO Storm at Sea Die (9” Finished) (55221)
  • GO! Strip Cutter 3 ½” (3” Finished Strip Die (55032)
  • GO! Strip Cutter – 1 ½” (1” Finished) (55024) OR GO! Strip Cutter – 2 ½” (2” Finished) (55017) depending on Quilt size.

I love the accurately cut pieces which makes string piecing go quickly.

A closeup of the little Bee Skep Beehive in the center. So Cute!

Thanks for stopping by to see my new Pattern Design.

Available now in my Etsy Shop!

Check out these other AccuQuilt GO! Friendly patterns in my shop.

Free Tutorial – Updated Silverware Rolls

I first introduced these handy little silverware rolls back in 2015. They are such a great project that I have revisited the pattern and updated the design. They are still great for picnics, family reunions and bbq’s, or just throw them in the car when you grab some take out and go to the park.

They are sized perfectly to fit plastic or regular silverware and a napkin. Make one or tuck in a paper napkin, they all work well.

These stitch up so fast that you will want to make several and give some away. My quilt guild used to hold holiday potlucks and these made perfect gifts for my quilty friends for those dinners. I love that you can just wash them up, refill and use again and again.

Materials Needed:

This will make 4 silverware rolls.

  • 5/8 yd red print fabric for outside and pocket
  • 3/8 yd blue print fabric for lining
  • 3/8 yd of batting
  • 1/4 yd Medium Weight iron-on interfacing
  • 3-4 yards of coordinating ribbon
  • Coordinating thread

Directions:

Cut

For each silverware roll (Make 4)

  • 1 — 9″ x 10″ rectangle of red print fabric for outside
  • 1 — 9″ x 10″ rectangle of batting
  • 1 — 9″ x 10″ rectangle of blue print fabric for lining
  • 1 — 10″ x 10″ rectangle of red print fabric for pocket
  • 1 – 4 1/2″ x 10″ rectangle of interfacing
  • 22″ of ribbon for the tie

Stitch

  1. Take the 10″ x 10″ pocket and fold in half and press flat.
  2. Place the strip of interfacing inside and press.
  3. Top stitch the top of the pocket at the fold stitching two lines, 1/8″ and 3/8″ away from the fold.


  4. Layer the batting, the lining and the pocket all facing up as shown.


  5. From the left side of the pocket, measure 2 inches, 3 1/2″ and 5″ at the top and bottom of the pocket.  These will mark the stitch lines to make the channels for the silverware.
  6. Stitch down from the markings on the pocket to make the silverware channels.  You will have three stitch lines.  Do a couple of back stitches at the top to secure the channels.


  7. Next, take your 22 inch ribbon and fold almost in half leaving one end about one inch longer than the other.  Pin the ribbon flat on the right side of the pocket about halfway down the side of the roll.  Make sure that you will catch the ribbon when you stitch the side seam.  Tuck the ends out of the way so that you do not catch them in the side seams.


  8. Layer the rectangle from the print fabric over the pocket, right sides together and pin in place.
  9. With a 1/4″ seam, stitch all the way around the roll leaving an opening for turning on the bottom.  Clip corners.

  10. Turn the roll right side out and tuck in the raw edges on the opening.  Iron the silverware roll flat.


  11. Top stitch close to the edge of the roll all the way around being sure to catch the edges of the opening and sew them shut.


  12. Your first silverware roll is completed, now just make three more!  These really do stitch up fast, sew them assembly line style! To store, just roll them up and tie with the ribbon.

Published – Peabody Pouch

Hot off the Press! I am delighted to share my Scrappy Peabody Pouches! These cute little pouches feature a unique shaped top that opens wide to fill with whatever goodies you like. I used color coordinated scraps from the stash to create these little cuties.

Featured in the July 2021 issue of American Quilter Magazine, this issue is loaded with lots of fun projects…including my Peabody Pouches.

I pieced the scrappy half square triangles and then used scrap linen from the stash for the body of the pouch.

I stitched the zipper right on curved top of the pouch to create the unique shape.

I quilted right through the lining and just used binding to hide the raw edges on the inside.

That curved top helps the bag open wider to really fill it up whether you use for cosmetics, quilting notions or essential chocolate.

You can stitch up a whole group of little Peabody pouches for gifts or just make something special for yourself. They make great assembly line sewing, so make up a pile of them.

Grab a copy of the latest issue or head over to Americanquilter.com to get a digital copy.

Happy Stitching!

Published – Cool Waters Quilt

Used with permission from American Patchwork & Quilting magazine. Copyright 2021 Meredith Corporation All rights reserved

I am pleased to share my Cool Waters Quilt that is published in the January 2021 issue of American Patchwork and Quilting Magazine.  This throw size quilt is a block full of triangles.  It is easy to piece and I love the calming color way.

This is the cover of the January issue to look for.  It is packed with great projects to sew this winter.

Used with permission from American Patchwork & Quilting magazine. Copyright 2021 Meredith Corporation. All rights reserved.

Here is the full Cool Waters quilt in all its glory.  I loved the way a secondary pattern appeared in the design as the blocks were sewn together.  By limiting the fabric choices, I think it seems crisper and simpler even with all those triangles.

I designed my quilt with EQ8 Quilt Design Software.  It is a regular pieced quilt block. It makes it so easy to try different fabrics and combinations of colors.  I could add or remove blocks until I got the size of quilt that I wanted.


Here are all my stacks of pieces.  EQ8 gave me a handy rotary cutting guide to help cut all the patch shapes.  I print it out and scribble all over it as I cut things out and take notes.


I Pieced the larger triangle modules first to make it easier to assemble.


This is a common scene when I am in the middle of a project.  Pieces of fabric and notions everywhere!


I used free motion quilting to quilt a paisley  all over design on this quilt to finish it off.  I usually quilt on a Bernina domestic machine.

Please tag me on instagram @lorimillerdesigns or on facebook @lorimillerdesigns.  I would love to see your version!

Happy Stitching!

NEW Patterns – Florette and Nova

NEW PATTERNS

I have been sewing and quilting lots of secret projects during the pandemic, and now I get to share some of what I have been up to.  Introducing two new beautiful patterns for you to stitch and quilt. I am delighted to share them with you.

FLORETTE

This first pattern is called Florette.  It is a sweet table runner that changes its mood by just changing the colors.  The individual blooms are a variation of a log cabin block.  So bright and cheery, this pieces together in no time at all.  Just grab some scraps from the bin and put it all together.  This would be a great gift for a friend, housewarming, or something cheery for your own table this winter.

This table runner finishes at 14″ x 42″.

NOVA

Next up is this clever two color star quilt I am calling Nova.  It is made up of a lot of flying geese! But if you use speed methods, you can whip those up in a jiffy.

I love the two color design that creates the striking star blocks.  However, it would be easy to add a little red to make this a Patriotic quilt.  My pattern includes instructions to create four flying geese at a time to make stitching it up go even faster.  The Sashing and borders also help to easily square up this quilt and make it a little more forgiving for beginner quilters.

This pattern comes in three sizes:

  • Baby    42″ x 42″
  • Throw (Pictured) 56″ x 70″
  • Twin 70″ x 84″

More Patterns to Make

Thank you so much for your interest.

Happy Quilting!

Published – Welcome Neighbor Table Topper

Used with permission from American Patchwork & Quilting®. ©2020 Meredith Corporation. All rights Reserved.

In the August 2020 issue of American Patchwork and Quilting Magazine, you will find my latest design. It is a table topper of little rainbow paper pieced houses.  I used a linen background and colorful fabrics from my stash to make this little cutie.  It is a great gift idea to celebrate a new home, welcome new friends or just spiff up your own table.

Here is the cover of the August issue to look for, there are lots of fun projects in this issue just in time for summer sewing.

I designed my topper in EQ8 Quilt Design Software.  It is a foundation paper pieced design that would be great for an intermediate quilter or a dedicated beginner.  I find starting on paper pieced projects that are smaller is a great way to try out this technique.

I played with a lot of different color ideas, EQ8 Quilt design software makes it easy to do that, try on different fabrics and styles.  Here is another color way that I played with in EQ8.


I used foundation patterns created with #EQ8 to make each of the eight sections of the quilt.  This section is the top of the house.

i just took my time carefully pressing and trimming.  I did not want to handle too much to keep the linen edges from fraying.

I always think it is a little weird to sew upside down and backwards, lol, but the precise stitching lines it creates are so worth it.


Here is one of the 8 little house wedges all put together.  Ignore my well used ironing board cover.  I will have to make a new cover one of these days.

I did assembly line sewing for each section.  I just love how they take shape.

I stitch the wedges into pairs aligning the seams.  Then I sew the four sections of the block together to make half of the table topper.  I then sew the two half together and press seams open.

Used with permission from American Patchwork & Quilting®. ©2020 Meredith Corporation. All rights Reserved.

I used a combination of walking foot quilting and free motion quilting on the topper.  It is small enough that you can experiment with some detail to get the lovely texture.

I would love to see your version, just tag me on facebook or instagram @lorimillerdesigns

I love a good table topper.  Check out my other designs on these posts.

Welcome Home Pineapple Topper information can be found HERE.

If you are new to paper piecing, you might like to try my Stardrop Table Topper first.  I have a free tutorial HERE.

Please tag me on instagram @lorimillerdesigns or on facebook @lorimillerdesigns.  I would love to see your version!

Happy Stitching!


Free Tutorial – Goose Trot Quilt designed in EQ8, Cut with AccuQuilt

This is my son Colin’s quilt.  It is called Goose Trot.  I wanted something to give him for his tiny house to make it a bit cozier.  I also knew I wanted to try my new AccuQuilt GO! 12″ Qube dies with my AccuQuilt GO! Cutter and use some fabrics from my stash to make it scrappy.  This is the design that I came up with and I really think he will like it.

It is made with this simple four patch block I designed.  I just rotated the block to create the overall design.

Here is the full design of the quilt.  If you want to design it with EQ8, you can find a design tutorial on my EQ8 Lessons with Lori Blog post over at Electric Quilt HERE

Goose Trot Quilt

Finished size is 51″ x 60″

Finished block size is 12″

Materials

  • 2 yd assorted blue and gray fabrics for geese
  • 1/2 yd light blue solid
  • 1 3/4 yd light gray print for vertical strips
  • 1/2 yd for binding
  • 4 yd Backing
  • 4 yd Batting

Directions

Please note:  This assumes you will be using your AccuQuilt GO! 12″ Qube and die cutter to cut out the quilt.  There is enough fabric to cut the traditional method.  See tip at end of tutorial.

Dies used in this design:

  • GO! Square-6 1/2″ (6″ Finished) (55000)
  • GO! Quarter Square Triangle-6″ Finished Square (55726)
  • GO! Half Square Triangle-3″ Finished Square (55703)
  • GO! Strip Cutter – 2 1/4″ (1 3/4 ” Finished) (55053)

Cut Fabric:

Assorted blue and gray fabrics.  I mixed half and half blue and grey fabrics, using light and darks for interest.   I wanted to use up a bunch of scraps and this was the perfect way to do that.  You just have to count as you go so you have enough pieces of each shape.

Using 7 3/4″ strips of fabrics to cut Number 4 shape (6″ finished Quarter Square Triangle), CUT

  • 30 – Assorted blue Number 4’s
  • 30 – Assorted Gray Number 4’s

Using 4 3/4″ strips of fabrics to cut Number 5 shape (3″ finished Half Square Triangle), CUT

  • 60 – Assorted blue Number 5’s
  • 60 – Assorted Gray Number 5’s

Light Blue Solid

  • Using 2 – 7″ x WOF strips of fabric to cut Number 1 shape (6″ Square), CUT
    • 10 –  Number 1’s

Light Grey Print

  • 3 — 9 1/2 ” x 60 ” strips

Binding

  • 6 — 2 1/4″ x  WOF strips for binding

Assemble the blocks

Begin by making 60 sets of Flying Geese.  I alternated using the greys and blues.

Then join two geese together and make 30 sets of these.

Then arrange your flying geese blocks with your light solid blue squares into a 12 ” block.  I actually arranged the whole strip before I assembled the blocks to make sure they were scrappy and to spread around the different prints.  There are five complete 12″ blocks in a strip.

Assemble the Quilt

Once you have your blocks together and arranged, add your light grey print strips to complete the quilt top.

Finish the Quilt

  1. Create a quilt sandwich with the backing, batting and pieced quilt top.
  2. Baste the quilt layers together.  Quilt as desired.
  3. Add binding and finish.

Here is my quilt sandwich, pin basted and ready for quilting.  Notice my helper, Cookie cat in the window seat.

I like to hand bind my quilts most of the time.  I just watch a little TV and stitch away.  I used the solid light blue for my binding.

For traditional cutting, you can try these charts.

NEW PRODUCTS for EQ8 and ACCUQUILT GO! QUBE

If you like designing quilts with EQ8 and then cutting them out with your Accuquilt GO! Qube, you might want to check out my new EQ8 block libraries for Accuquilt.

I have created EQ8 Block Library files for each of the 216 blocks shared by AccuQuilt to go with their GO! Qube dies and companion dies.  There are currently available in all the block sizes. 

You can find a variety of EQ8 Block Library files and my original patterns in my Shop.

Were you inspired to try this quilt?  Be sure to let me know your thoughts in the comments and share pictures with me on social media on Facebook or  Instagram.  Be sure to hashtag #LoriMillerDesigns so I see it!  And don’t forget to sign up for my blog updates to you get ideas like these right to your inbox.

Looking for the EQ8 Design Instructions?  You can find them HERE

For more projects and tips and techniques on using EQ8, visit my Electric Quilt blog series EQ8 Lessons with Lori.

For more information on EQ8, go to Electric Quilt 8 Software.

Published – Welcome Home Pineapple Table Topper


In the May 2020 issue of American Quilter Magazine, you will find my latest design. It is a stunning table topper made with Princess Palette Batik by Mirah.  This palette of batiks acts like blenders and is the perfect combination of colors for the design.  This sunny Pineapple represents warm welcomes, celebration and hospitality and is perfect to welcome guests or gift to a friend.

I designed my topper in EQ8 Quilt Design Software.  It is a foundation paper pieced design that would be great for an intermediate quilter or a dedicated beginner.  I find starting on paper pieced projects that are smaller is a great way to try out this technique.

I was able to import the Princess Palette Batik fabrics right into EQ8 to mock up a realistic picture of my design.  I could try different colors before I had to cut into that precious fabric.  Batik by Mirah generously provided all of the fabrics.  They have some beautiful fabrics that you should definitely consider for your next project.  Batik by Mirah


I used foundation patterns created with #EQ8 to make each of the eight sections of the quilt.

It is a lot of stitching, pressing and cutting, but the result really starts to take shape.

Here, I am trimming the sewn foundation.

Then I stitched the four sections of the block together.

The individual blocks  come together to create one pineapple.  There are 8 blocks needed to make the topper.


I sewed four blocks together to make half the topper and then stitched the two halves together.

I use a water soluble pen to mark the quilting designs on the topper.  I wanted to stitch little feathers in the background.

Then I stitched cross hatching in the pineapples.

Here is a closeup of the quilting after it was finished and washed.  I love that crinkly texture!

I would love to see your version, just tag me on facebook or instagram @lorimillerdesigns

Happy Stitching!


Free Tutorial – Make an Envelope Back for your Pillow

I really enjoy making throw pillow covers that I can remove and easily wash.  You will find a lot of seasonal quilted pillow covers in my house, they are a quick project and I get to see something from my efforts pretty quickly.  I have found that an envelope style back allows me to slip them on the pillow forms without any buttons or velcro.

The fronts of the pillows are pieced and quilted with a binding finish.

It doesn’t matter the size of the pillow, I make an envelope back.  The shots above are from my Nautical Bench pillow.

Flip them over to the back and you can see has the overlapping envelope back.

Here are my recent pillows for my son’s tiny house.  The envelope back means he can just pull them off and wash them.

This is just a great way to brighten up your decor by just changing out your pillow or cushion covers.

Here is how I create my Envelope backs.

I have found that there are two ways to make your pillow cover with the envelope back.  My favorite style is to finish the edges of the pillow with a binding.  The other style just involves sewing around the front and back with a seam on the inside of the pillow.  The pictures I have show mostly the binding edge style.  For the envelope back, I like to overlap top to bottom and my diagrams will reflect that.  You mix it up however you like them.

Determine how large to make the pieces for the Envelope.

  1. Measure your pillow’s width and length to start.
    • We are going to cut two pieces and use one for each side of the envelope.  I use a piece of fabric folded in half.  Here is how to figure out what size of rectangle is needed for the two envelope pieces.  This assumes we are overlapping top to bottom.  I like it to overlap at least 2 – 2.5″ on each side of the center and that is why we are adding the extra 5″.
  2. For the width of the two pieces, use the width of your pillow + 1″
  3. For the length of the envelope, use the length of your pillow + 5″.
  4. For example, we will use 18″ x 18″ pillow.
    • For the width, use  18″ + 1″ = 19″
    • For the length, use 18″ + 5″ = 23″
  5. You will then cut two rectangle pieces 19″ x 23″.

Prepare the Pillow Envelope backs

  1. Fold the envelope rectangles in half crosswise, wrong sides facing, keeping the width and press.
  2. Add interfacing inside the fold.
    • I like to take a 1 inch strip of medium weight interfacing and nestle it into the fold and press it in.
  3. Topstitch about 3/8″  to 1/2″ away from the fold to hold it in place.
    • This will help keep this edge from wrinkling in the wash.pillow-back
  4. Overlap the pressed folded edges making a square the same size as the pillow top.
    • Make sure they are overlapped top to bottom how you want them to show on the outside of the pillow.
  5. Baste the overlapped edges to hold in place about 1/8″ from the edges of the overlap.

Finish the Pillow Cover

Style 1 – Bind the Edges of the Cover

  1. Place the quilted pillow top and the overlapped backing together with wrong sides facing.  Baste around the pillow top 1/8: from the outer edge.
  2. Stitch your binding in place and complete binding using your favorite method.
  3. Slip your pillow form inside.

Style 2 – Sew Seam inside the Pillow Cover

  1. Place the quilted pillow top and the overlapped backing together with right sides facing.
  2. Stitch around the outer edge with 1/4″ seam allowance.
  3. Turn the Cover right side out using the opening in the overlapped envelope back.
  4. Slip your pillow form inside.

I hope these directions help you make lots of fun quilted pillow covers!

Tag me on Facebook or Instagram @lorimillerdesigns, I would love to see what you have created.

Pin and Needles Sew Along

I am very excited to be hosting the first week of the Pins and Needles Sew Along for my crafty friend, Kim’s new Pins and Needles Book Pattern.  You might know Kim best as Retro Mama and she makes and designs the cutest little quilty things.

I like to collect fun sewing theme prints and since you don’t need a lot of fabric, I found some perfect scraps to make this project.  Here is some fun spools of thread and I even found some fabric with pins on it to use.

I used a little stiletto to help guide my binding around the outside edge when I took off the little clips to sew.  It really went together fast.

Instead of a little tape, I fussy cut this pincushion from another scrap of fabric I had and stitched it to the inside pocket.  I used this pocket and a zipper pocket combination.

This pattern comes in two sizes, the small is 3 1/2″ x 5″ and the medium is 4 1/2″ x 6″.  I decided to make two of the medium size books.  One for myself and one to give away as a gift.

For the extra book, I turned it into the perfect mini sewing kit.  I put three small spools of white, black and grey thread in the zipper pocket.

Then I added some pins, needles, safety pins, small scissors and mini clips.

Since I used the elastic closure, it easily closed with the elastic and a button.

I love that you can put your own touch and style on each pins and needle book by adding embellishments, piecing and quilting.

There is so much inspiration on Instagram for this cute little Pins and Needle book, just look for the #pinsandneedlesSAL or #pinsandneedlesbook.

Don’t miss all the fun!  Here are all the terrific makers who are hosting each week.  They will share their own needle books and prizes.  Just post a picture of your finished needle book with the hashtags #pinsandneedleSAL #retromamapattern

Week 1 – July 8-14

Elnora @elnorac
Lori @lorimillerdesigns

Week 2 – July 15-21

Stephanie @sissybellesews
Zoe @zoemayson

Week 3 – July 22-28

Helen @henhousehandmade
Laurraine @patchworkpottery

Week 4 – July 29-August 4

Sarah @princess_ina_pouch
Mary @sunnydaysupply


Joining the sew along is simple! Here’s what you need to do:
1) Grab the  Pins and Needles Book Pattern  from @retromama and stitch up the cute Pins and Needle Book.  The pattern is on sale throughout the sewalong.

2) Follow me  @lorimillerdesigns and @retro_mama on Instagram, as well as each of the amazing ladies listed above. Then follow the hashtag #pinsandneedlesSAL to see all the projects, WIPs, and giveaways!

3) Post your photos on Instagram with the hashtags #pinsandneedlesSAL and #retromamapattern to participate and be eligible for prizes. You are very welcome to post WIPs but only completed projects will be eligible to win. Be sure that your account is public during the SAL so we can see your projects! You may enter more than once if you make more than one Pins and Needles Book.

Happy Stitching!


Free tutorial – Easy St. Patrick’s Day table runner and napkins

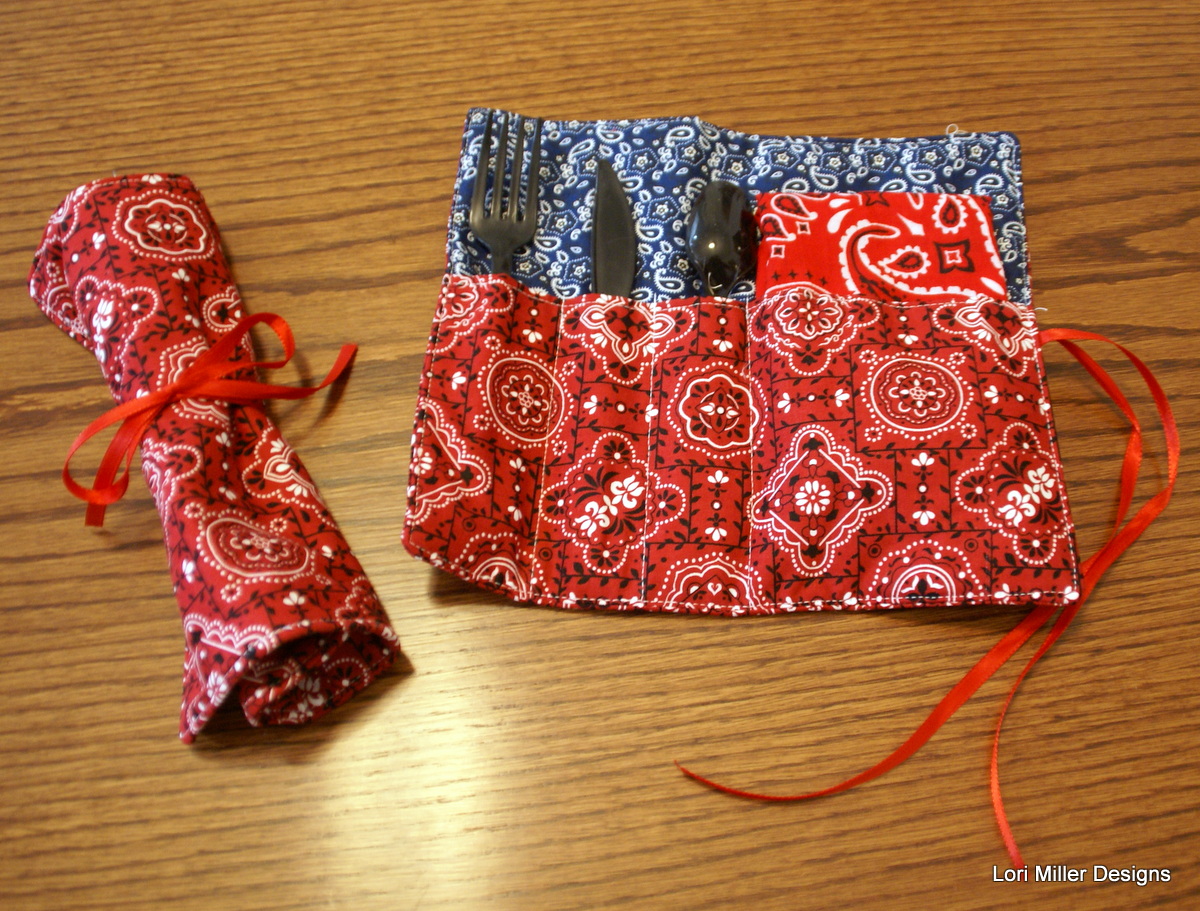
Here is a super easy to make table runner and matching napkins to celebrate St. Patrick’s day.  This easy project can be made in any fun novelty fabric.  Grab 1 ½ yards of a St Patrick’s day print and stitch this up in time for your corned beef and cabbage dinner.  This is a great practical gift idea and a perfect beginner’s project!  You will learn to sew a simple hem and stitch straight lines for the table runner and 4 napkins.

Materials:

  • 1 ½ yards of a St. Patricks day cotton print (42-45 inches wide)
  • Matching thread
  • Sewing machine
  • Pins
  • Iron and Ironing Board
  • Measuring tape or sewing gauge

Prepare the Fabric:

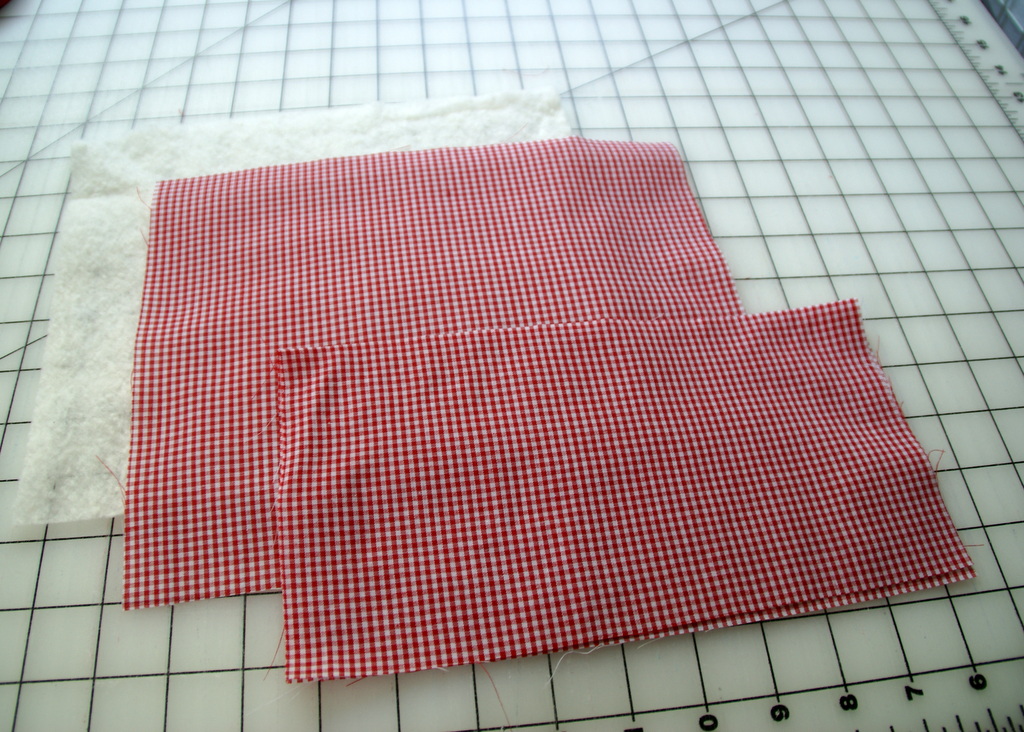
Prewash and dry the fabric. I threw mine in the washer on warm with a smidgen of detergent and dried it in the dryer.  This will help to pre-shrink the fabric before you sew it together and I think it washes better after use.

Next, iron any wrinkles out of the fabric so that it will lay flat to cut out your pieces.

Cut the fabric:

There is a selvage on each side of the fabric which needs to be cut off.  Evenly trim the selvages off the sides.  I usually take ½ to 1 inch off to get all of the selvage.


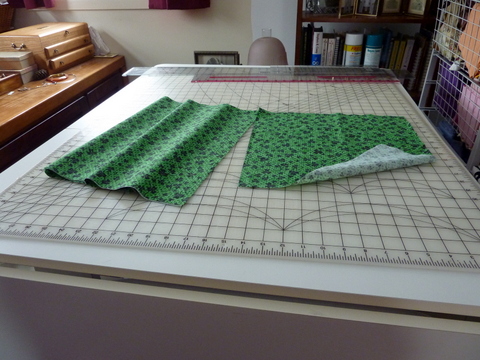
Cut the table runner 16 inches wide and the length of the fabric(approximately 54 inches).

For the napkins, cut 4 squares 13 x 13 inches.

Sew the table runner:

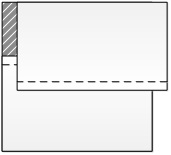
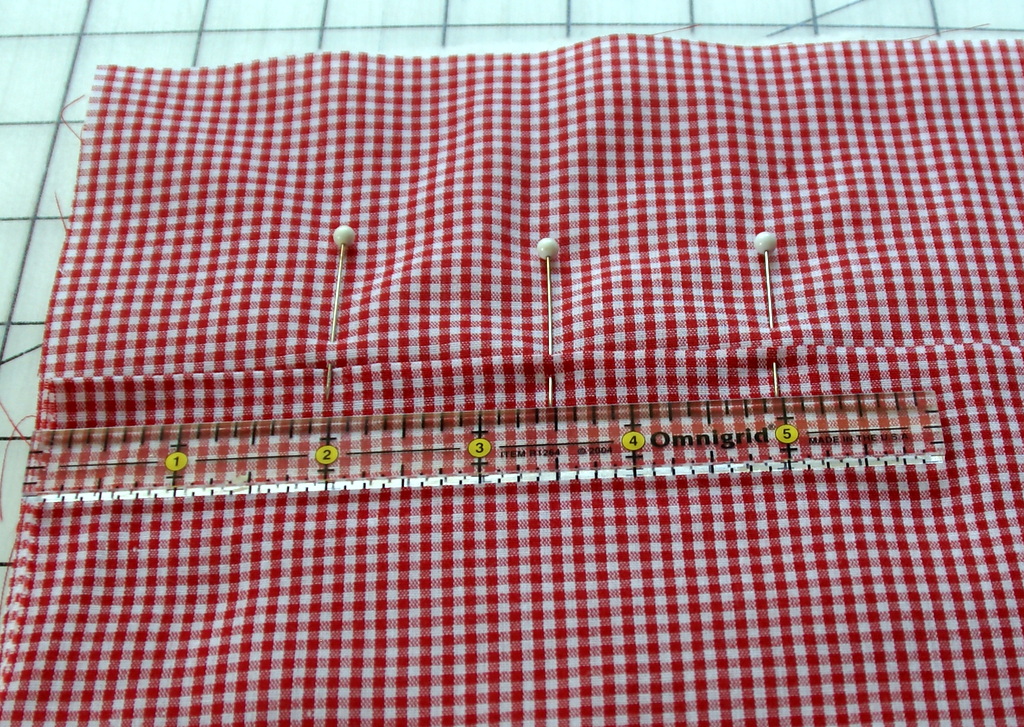
Starting with the ends of the runner, sew a ½ inch double hem.  Here is how:

Fold the material over, wrong sides together ½ inch.

Then fold it over ½ inch again to fold the raw edge into the inside of the fabric.  Pin the hem in place.

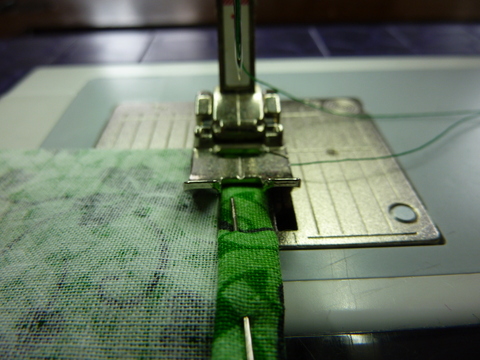
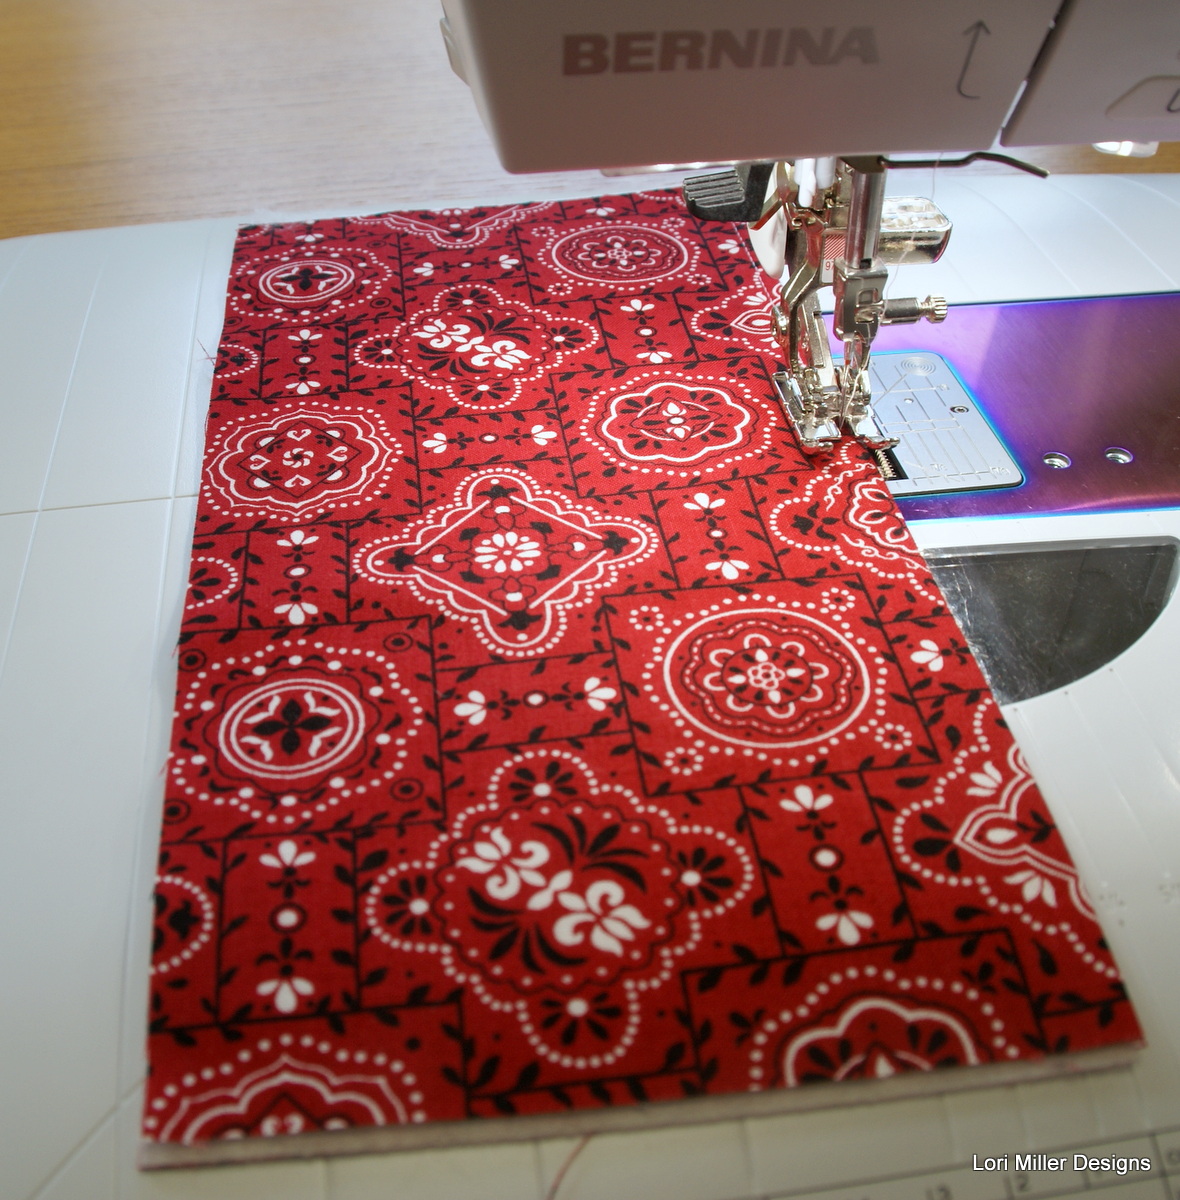
Place your presser foot about 1/8 inch from the edge of the fabric and carefully stitch down the hem.

Topstitch the hem with your sewing machine.  Sew as straight as you can.  I used a stitch length of 2.5mm.  I use my hands like this to guide the fabric to keep the edge of the hem next to the presser foot.  Pull the pins out as you go so you don’t have to stitch over them.  Trim your threads.

Iron the END hems flat

Now, sew a ½ inch double hem on the long sides of the table runner.

Follow the same steps as you did for the ends of the table runner, only this time you will be pinning the long sides to sew.

On these ends, backstitch 2-3 stitches when you start and end the sides to secure the thread.

Finishing the table runner

Top stitch again around the entire table runner stitching 1/8 inch away from your initial stitch line towards the outside of the table runner.

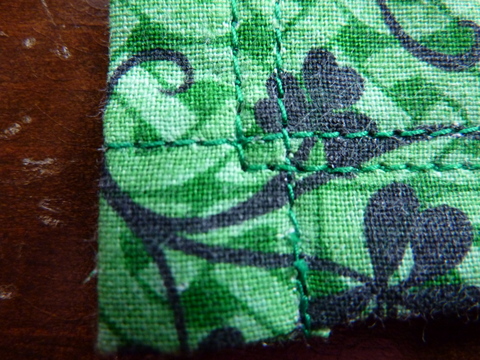
When you get to the corner, take two stitches past the intersecting stitch line and turn.  If your stitch length is 2.5 mm, it should be about the right position away from you original line again.  Stitch all the way around. Trim your threads.

Sew the napkins

Now that you have mastered the double hem, you get to try a smaller double hem on the napkins.

On opposite sides of a napkin, sew a ¼ inch double hem.  Here is how:

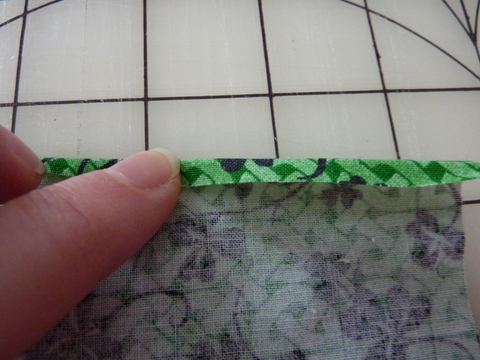
Fold the material over, wrong sides together 1/4 inch.

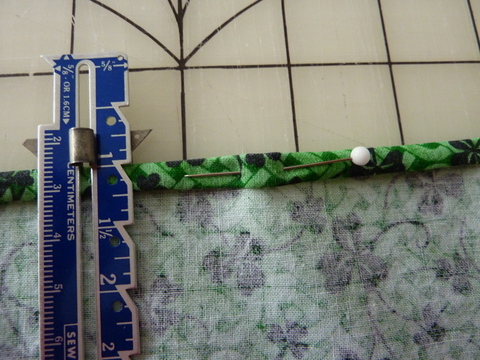
Then fold it over 1/4 inch again to fold the raw edge into the inside of the fabric. Pin the hem in place.

Place your presser foot so that you are stitching right down the middle of your folded hem.

Carefully stitch the hem with your sewing machine.  Sew as straight as you can.  I used a stitch length of 2.5mm.  Pull the pins out as you go so you don’t have to stitch over them.  Iron the end hems flat

Now, finish by sewing a 1/4 inch double hem on the remaining sides of the napkins. Follow the same steps as you did for the first two sides.

On these ends, backstitch 2-3 stitches when you start and end the sides to secure the thread.  Trim your threads.

Fold the napkin in half and then in half again and iron.  Finish the hems on the remaining napkins.

That is it, you have created a beautiful table runner and napkins all by yourself!

You will have some fabric left over, you may be able to make additional napkins or save it in your stash for another project.

Variations:  Use any holiday print or just a fun fabric design to create your table runners and napkins.  Mix and match coordinating fabric for the table runner and napkins.  Play with some decorative stitches on your sewing machine instead of just sewing a straight line for your hems.  Have some fun and see what you can create.

Happy sewing!

Free Tutorial – DIY Wrapping Paper or Fabric

Most of you know, I am an EQ8 fanatic and this time I used the quilt design software to create my own wrapping paper and my own fabric with the EQ Printable fabric sheets.   EQ allows you to export blocks and motifs as an image that you can then edit and print using the Photo Layout on the Image Worktable.  Don’t worry if you dont have EQ8, I will include PDF files of my homemade wrapping paper that you can use too.  In addition to the wrapping paper, I used the printed fabric to create a little drawstring bag.

I edited a block with a Vintage Sewing Machine, added some holly, and scaled it onto a sheet of paper and printed it out.

It is an 8 1/2″ x 11′ sheet of paper, but you can wrap some cute small gifts with it.

I also colored a block called Evergreen that was a mod looking pine tree and printed it out.

For this gift, I wrapped the main gift in white tissue paper.  Then I trimmed my diy wrapping paper and cut it in half.

Then I just matched up the print and taped them together in a long strip.

I used the strip and wrapped it around the package like an embellishement sleeve and then just added a coordinating bow on top.  This is a good way to use your cute designs when you are limited to your printer paper size.

Here are the PDF Files that you can use to print that I designed with EQ8.

LMD Holiday Vintage Sewing Machine

LMD Mod Evergreen

Next, I printed my cute holiday vintage sewing machines onto EQ Printable fabric sheets.  I printed two of them and then used them as fabric to create this cute drawstring bag.

DIY Fabric Drawstring Bag

Finished size is approx 6″ x 3″ x 7″

Note: Read through directions first before sewing.  Unless otherwise noted, use 1/4″ seam.

Materials

  • 2 —  8 1/2″ x 11″ printed fabric sheets
  • 2 —  8 1/2″ x 11″ fabric for lining
  • 2 —  2 1/2″ x 8 1/2″ strips of fabric for casing
  • 2 —  26″ pieces of ribbon for drawstring  (1/2″ or less)

Directions

Sew Casing

  1. Make a 1/4″ double rolled hem on each of the short ends of the casings.
  2. Fold wrong sides together and stitch.
  3. Roll the seam to the back so it will be hidden on the back side of the casings and press.
  4. Measure down 1 1/2″ from top of printed fabric and pin the casing down.  Stitch very closely on the top and bottom to secure the casing.  Backstitch at the beginning and end of your seam.  Sew both casings.

Sew Bag


  1. With right sides together, stitch the sides and bottom of the bag.
  2. Cut a 1 1/2″ square from each bottom corner of the bag.
  3. Pinch the bag together to box the corner and stitch across.
  4. Place the lining  pieces right sides together. Stitch the sides and bottom of the lining leaving a 2-3 inch opening in the bottom of the lining for turning.
  5. Box the corners of the lining in the same way as the outer bag.
  6. Leaving the lining the wrong side out, slip it over the bag aligning the top edges and seams.
  7. Stitch around the top.  Pull the whole bag right side out through the opening in the lining.  Stitch the hole in the lining closed.
  8. Tuck the lining into the bag.  Top stitch around the top of the bag.
  9. Thread the ribbon through both casings.  Start one from one side and the other from the opposite side.  Knot the end of the ribbons to hold them.
  10. Pull the drawstring to close the bag.

I used EQ Printables Inkjet Fabric Sheets.  There are several types of fabric sheets to choose from.  I really like them and I use them a lot for quilt labels.  The fabric holds the color very well and is pretty soft to the touch when you wash it.  You can get more information about them HERE.

Share pictures of your own DIY Wall Paper or Fabric!  Tag me on Facebook or Instagram @lorimillerdesigns

Looking for the EQ8 Design Instructions?  You can find them HERE!

For more projects and tips and techniques on using EQ8, visit my Electric Quilt blog series EQ8 Lessons with Lori.

For more information on EQ8, go to Electric Quilt 8 Software.

Free Tutorial – Pop Art Wall Quilt

Greetings!  I am making this quilt for my son for the holiday, it is a picture of his cat, Oreo.  Being a 20 something young man, I wanted something a little more grown up but still fun.  This quilt is made by taking a picture of Oreo and editing it using EQ8 Quilt Design Software.  The edited pictures are then printed on EQ Printable Inkjet Fabric Sheets.  You can use the general tutorial with any picture of the same size but what makes it so much fun, is the ability to edit the picture to black and white and then add different background colors.  It makes this quilt reminiscent of the visual art created by Andy Warhol.  If you have not tried using the photo editing functions of the Image Worktable in EQ8, here is your chance.  Let’s make a Pop Art Wall Quilt.

Pop Art Wall Quilt

Finished size is 24″ x 30″

Materials

  • 9 —  8 1/2″ x 10 1/2″ printed fabric pictures
  • 1/4 yd black fabric for binding
  • 1 yd backing
  • 1 yd batting

Directions

Cut Fabric:

Black

  • 4 — 2 1/4″ strips

Print your edited  8″ x 10″ pictures onto Printable Fabric.  (Link for quilt design and photo editing at the end of post)  Be sure to follow manufacturer’s directions when printing.  I used EQ Printables Inkjet Fabric Sheets.  There are several types of fabric sheets to choose from.  I really like them and I use them a lot for quilt labels.  The fabric holds the color very well and is pretty soft to the touch when you wash it.  You can get more information about them HERE.

These are the sheets that I printed.  Then I trimmed them to 8 1/2″ x 10 1/2″ with a seam allowance.

I pieced them into a nine patch.  Arrange the colors how you like.

Quilt the Wall Quilt


Layer quilt top with the backing, batting and kitties quilt top.

Pin baste the quilt layers together.

Quilt as desired.  I used painters tape to mark horizontal lines and then I quilted about 1/2″ apart with my walking foot with a dark gray thread.

Then I pieced the black binding strips together and bound the quilt.  I need to make a hanging sleeve, but it is finished.

Here is a sneak peek at my work area.  As you can see, my new studio is still in progress but I just had to sew, it has been months of moving and unpacking.

Here is my original design from EQ8.  The colors are not quite as vivid when you print them on the fabric, but they are still eyecatching!

And here is the original picture of Oreo.  He had an issue with his ear, so he always has that rakish, debonair look.

Share pictures of your Pop Art Quilt!  Tag me on Facebook or Instagram @lorimillerdesigns

Looking for the EQ8 Design Instructions?  You can find them HERE!

For more projects and tips and techniques on using EQ8, visit my Electric Quilt blog series EQ8 Lessons with Lori.

For more information on EQ8, go to Electric Quilt 8 Software.

Published – Connect the Curves (Cirque)

Used with permission from American Patchwork & Quilting® magazine. ©2018 Meredith Corporation. All rights reserved.

My Connect the Curves (Cirque) quilt has been published in the  December 2018 issue of American Patchwork & Quilting

There are a lot of amazing quilts in this issue and I am so proud to be a part of it.

As usual, I designed this bold quilt with Electric Quilt design software.  I started with a regular drunkards path block, super sized it and then made a few adjustments to create the swirling effect.

I used templates that I created with #EQ8 to cut out all of the curved pieces in my quilt.  I generously received beautiful fabric from American Made Brand fabrics.


Stitching the curves on these 10″ blocks is easier than you think because of the size.

I use a 3 pin method and stitch from the outside to the center.  Then I flip and stitch from the other end to the center adjusting the curve if needed.

The individual blocks  come together to create a 20″ wide swirling center.

Does this happen to you? I can piece all day in quiet, but as soon as I start quilting, I get a furry helper.  Cookie, you make it a little difficult to use the walking foot!

I tried some echo quilting around the curves of the center quilting about 1 ” apart to accentuate the motion.

Then I did some free motion feathers and free motion fill to finish up the negative space on the sides.   You know I love the texture!

I hope you enjoyed getting a little behind the scenes view of my process on this lovely quilt.

Happy Stitching!