Heirloom Thanksgiving Bread Cloth (free tutorial)

It is not Thanksgiving at my house without some fresh homemade rolls.   If my son does not eat them all, they are pretty tasty for little turkey-cranberry sandwiches. I have a very pretty bread cloth that my mother in law gave me many years ago.  It makes me think of her when I use it and we lost her last year.  Everyone needs a little bread cloth to make Thanksgiving special and perhaps it will become an family tradition.  Here is how to make an heirloom Thanksgiving bread cloth for your hot, buttered rolls (homemade or not!). Use the fancy stitches on your sewing machine to sew the heirloom inspired hem. Then embroider one of my designs in fall colors for to match your Thanksgiving decor.  This would be a great gift too!

Materials needed:

  • 18″ x 18″ square of heavy cotton fabric (1/2 yd of linen or a heavy white kona works well)
  • Size 100/16 Wing needle (for those fancy heirloom stitches on your sewing machine)
  • White thread
  • Embroidery floss in Fall Colors
  • Free breadcloth pattern below

Directions:

  1. First make the bread cloth.
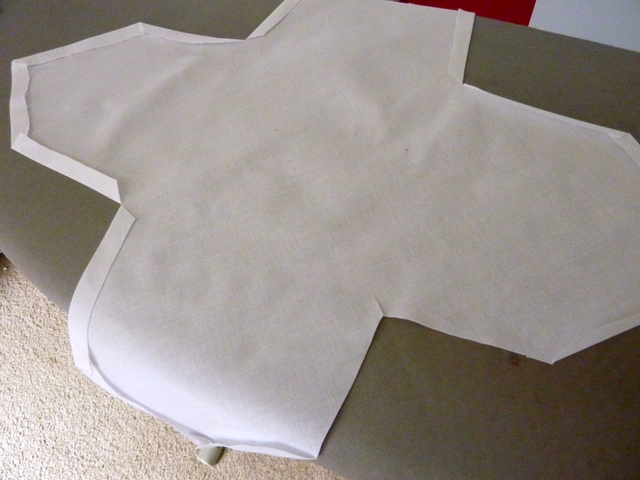
  2. Cut out the Thanksgiving bread cloth using my FREE Pattern. It also has my free embroidery designs too!
  3. Iron and starch the cloth really well.  You may want to put down something on your ironing board for the overspray as it gets pretty crunchy with a lot of layers.bread cloth
  4.  Fold over 1/2″ all the way around the cloth and iron.bread cloth
  5. You will need to snip the inner corners to get the fabric to fold.bread cloth
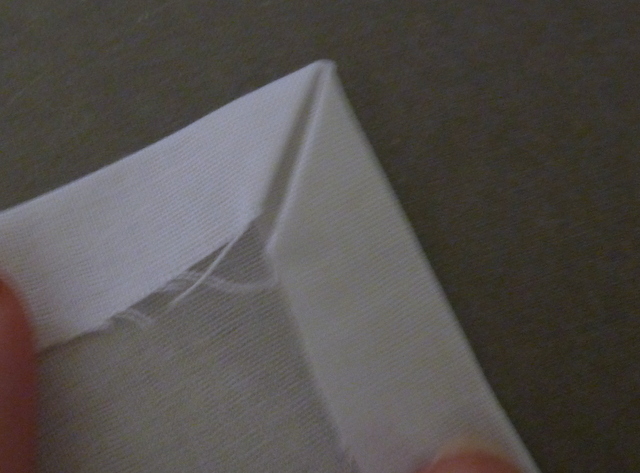
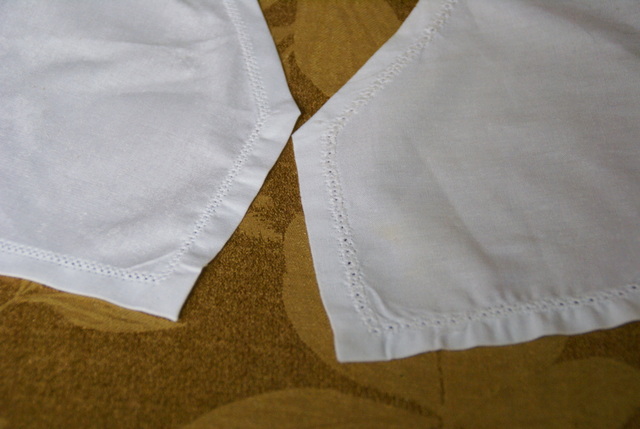
  6. For the pointy corners, fold in the corner.bread cloth
  7. Then fold each side to form a miter.bread cloth lori miller designs
  8. After you have ironed,I like to hand sew the inner corners so that there are no raw edges. The rest of the sides get caught by the fancy heirloom stitching. Just fold each edge under and take some tiny whip stitches to hold them down. At the point in the corner, I just make about 3 or 4 satin stitches and it looks just fine.

Stitch the fancy hem

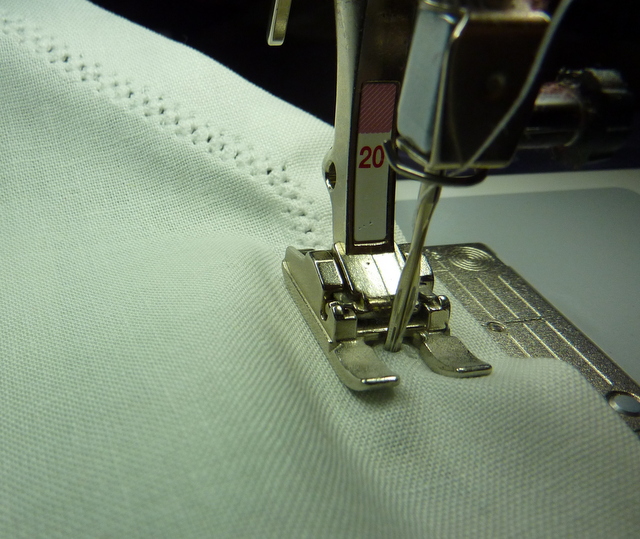
  1. Put your wing needle in your sewing machine.  I just used regular white all purpose thread.P1090318
  2. Choose an heirloom fancy stitch. Here are couple to try.  The ones I used were 701 and 711 on my Bernina 630. Just find a stitch on your machine that looks like one of these.P1090322
  3. Stitch about 1/2″ away from the edge so that the fancy stitch catches the raw edge of the hem underneath. Hint: If the fabric is puckering, add a little stitch and tear stabilizer underneath it.
  4. Stitch all the way around. This will take some time so be patient, but you will be so happy because it looks awesome. Now your bread cloth is ready for embroidery.
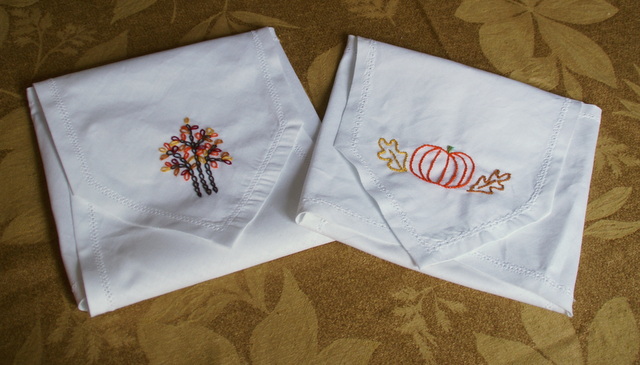
  5. I have included two FREE embroidery designs to try on the pattern, a little pumpkin and a fall tree.


  6. Here is the pumpkin.P1090326
  7. Using three strands of embroidery floss, embroider the pumkin and leaves with a stem stitch.stem-stitch-clean-and-sized-600x276
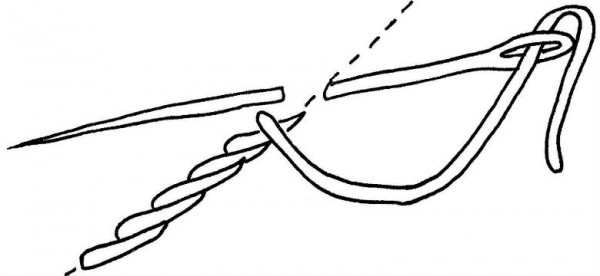
  8. Here is a diagram of a stem stitch.


  9. For the little tree, I made the trunk with a chain stitch (just a bunch of lazy daisies strung together) and the leaves are just lazy daisy stitch.lazy-daisy-stitch-clean-and-sized-600x276
  10. Now your bread cloth is all ready to place in your basket and fill with rolls or bread for Thanksgiving.  These would also be great with a holly design for christmas gifts.  Happy Stitching and Happy Thanksgiving to you and your family!

Modern Swallow Trail Tiny Quilt goes to Road to California 2016

My mini quilt, Modern Swallow Trail, has been selected to be part of a special exhibit of 40 mini quilts at the Road to California  Quilt Conference in January 2016.  With lots of bright colors and straight line quilting, this cute little quilt was so much fun to make.  I did make the mistake of trying to piece this quilt.  I should have paper-pieced it for some sharper edges, but I had a really good reason why I didn’t. Really.  Read on to find out how I tackled this project.

american-made-brand-cotton-solids

American Made Brand Cotton Solid Fabric is sourced and and manufactured entirely in the United States.  American Made Brand  issued a challenge.

AMB Tiny quilt challenge

It was called the tiny quilt challenge and you needed to make an original mini quilt from their American Made Cotton Solids in any style you wished.  I saw the notice but I did not pay much attention.  Then they sent a reminder.  I thought about it, but I did not have any material, or so I thought.  Then another reminder came and now it was the end of August.   I had an idea in my head but I did not have time to make this thing.  Well creativity is a weird thing, I could not stop thinking about it.  Then I ran across something, a rainbow mini charm pack of AMB solids from Quiltcon 2015.  That sealed it and I was off and designing.

I needed background fabric.  I called every quilt shop within a 40 mile radius of metro Detroit.  A small quilt shop 30 miles away said they had some fabric so off I went.  They had 3 bolts and one happened to be a kind of khaki grey color  called Taupe which I thought was a perfect neutral for the bright mini charms.  I saw a large round swallow tail pattern but this had to be mini.  I drafted my swirling trail pattern on some graph paper and cut out templates.  I only had a couple mini charms of each fabric and I needed to cut out two diamonds from each plus a binding.  There was simply no extra fabric for paper piecing, so I cut and pieced the bright colors.

I took the colors in the mini charm pack and picked the ones I liked and then tried to arrange them in a rainbow pattern.  I varied the flow a little from the top to bottom and the colors really blended well together.  I had just enough fabric to add my signature colored border snippets.  I just straight line quilted it how my heart desired.  I love the texture of the matchstick quilting.

Although my quilt was not one of the main winners in the challenge, I was thrilled that AMB asked if I would provide my mini quilt for the Road to California exhibit in January 2016.  Road to California is the premiere Quilters’ Conference & Showcase west of the Rocky Mountains!


Published – A+ Journal Covers

Issue 8 of Make Modern Magazine is out and I am pleased to share my A+ Journal Covers in this modern quilty issue.  These Journal covers fit over a US standard Composition book.  They feature plus sign shapes creating a scrappy look with the plus signs either in brights or neutrals.  I tried quilting them two ways, but I think I love the natural, squiggly lines on the aqua journal the best.

Make Modern Volume 8

Make Modern is an online magazine created by Jane, Lara and Kristy and is filled with delightful modern quilt and sewing patterns.  Make Modern is a digital magazine put together by quilters for quilters who are passionate about modern quilting and sewing.  And I will add, it is very reasonably priced for the huge amount of content.

This cover is pieced with lots of 1 1/2 inch squares.  I thought it would use up some of my pile of scraps.  I like the low volume plus signs, they really make the aqua scraps stand out.

The inside features a little pocket to tuck in a pen or pencil.  It all closes with some elastic and some funky buttons.

Here is a look at the purple and grey cover with the background as low volume grey prints.

I envisioned these to take to my meetings where I needed to take notes.  They also make great gifts with that personal quilty touch.  Wouldn’t these be perfect for a favorite teacher or as a holiday gift for a friend who likes to journal?


Grandma Town BOM #10 – Chicken and Egg

chicken and egg


Are you sewing along?  Grandma Town Block of the Month continues with this cute little chicken and egg.  On the farm, Grandma raised chickens for the eggs and for Sunday dinner.  There was a large hen house behind the house.  I never helped gather eggs, maybe grandma thought I would break them.  We did get to throw the food scraps and potato peelings over the fence for them and sometimes some cracked corn.  There were all kinds of chickens including little banny hens that ran around everywhere.  The Chicken blocks finish at 8” x 7”.  The Egg blocks finish at 3” x 7”.  You will need 6 chicken block and 5 egg blocks for the row of the quilt.

Grandma Town Chicken&Egg

Grandma’s favorite chicken was a big red hen she named Molly.  Molly laid large colored eggs, they were sort of grayish green color.  Grandma also made delicious fried chicken, but the best was a scalloped chicken that she made which was kind of like chicken and stuffing.  It was crispy on the top and tasty all the way through.


I know my grandparents raised their own chickens, but luckily I did not ever have to experience how they got to the table.  This chicken pattern reminds me of Molly and her jumbo eggs.

Are you sewing along?  If you are, post it on Instagram and tag me @lorimillerdesigns and #GrandmaTownBOM so I can see what lovely things you are stitching up. A comprehensive pattern and directions for the Chicken and Egg block along with the whole BOM is currently in development.

Enjoy!
grandma Town Quilt A

Grandma Town Block of the Month

If you are new to the Grandma Town BOM, this row by row quilt was a labor of love to celebrate my Iowa roots.  I spent my childhood visiting my Grandparents on their farm just west of Des Moines in Earlham, Iowa.  It is especially a tribute to my dear Grandma.

When my sisters, brother and I were little and my parents would drive us to my grandparents farm, my brother would yell, “We are going to Grandma Town!”.  It was a loving tribute that stuck.  This little quilt is full of those reminders of the farm and of Grandma, who loved to garden and loved to cook.  Each block is a sweet memory of my youth growing up on that country farm.

I hope you will find some shared love for your family, a cherished farm  or your own grandma in my quilt.  You can make all of these sweet blocks or pick and choose the blocks you like the most to make something special for yourself or a dear loved one

Released Blocks – 2015

FEB  Block 1 – Forget Me Not Flower

MAR  Block 2 – Sewing Machine

APR Block 3 – Nine Patch and Color Block Rows

MAY Block 4 – Ear of Corn

JUN Block 5 – Sweet Hearts

JUL  Block 6 – Canning Jar

AUG Block 7 – Barnyard Double Block

SEP Block 8 – Pie Quilt Block

OCT Block 9 – Home Sweet Home Double Block