Mod Apple Hotpad (free tutorial)

mod apple hotpad lori miller designs

I am happy to share my Mod Apple Hotpad post that I presented as a guest blogger for the American Quilting Society’s (AQS) OnPoint Newsletter.  I have been an AQS Member for many years. They sponsor wonderful quiltshows and classes.  If you have not checked them out, start with their free newsletter which features free patterns, tips and other quilty information.  You can sign up HERE. And check out their Blog too!  Now, on to my post!

I spent a week at my cottage in northern Michigan and I was able to visit the local farmers market.  I was thrilled to find my favorite early apple, Ginger Gold. They are a cross between an early apple and a yellow delicious: tender skin and tangy flavor. They were the only thing I could eat when I was pregnant many years ago with my son and I still love them. They are the inspiration for this fancy little apple hot pad. This one is a Pink Lady apple, but you could easily make a tasty Red Jonathan, yummy Yellow Delicious or Green Granny Smith. Make your favorite apple to celebrate the arrival of fall.

Materials:

  • 1 – 3 ¼” x 40” strip for apple center
  • 1 – 1 ½” x 40” strip for outer apple skin
  • 1 – 1 ¼” x 40” strip for inner apple skin
  • 1 – 3” x 6” rectangle for leaf
  • 1 – 12” x 12” square for back of apple hotpad
  • 1 – 12” x 12” square of Insul-Bright insulated batting (Note: This batting by The Warm Company reflects energy, hot or cold, back to itself. You can find it with the utility fabrics.)
  • 60 degree ruler or my triangle template

Directions:

Cut:

  1. Print out my FREE Mod Apple Hotpad Templates.
  2. Using the hexagon template, cut out the back of the hotpad.
  3. Using the same hexagon template, but out the insul-bright batting.
    apple hotpad 2

Sew:

  1. Stitch the strips together, one at a time, ironing seams open. Make sure the narrow strip for the inner apple skin is in the center.
    apple hotpad 3
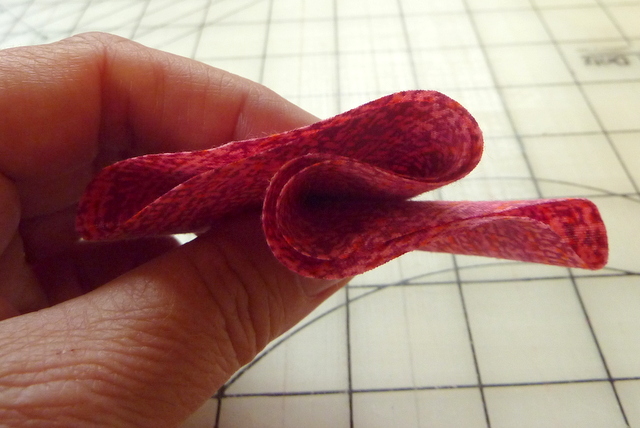
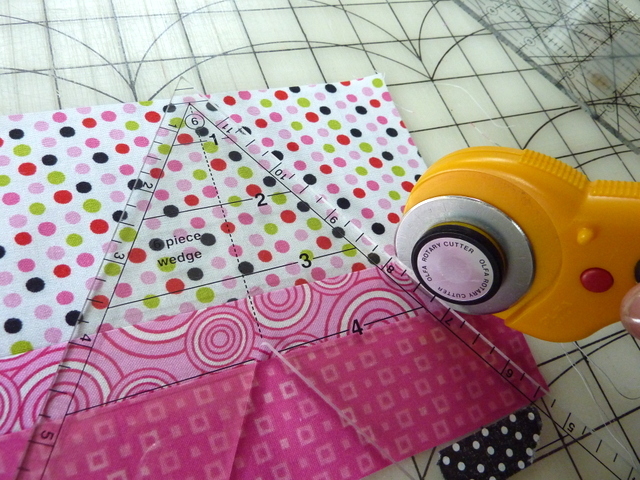
  2. Using a 60 degree ruler, cut six equilateral triangles. If you have a 60 degree ruler, this goes pretty fast. I had an old Starmaker ® 6 ruler from a Kaye Wood class that I had attended. Several companies make them, but if you don’t have one, just use my template, a regular rotary cutter and straight rotary cutting ruler.
    apple hotpad 4
  3. Position the ruler to start cutting with the outside apple skin on the bottom.
    apple hotpad 5
  4. Cut out a triangle.
    apple hotpad 6
  5. Flip the ruler and cut another triangle from the top, Lay these aside and save them for another project or make them into another hotpad.
    apple hotpad 7
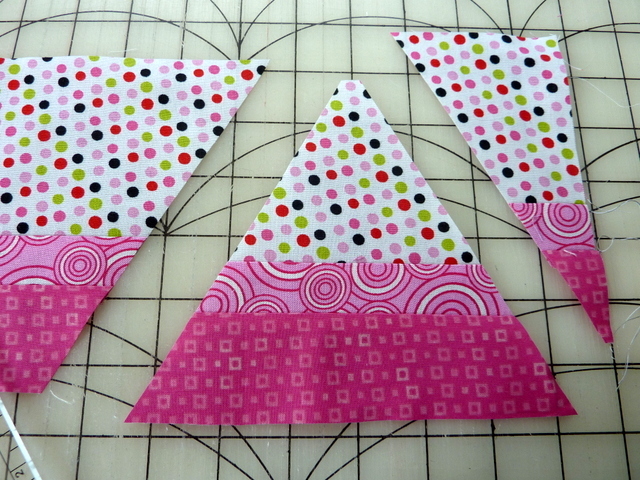
  6. Cut six triangles total. There should be enough fabric to cut six apple triangles and six other triangles.  Stitch your triangles together. Be sure to line up the seams on each side so they match.
    apple hotpad 8
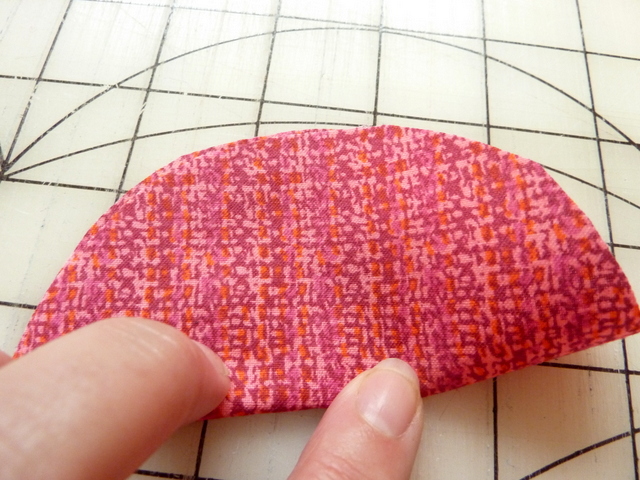
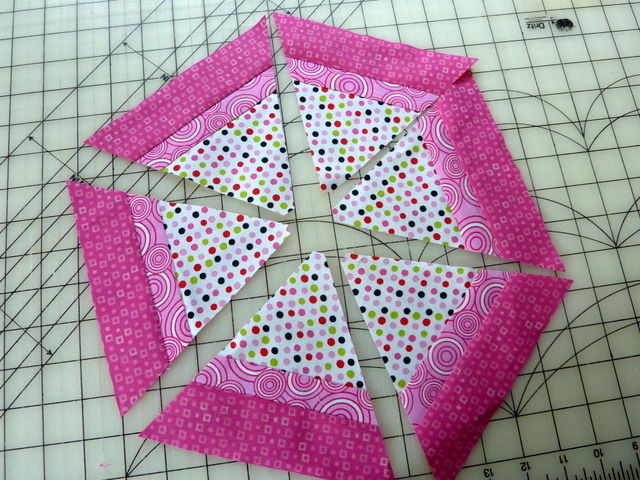
  7. Piece them in groups of three and press seams open.
    apple hotpad 9
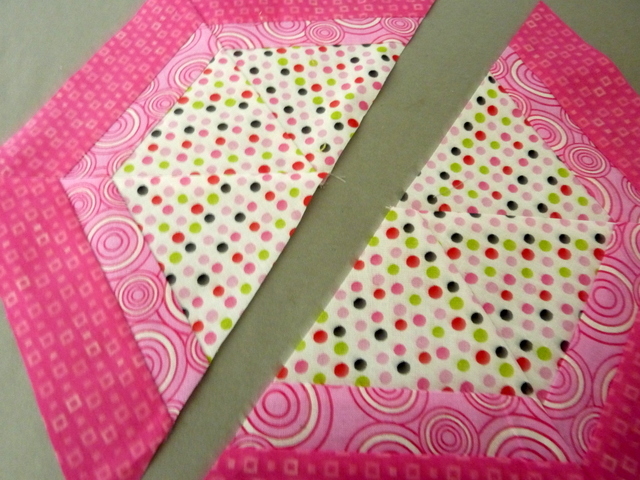
  8. Stitch the two halves of the apple together, aligning the seams and iron flat
    apple hotpad 10
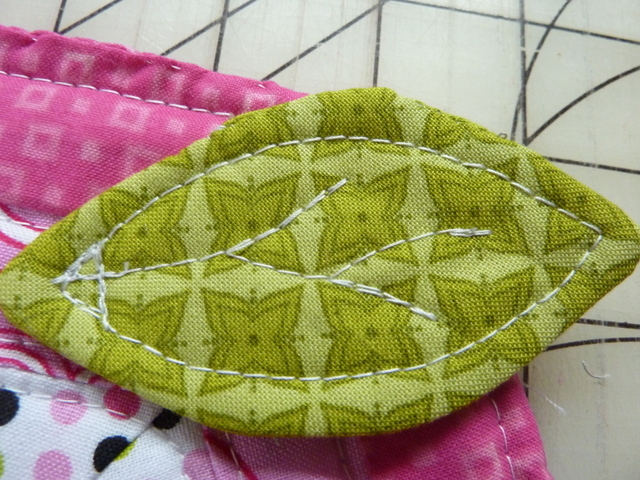
  9. Fold the leaf fabric right sides together and mark the leaf.
    apple hotpad 11
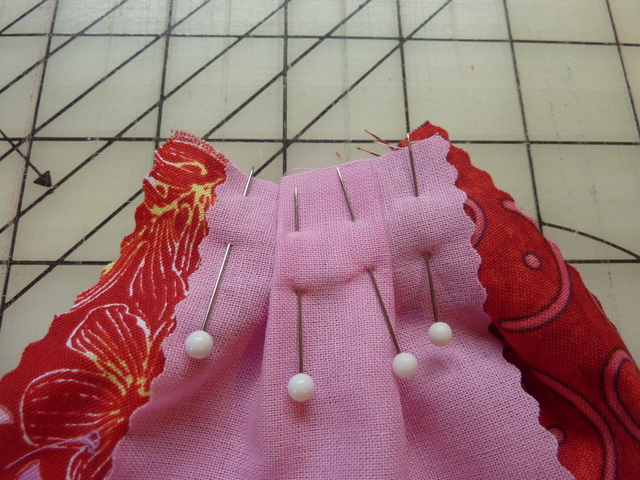
  10. Layer a small piece of batting underneath and stitch around the leaf leaving a place to turn. Snip curves and turn right side out. Whip stitch the opening closed.
    apple hotpad 12
  11. Quilt the leaf.
    apple hotpad 13
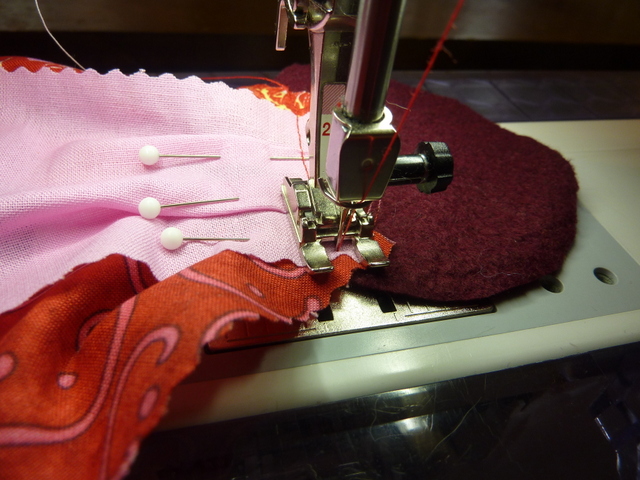
  12. Make a quilt sandwich. Lay the backing right side up, the pieced apple right side down and the Insul-bright batting on the top. Pin and stitch all around, leaving an opening to turn.  Turn the apple right side out and whipstitch the opening closed.
    apple hotpad 14
  13. Quilt the apple. I just used straight line quilting with my walking foot.
    apple hotpad 15
  14. Here is a close up of my quilting from the back.  I made the center of the apple with a couple of seeds.
    apple hotpad 16
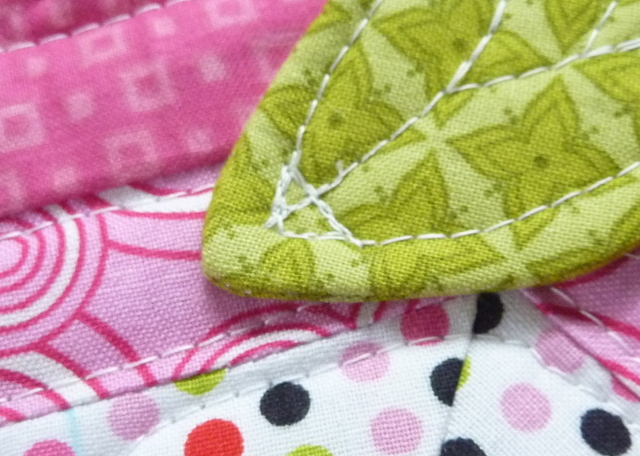
  15. Tack on the leaf.  I just stitched a small triangle at the base.

That is it, a bright, cheery apple to decorate your table and a practical hot pad to boot. What is your favorite apple?

New Pattern: Cedar Lake Tote Bag


Introducing my latest pattern, the Cedar Lake Tote Bag.  Designed in two sizes, this cute and versatile tote bag will carry all of your goodies in style.  It is the perfect design to highlight a favorite fabric for the main body of the bag, you can simply add coordinating fabrics to the paper pieced economy block topper to create a sophisticated look.  This lined tote has one or two inside pockets and sturdy handles attached with D rings for the perfect accent.  Cedar Lake has a special meaning because that is where we go to spend our summers in Michigan – up north!


Yes, the economy block is paper pieced, but with my directions and cutting hints, you can easily master this block.  I give you generous pattern pieces to make the piecing so much easier.  You can use scraps or have a coordinated look, but the result is simply stunning.

The design adds a little whimsy with one of the paper pieced blocks by reversing the dominant light and dark prints.

The inside of the large tote features two pockets that you can subdivide to hold pens, pencils or even a cell phone.

The small version of the bag is just as versatile in a more petite shape with only 3 paper-pieced blocks on each side.  I had this great black cat graphic print and loads of black and white scraps for the economy block topper.  I even fussy cat a little kitty for the center block on one side.  Go bold with a lot of color or keep it in a two color simple look like this one.

The small Cedar Lake Tote features just one inside pocket.  It is sized to hold regular size 8 1/2″ x 11″ sheets of paper or a notebook easily.  Just toss in a few things and go.


You can purchase my quilted Cedar Lake Tote Bag pattern as a PDF download by going to MY PATTERNS tab and following the link to My Etsy Shop.

Thanks for letting me share!  Tag me on Instagram at lorimillerdesigns, I would love to see your version!

DIY Seed Packets – free tutorial

seed packets

Even though I am a quilter, I am also a lifelong gardener.  Both fill me with joy and help me to relax.  Now that it is September, the garden is winding down.   I find myself looking for seeds to save for next year, especially flower seeds.  I am gathering zinnia, marigold, four o’clocks and morning glory seeds right now.

seeds

It is time to organize all of the seed packets I have strewn all over the sunroom and find a way to save the seeds.  Here is how I store my seeds and a free tutorial on how make your own seed packets for seeds you might be saving.

Storing your seeds

seed container

I use an airtight container like a glass jar or plastic container with a lid to store my seeds.

P1080701

To keep out moisture, I add a few of those little packets of silica jel saved from pill containers to keep them dry.  Then I put my seeds inside a paper or cloth grocery bag to eliminate any light and I leave them in my sunroom over the winter.  It is not heated, so the seeds get freezing cold.  This simulates being in the cold ground, so when spring comes, the seeds know it is time to be planted.

Can you keep seeds for more than one year?

I say YES, you don’t have to have new seeds each year if you have some left over.  They are too expensive to just throw away!  Many seeds keep for at least two years and often many more years if you store them in a dry, cool place.  I tend to use my seeds for several years as long as they will still germinate.  Some seeds are notorious for not keeping over the season for me, like lettuce and spinach, but almost everything else works.

P1080700

Organizing your seeds

I like to organize mine by alphabetical order, but I am thinking I should switch it up and do it by the timing of when to plant them instead.  I also like to separate vegetables, flowers and herbs into their own groups.

Saving Seeds

I like to save a few seeds for the next year, some things go to seed and it is easy to gather them.  Some of my favorites that are easy to save are zinnia, morning glory, forget me not, and marigold seeds.  I will also save seeds from melons, cucumbers and anything that gets too big before I pick it!  Just remember that if you planted a hybrid seed, the seeds will not grow true.  I like to pick heirloom seeds that you can easily save and get the same plant.  I have some funky heirloom cherry tomato seeds right now that I can hardly wait to plant next year.

P1080699

Make your own seed envelopes

I let the seeds dry and then I make these cute envelopes and labels to store and keep them.  I have found the heavy weight scrapbook paper is perfect for this, but you could recycle junk mail or catalogs too.  Here is the FREE DIY Seed Envelope Pattern in two sizes and a FREE DIY Seed Labels Template  (The labels are in an MS Word file template using Return address labels sized 1″ x 2 5/8″).

Materials:

  • 12″ x 12″ Scrapbook Papers
  • Heavy Cardstock for template
  • Glue Stick
  • Pencil
  • Scissors
  • Return address labels sized 1″ x 2 5/8″ for printer

Directions:

  1. Print out the template and cut it out of heavy cardstock or cardboard to use to trace around.P1080669
  2. Position it on your scrap book paper and use a pencil on the wrong side to trace around it.P1080671
  3. You can fit 2 large and 2 small envelopes on a standard 12 x 12 scrapbook paper.P1080675
    P1080678
  4. Cut out your envelopes.P1080679
  5. First fold the large side flap.P1080680
  6. Use a glue stick to glue the outside edge of the flap.P1080682
  7. Fold the small flap over and crease in place.P1080687
  8. Glue the bottom flap and fold it up into place.P1080690
  9. Let the envelope and glue dry for a bit.P1080693
  10. They are so easy, make a bunch of envelopes.P1080697
  11. Print out your labels and attach one to each  envelope.P1080699-001
  12. Mark the label with the type of seed and date and then fill them up with your saved seeds.  Fold the top flap down and secure with a sticky dot or  a little glue and organize them in your container.

Gift idea!  Make these for Mother’s day or for a garden party for favors.  These would make nice gifts to slip inside a birthday card too.

What seeds do you like to save?

New Pattern – Poinsettia Pop Throw Quilt


I am excited about my new holiday pattern now available in my shop.  It is called Poinsettia Pop and it is a generous lap size to snuggle under when the weather turns cold.  The bright and cheery poinsettia blocks dance across the quilt bringing cheer to whoever receives it.

This quilt is made using large 15 inch finished blocks that stitch up quickly.  You only need to piece seven Poinsettia blocks so you can whip it up in time for last minute gifts.  I even included some speedy techniques to save you some time.  The bright hot pink fabrics, text print background, and alternate grid pattern give this block a very modern look.

The Poinsettia is actually a variation of the traditional Providence block.  I am not sure if it is named after the city in Rhode Island or has a deeper meaning of the manifestation of divine care, but it is a lovely thought for a holiday gift.poinsettia pop

The layout creates some additional designs and star patterns.  You could use my design as a base and let your imagination run wild.

You can find my Poinsettia Pop Throw Quilt pattern for sale by following the link for My Patterns.

Thanks for checking it out!  Tag me on Instagram, I would love to see your version!


Grandma Town BOM #8 – Pie Quilt Block

Pie is a glorious thing.  I choose it over cake or even chocolate.  My Grandma was a master pie maker and she taught me the secret art of a light and flaky crust.  This month’s Grandma Town Block of the Month is a PIE, of course.  My favorite pie is Gooseberry.  It is the green, tart cousin of the red currant.  It is simply heaven.
Grandma Town Pie Grandma always made two pies at a time and I have the recipe memorized.  She taught me how to spin that rolling pin on a giant wooden board that pulled out of an old spice cabinet hutch.  Her pies were the highlight of any meal, made with real lard and served with vanilla ice cream.  I think of her every time I pick gooseberries and make a tasty, sour lip smacking pie.  You can make any kind of pie you like, I made blueberry and cherry.  Are you sewing along?  If you are, post it on Instagram and tag me @lorimillerdesigns and #GrandmaTownBOM so I can see what lovely things you are stitching up. A comprehensive pattern and directions for the Pie block along with the whole BOM is currently in development.

Enjoy! grandma Town Quilt A

Grandma Town Block of the Month

If you are new to the Grandma Town BOM, this row by row quilt was a labor of love to celebrate my Iowa roots.  I spent my childhood visiting my Grandparents on their farm just west of Des Moines in Earlham, Iowa.  It is especially a tribute to my dear Grandma.

When my sisters, brother and I were little and my parents would drive us to my grandparents farm, my brother would yell, “We are going to Grandma Town!”.  It was a loving tribute that stuck.  This little quilt is full of those reminders of the farm and of Grandma, who loved to garden and loved to cook.  Each block is a sweet memory of my youth growing up on that country farm.

I hope you will find some shared love for your family, a cherished farm  or your own grandma in my quilt.  You can make all of these sweet blocks or pick and choose the blocks you like the most to make something special for yourself or a dear loved one.


Released Blocks – 2015

FEB  Block 1 – Forget Me Not Flower

MAR  Block 2 – Sewing Machine

APR Block 3 – Nine Patch and Color Block Rows

MAY Block 4 – Ear of Corn

JUN Block 5 – Sweet Hearts

JUL  Block 6 – Canning Jar

AUG Block 7 – Barnyard Double Block

State Fair Winning Ribbon (free tutorial)


With all of the delicious fruit available, all I can think of is making pies and jam.  It reminds me of the Iowa State Fair of my youth.  Everyone went to the state fair and my family always had a few entries.  My Dad was a beekeeper and he always entered some honey or an observation hive of bees.  He won many ribbons and this cute and quick ribbon gives me fond memories of those days.  This ribbon would also be good to make for quilt shows, your own contests or to decorate for a party, wedding or shower. How about red, white and blue?  They feature raw edges and just a little bit of sewing so you can make several very quickly.

Materials:

  • Scraps of coordinating cotton fabrics or use one color (1/4 yd is generous)
  • A 5 x 5 piece of wool felt
  • large button
  • coordinating thread

Directions:

Print out my FREE State Fair Winning Ribbon Pattern.

fair ribbon

Cut

  • 1 – Small circle pattern A from the wool felt for the base of the ribbon
  • 2 – Side ribbons from pattern B (Be sure to flip the pattern so you have one going each way.)
  • 1 – Middle ribbon from Pattern C
  • 4 – Large circles with Pattern D
  • 4 – Small circles with Pattern E

Assemble and Sew

P1080251


  1. Take one of the side ribbons B and take a small pleat or tuck to gather the top.P1080252
  2. Using a pin, pin the tuck to one side of the middle ribbon C at a slight angle.P1080253
  3. Take the other side ribbon B and make a tuck and pin to the other side of the middle ribbon C.P1080257
  4. Make two tucks in the center of the middle ribbon.  Start with one side and pin it and then tuck the other side.P1080260
  5. Place your streamer ribbons over the bottom of the felt circle base.  Stitch across all of the ribbon streamers and tucks, backstitching each side to hold it in place.P1080264
  6. Fold the centers of the ribbon.  Take a large circle D.
    P1080265
  7. Fold it in half, wrong sides together.  Next, you will need to make two pleats in the fabric but leave a point making it into a quarter pie shape.  I will talk you through it.
    P1080266
  8. Pleat and tuck one side.
    P1080267
  9. Fold the tuck to the back like the picture above and pin.
    P1080269
  10. Make another pleat and pin it too.  Pleat and fold each circle into a quarter triangle shape. You don’t have to be too accurate but you will need the center point.
    P1080270
  11. Places the circles together on the felt base.
    P1080272
  12. Continue until you have all four pleated circles in place.
    P1080276
  13. Starting about 1/2 inch from the center on one side of a triangle point, stitch across the end point of each folded circle.
    P1080277
  14.  You will stitch in a square, pivoting to stitch over each edge of the folded circles.
    P1080281
  15. Fold the small circles for the center of the ribbon using the small circle E.
    P1080283
  16. Fold the small circle in half, wrong sides together.
    P1080284
  17. Make one pleat to create a triangle that is about 1/4 size of the full circle and pin it.
    P1080287
  18. Begin laying the small pleated circles so that they cover the stitched seam from the large folded circles underneath.
    P1080292
  19. Slightly overlap the points on this layer of folded circles.
    P1080293
  20. Stitch a tiny triangle shape through the center of these points, catching all of them and stitching through the felt backing.
    P1080294
  21. Using a button large enough to hide your stitching, sew it in place in the center of your ribbon.  That completes the ribbon.

P1080332

Make it scrappy style to create a multi-colored state fair style ribbon.

P1080327

Make it modern in pink and grey.  I think the freshly picked zinnias from my garden make it special.

I hope you use your ribbons to celebrate in style!