

I am feeling lucky! I have two new lovely Shamrock Pillows to decorate for St. Patrick’s Day all designed with EQ Mini Quilt Design Software by The Electric Quilt Company. For these pillows I used the pieced Shamrock quilt block, but used two different sizes and some sashing. These pillows finish at 18″ square. I used my favorite technique which is to quilt the top and use an envelope back and then bind all around the pillow. Then I just have a bunch of pillow covers that I can change out with my very neutral grey couch. I love it!
EQ Mini is the new scaled down, simpler version of EQ7 quilt design software. This program was created for quilters who are just getting started using software for quilt design. EQ Mini will help you create, edit, share, and print patterns and yardage for your quilt designs.
Lucky Shamrock Pillows
Finished size is 18″ square
Materials
- 1/2 yd green plaid
- 1/2 yd linen for background
- 1 1/2 yd shamrock print
- 5/8 yd muslin
- 5/8 yd batting
Directions
Cut Fabric:
Green Plaid
- 4 — 7 1/2″ squares (A)
- 16 — 3 1/2″ x squares (E)
- 4 — 2 1/2″ x WOF strips for binding
Linen
- 12 — 2 1/2″ x squares (B)
- 5 — 2 1/2″ x 14 1/2″ strips (C)
- 4 — 2 1/2″ x 18 1/2″ strips (D)
- 48 — 1 1/2″ squares (F)
- 2 — 2 1/2″ x 6 1/2″ strips (G)
Shamrock Print
- 4 — 18 1/2″ x 24″ rectangles
Muslin
- 2 — 19″ squares
Batting
- 2 — 19″ squares

Piece the large Shamrock Pillow

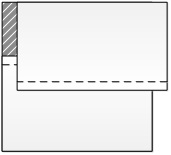
- Place a 2 1/2″ linen square (B) on a corner of a large shamrock leaf (A). Sew a diagonal corner. Mark a diagonal line onto the wrong side of the square with a pencil or water soluble marker. With right sides together (RST), stitch the square onto the leaf on the marked diagonal line. Trim the excess to a 1/4″ seam allowance. Press seam to the darker fabric side.

- Sew a diagonal corner to 3 of the corners on each of the four large shamrock leaves.

- Sew the four leaves together to form the shamrock matching the seams.

- Add the outside border by sewing two 14 1/2″ linen strips (C) to the side of the shamrock. Sew two 18 1/2″ linen strips (d) to the top and bottom of the shamrock. Set aside.


Piece the smaller shamrocks pillow
- Place a 1 1/2″ linen square (F) on a corner of a small shamrock leaf (E). Sew a diagonal corner using the same instructions as for the larger shamrock.
- Sew a diagonal corner on 3 corners of each small shamrock leaf (16 total leaves)
- Sew four leaves together as shown to form a shamrock matching the seams. Repeat for the other 3 small shamrocks.
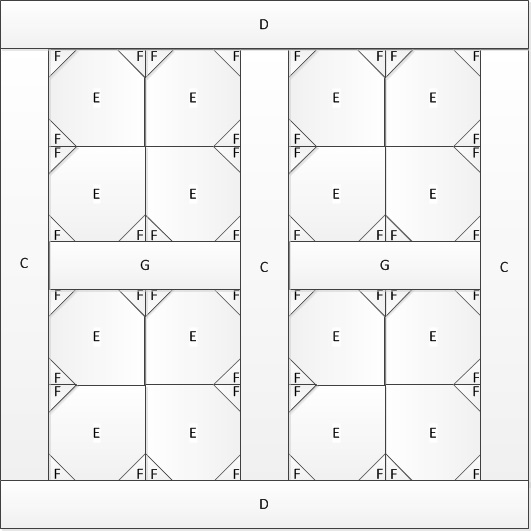
- Sew the sashing. Stitch a 6 1/2″ linen strip (G) between two small shamrocks. Repeat for remaining two small shamrocks.
- Sew a 14 1/2″ linen strip (C) in the center of the pillow to join the two shamrock panels. Sew a 14 1/2″ linen strip (C) to each side of the shamrocks.
- Sew an 18 1/2″ linen strip (D) to the top and bottom of the pillow.

Hint: If you used linen, baste very close to the outside edge of the pillow top to keep the linen from fraying.
Quilt the top side of the pillows
- Layer pillow top with the muslin, batting and pillow top, right side up.
- Pin baste the quilt layers together.
- Quilt as desired. Trim quilted pillow top to 18 1/2″ square.

Note: I found this Celtic Shamrock design for a tattoo on the internet, it had a nice continuous design I could adapt for the quilting. Inspiration comes from all sorts of places!

Here is the beginning of the design.

Here you can see the design on one of the little shamrocks.

And here is the design on the shamrocks with the detail on the linen as well. The texture crinkled so well after washing.
Finish the Pillow
- Fold each 18 1/2″ x 24″ rectangle in half, wrong sides together, to form four 12″ x 18 1/2″ rectangles. Press.
- Top stitch along the folded edge of the pillow about 1/2″ away from the fold.
- Place the quilted pillow top, right side down.

- Place two folded rectangles over each pillow, overlapping the folded edges in the center by about 4″.
- Baste 1/8″ along the outside of the layers.
- Bind with the green plaid binding strips.
- Insert a pillow form through the opening.
.

Here are pictures from EQ Mini of my quilt design.
Show me pictures of your lucky pillows! Tag me on Facebook or Instagram @lorimillerdesigns
Looking for the EQ Mini Design Instructions? You can find them HERE!
For more projects and tips and techniques on using EQ Mini, visit my Electric Quilt blog series EQ Mini Friday Fun.
For more information on EQ Mini software, go to EQ Mini.


Thanks Lori. March is coming up soon!!
Pingback: St. Patrick's Day Crafts: Easy Sewing Projects - Itchin' for some Stitchin'
Pingback: 9 Fun Things to Sew for St. Patrick’s Day – Sewing
Pingback: 9 Fun Things to Sew for St. Patrick’s Day – JACE NETWORK
This iis a great post thanks