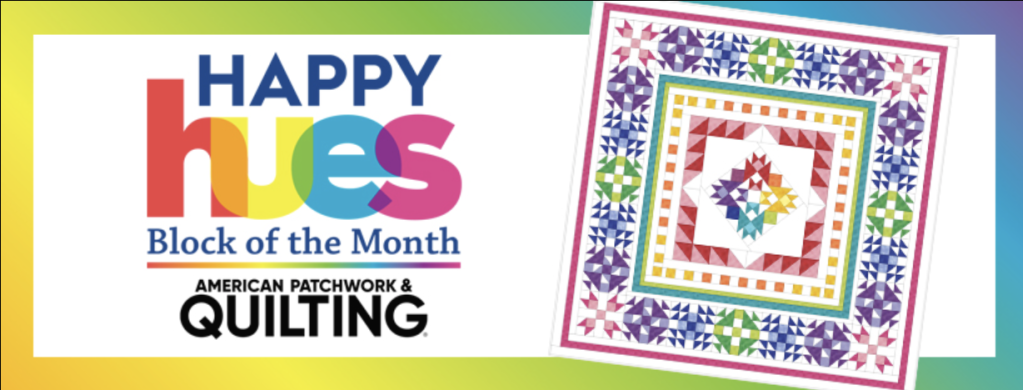
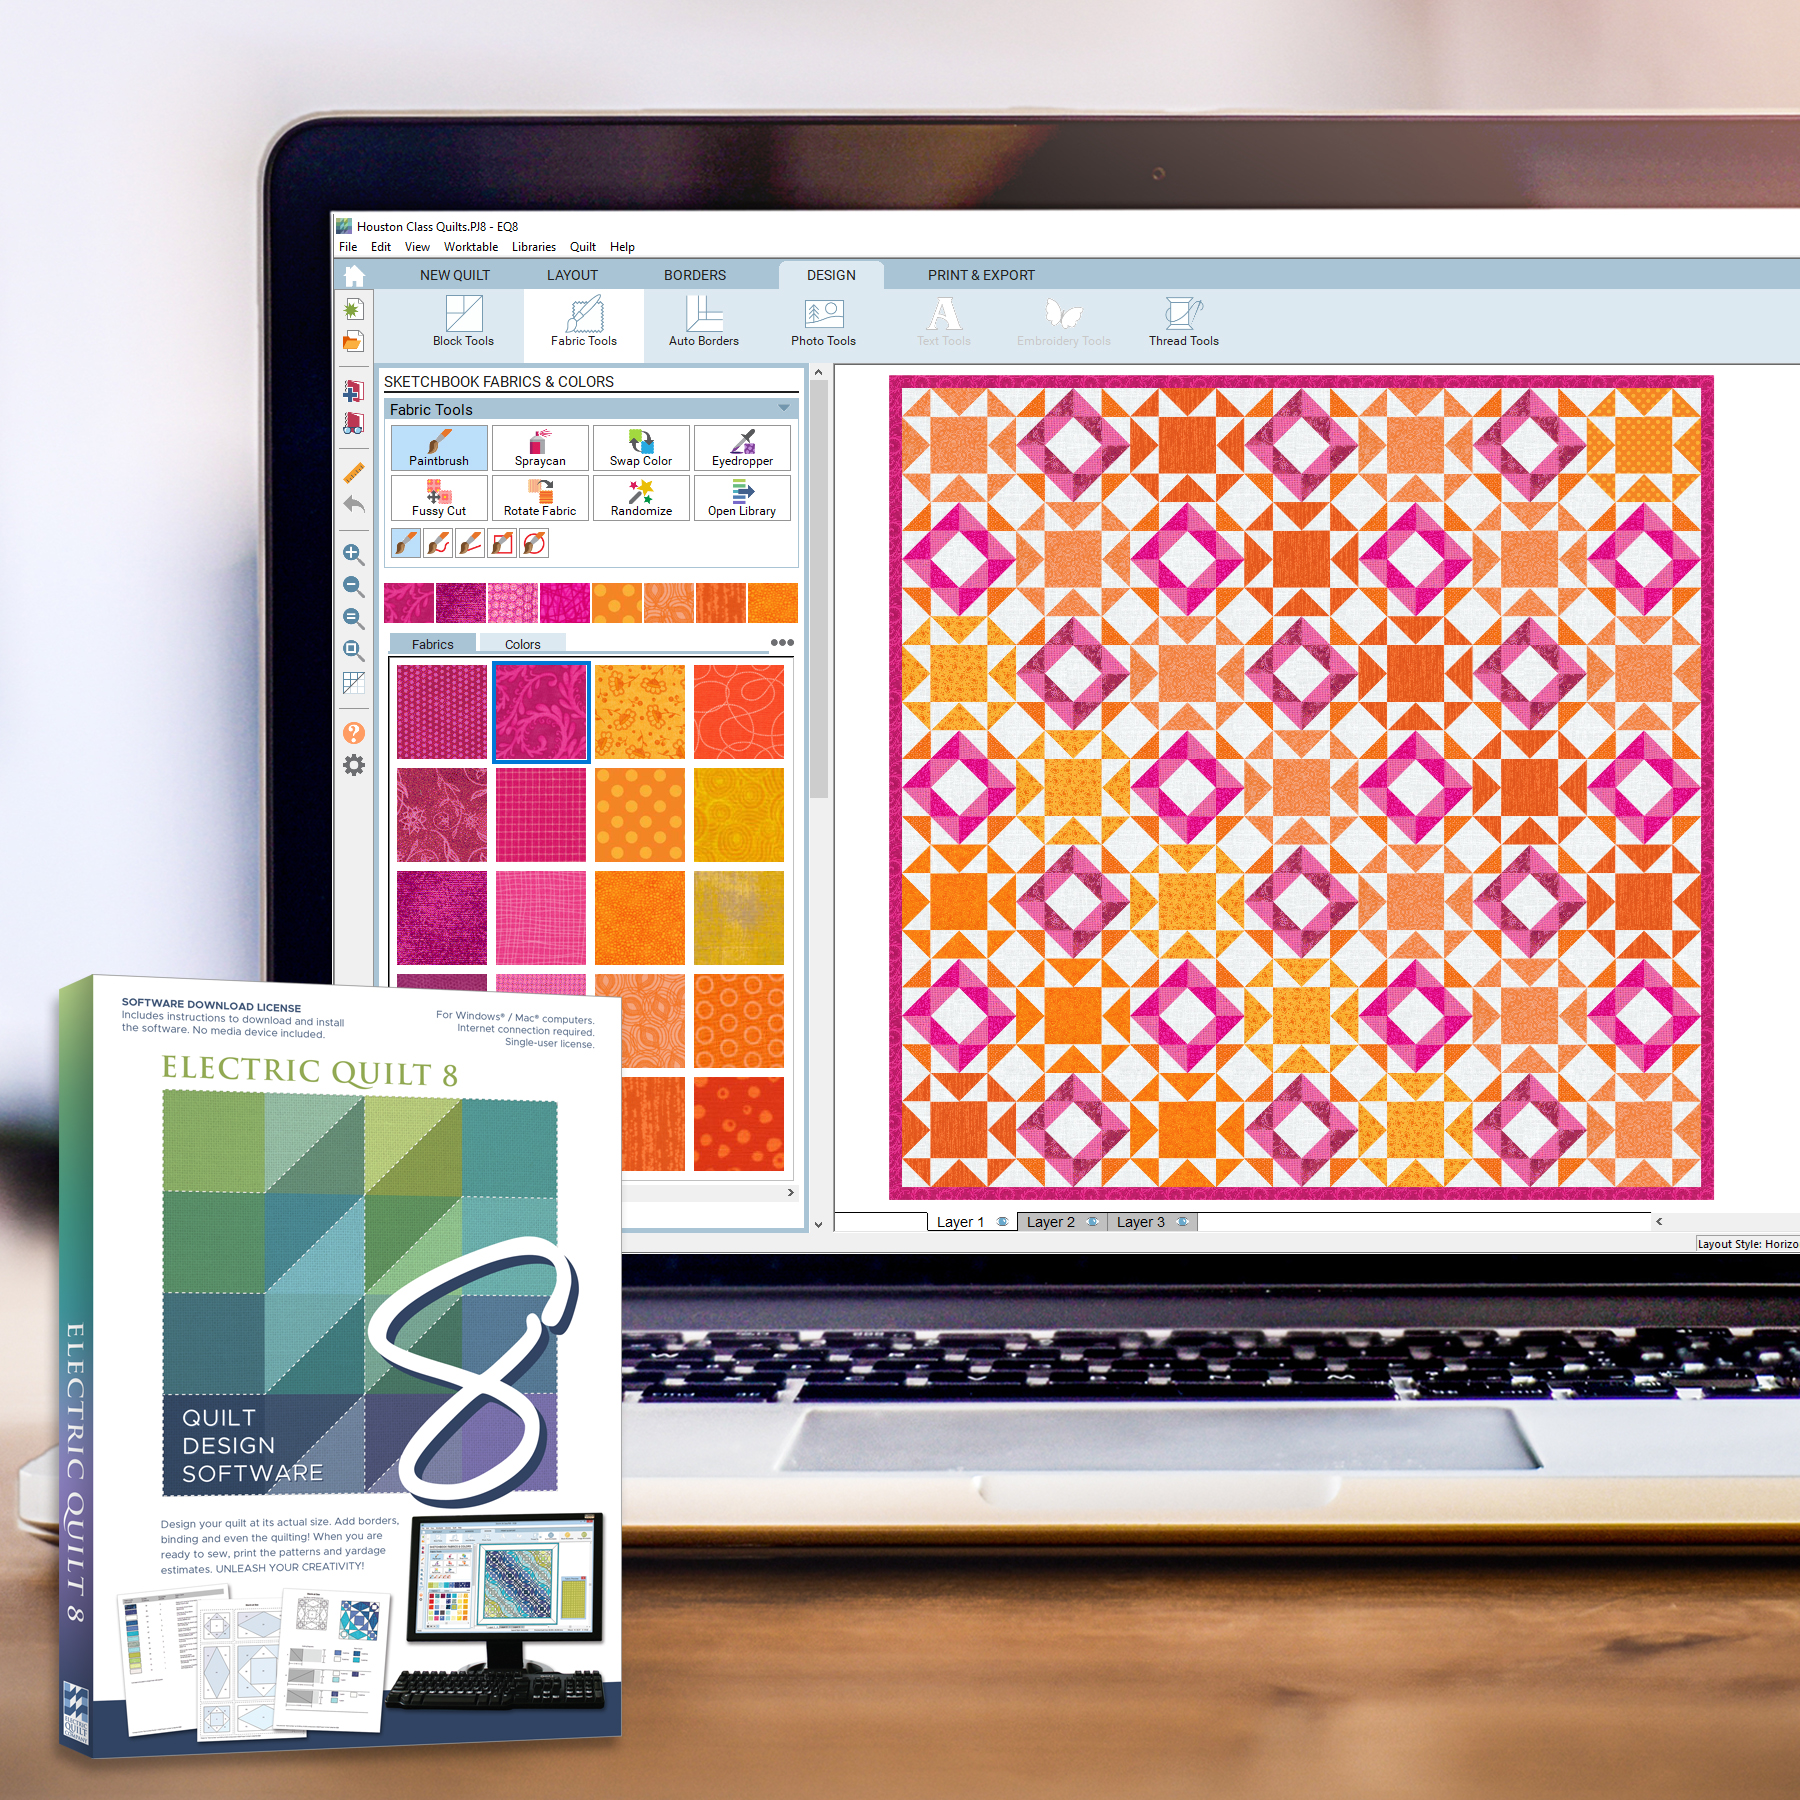
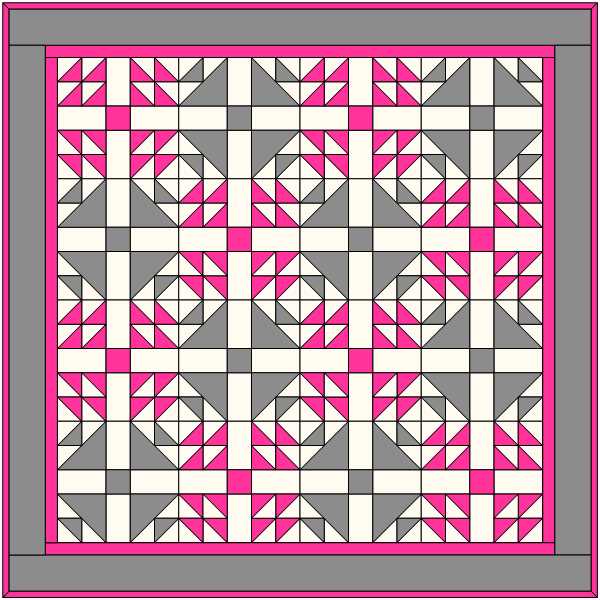
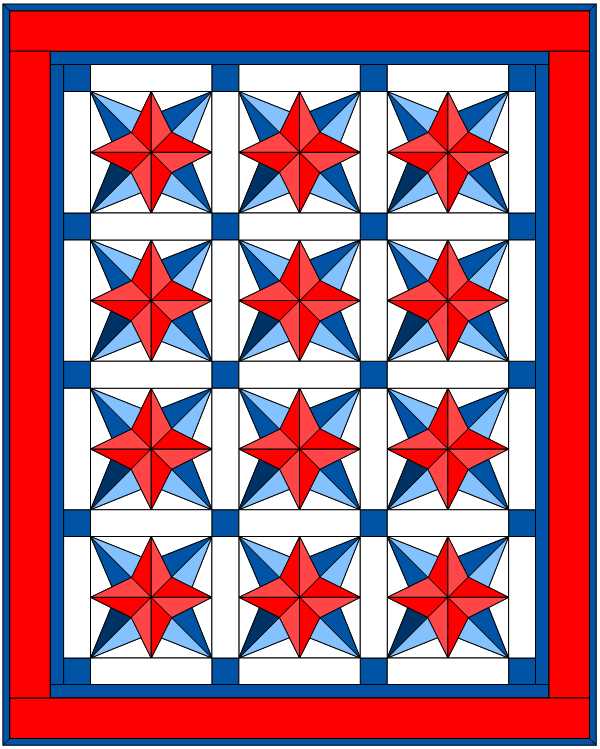
I am so excited to announce that I was asked to design Happy Hues, the new Block of the Month (BOM) for American Patchwork and Quilting. All People Quilt will be exploring color, contrast and value with this medallion quilt in a rainbow of hues.
Patterns will launch on the second Tuesday of each month. And for this BOM, they will provide BOTH Rotary cutting and AccuQuilt cutting directions. That means everyone can join in!
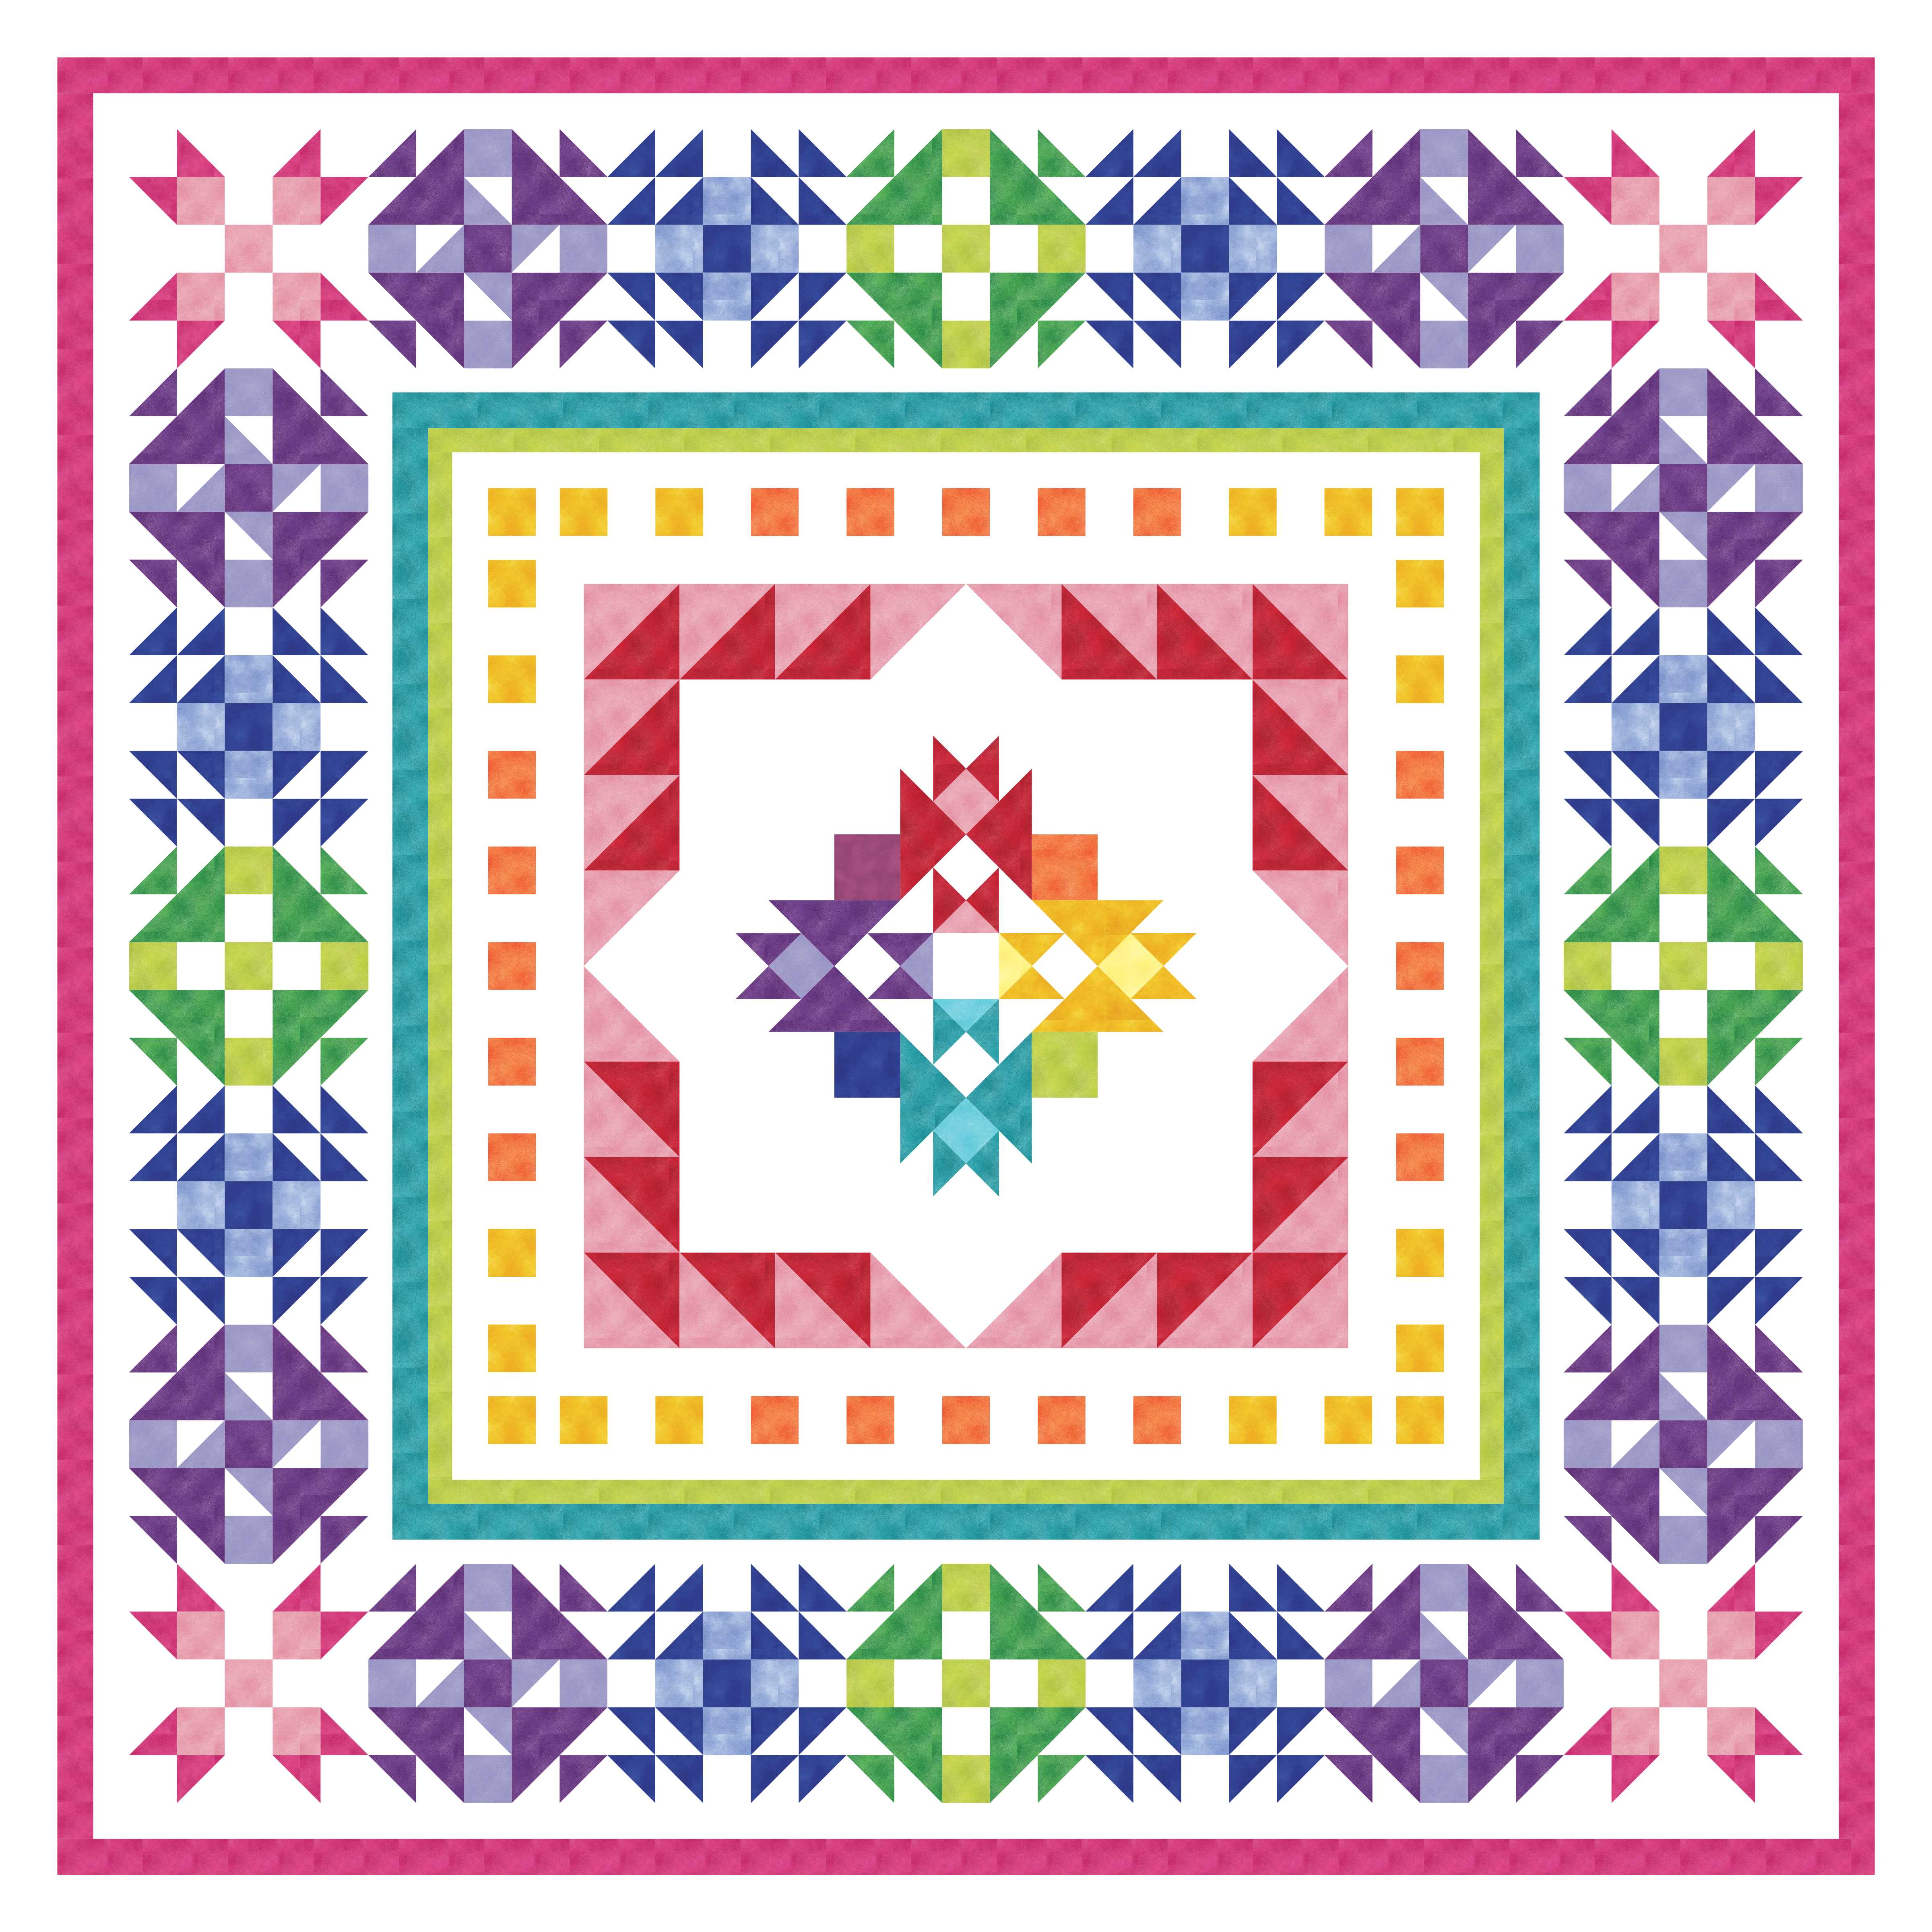
This quilt finishes at 80″ X 80″ square. I used Shadow Blush and Superior Solids fabrics from Benartex. The Fabric requirements have just been posted on the website, so gather what you need to get started in September. Instructions will be included for traditional Rotary Cutting AND for AccuQuilt Cutting. Join us for 7 months of quilty fun.
If you are using AccuQuilt, you will need the following dies:
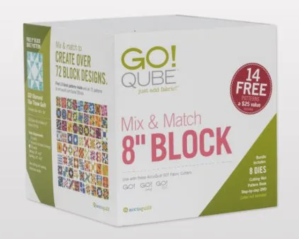
55776: GO! Qube Mix & Match 8″ Block
55017: Strip Cutter 2 1/2″ (2″ Finished)
55025: Strip Cutter 2″ (1 1/2″ Finished)
55024: Strip Cutter 1 1/2″ (1′ Finished
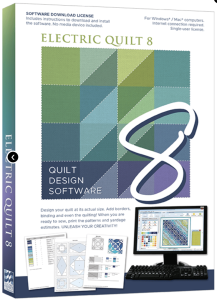
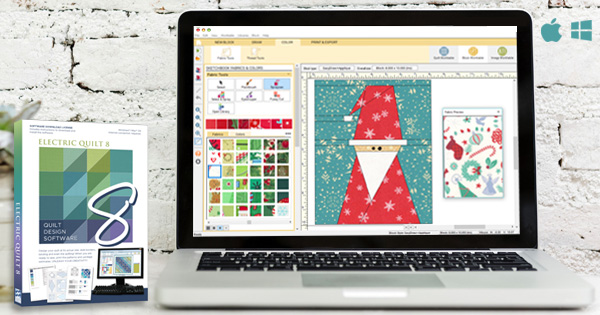
This quilt was designed with EQ8 Quilt Design Software. It is my go to tool for designing beautiful quilts.
I used blocks from my EQ8 Add-on Block Libraries for AccuQuilt. Each library for the AccuQuilt GO! Qube contain quilt blocks that are compatible with AccuQuilt GO! Cutters.
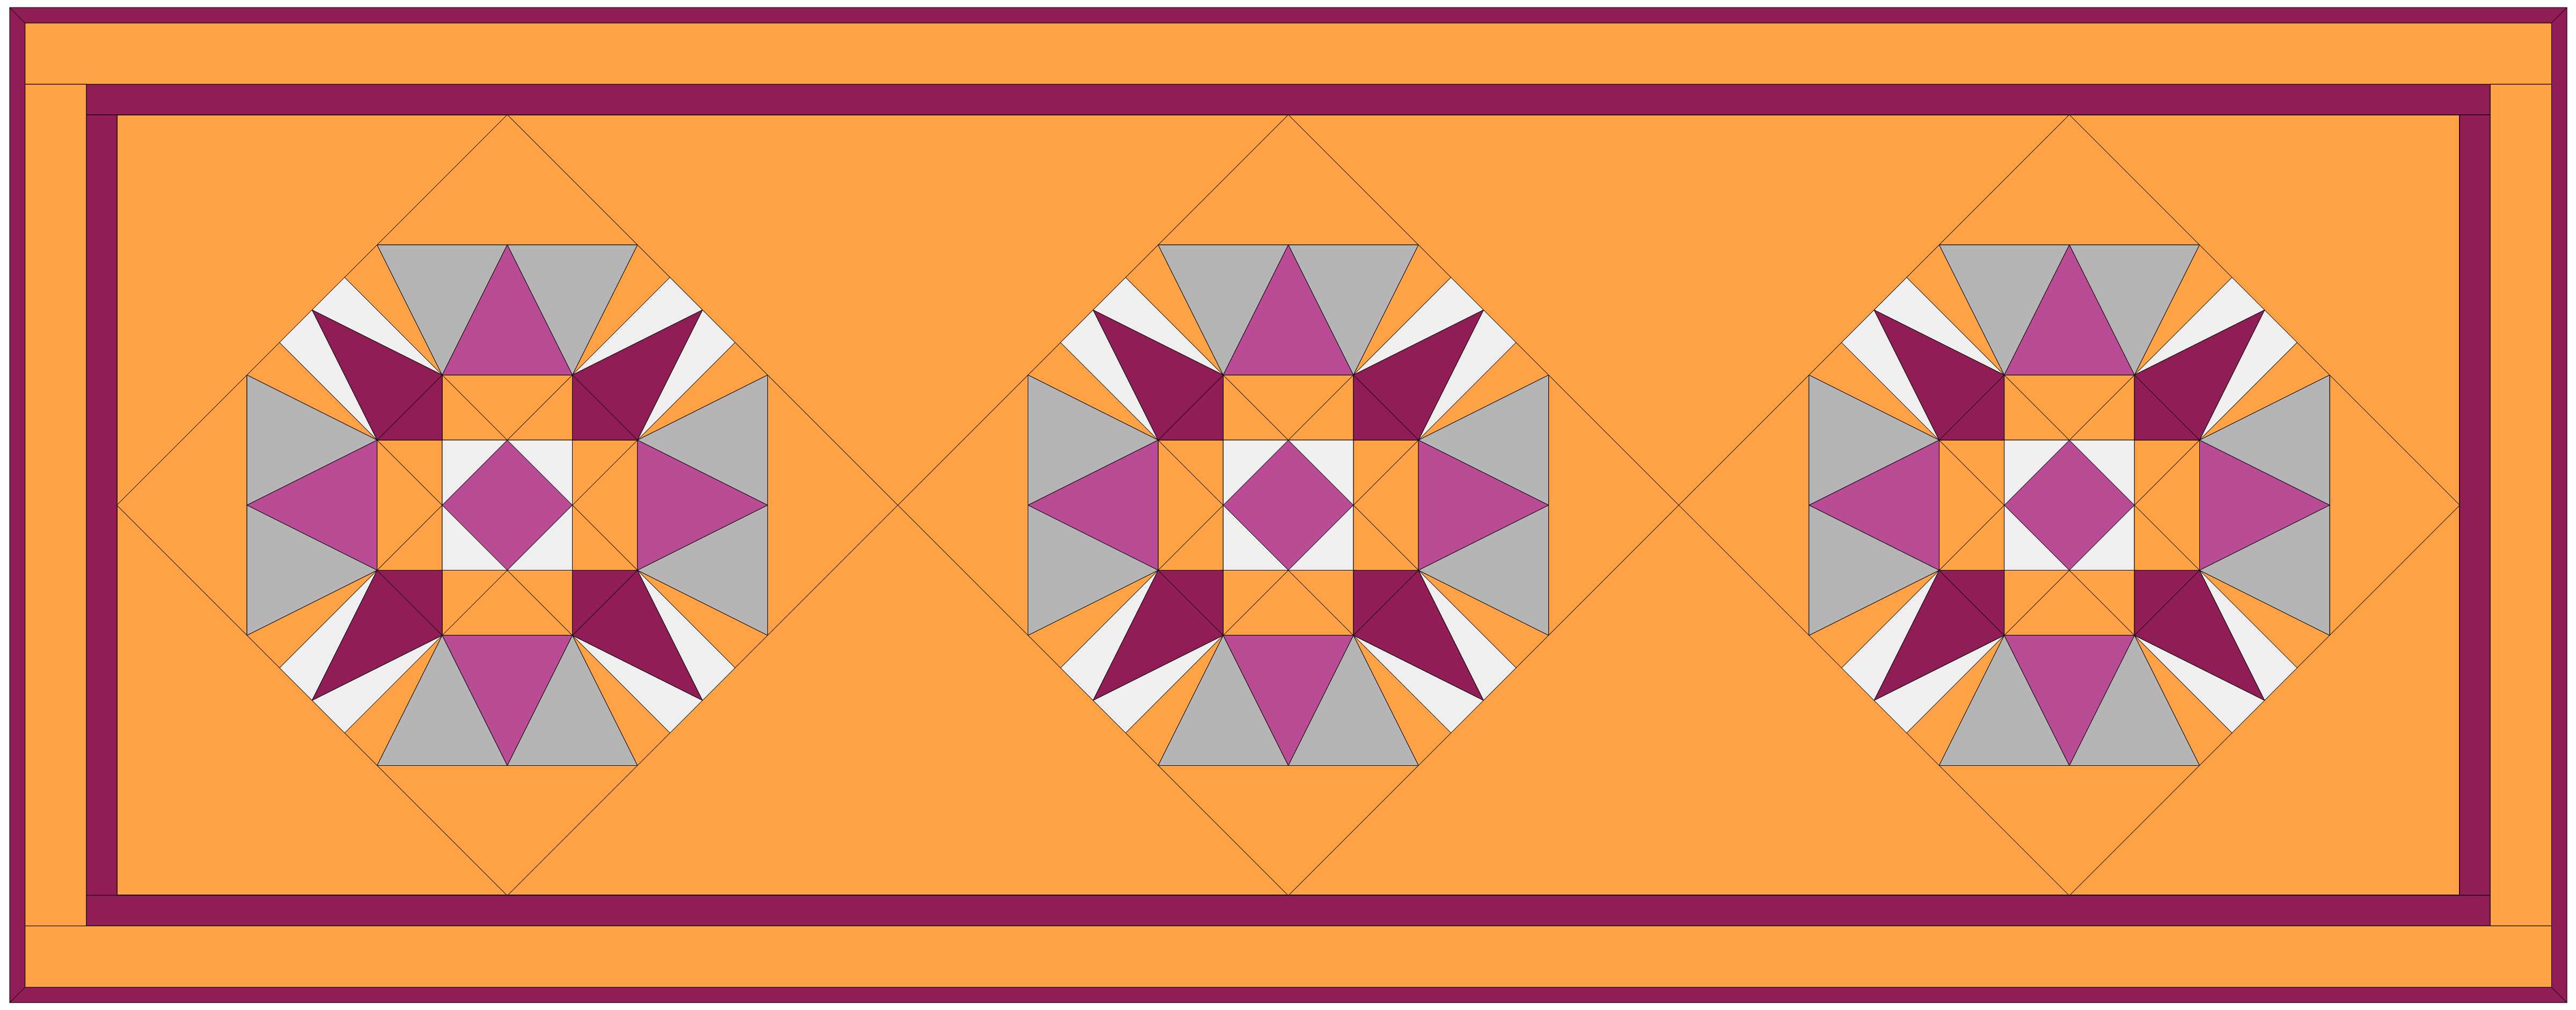
The center block of the Quilt is from my Sweet Sixteen EQ8 Block Library for AccuQuilt called Bursting Star.
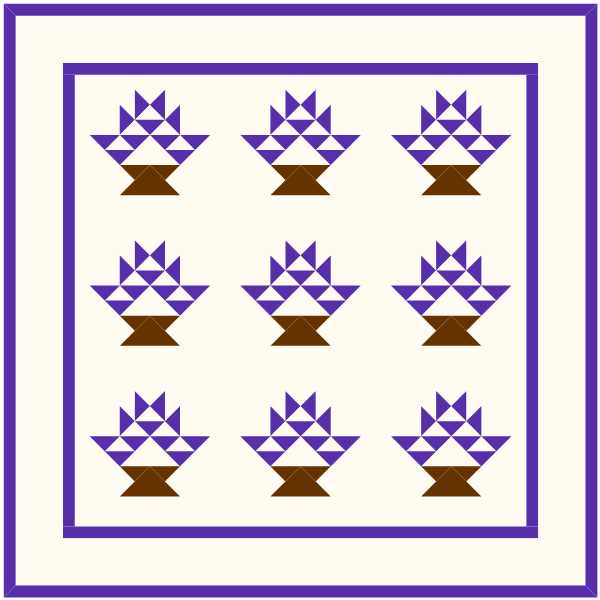
The Blocks in the outer border are adapted from my Five Patch Fun EQ8 Block Library for AccuQuilt. You can find these add-on libraries for EQ8 Quilt design software for purchase at Electric Quilt.
You can find Quilt Patterns and more in my Etsy Shop.
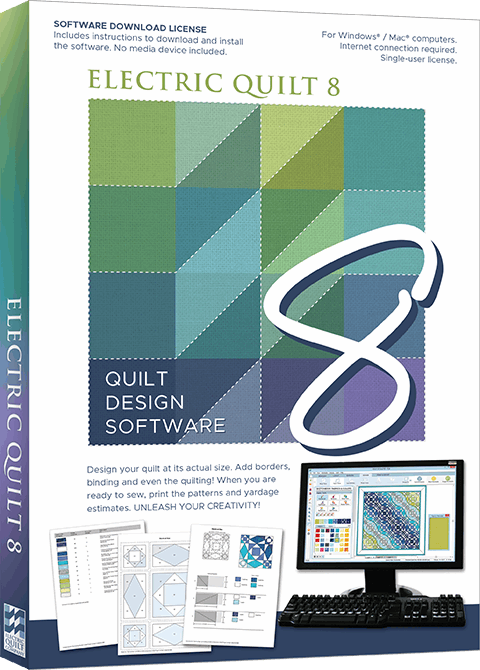
If you have been wanting to design your own quilts and are ready for the next step, you will want to consider learning EQ8 Quilt Design Software. If you are looking for an in person class to take, I wanted to share that I am teaching EQ8 in person in September at the AQS Des Moines Quilt Show and in October/November at the Houston Quilt Festival.
If you are not familiar, EQ8 is my design tool of choice to make and create beautiful quilts. It is quilt design software available for the PC and the MAC. It allows you to ditch the pencils and graph paper and design all kinds and styles of quilts using your computer.
If you have never seen it, check out this brilliant demo from The Electric Quilt Company for a great overview.
I am teaching a full slate of classes and there is still room to join me.
EQ8 Start at the Beginning, #59101w
Build your EQ8 confidence! Tour the workspace and begin designing a variety of beautiful quilt styles. Search the EQ8 libraries for the perfect block or fabric to turn your quilt designs into reality. Or add fabrics from your own stash. Learn how to print yardage estimates, rotary cutting charts, and more. Nicely paced and encouraging class for those who want to understand and practice the basics. Windows and Mac users welcome. Registration for this class includes show admission for Wednesday.
EQ8: I Want to Learn More, #59102t
Take the next step learning EQ8. Learn to draw or edit your own blocks to place in your quilt creations. Explore appliqué and stencils and understand the three layers of the quilt in EQ8. Take a deep dive into borders and Auto Borders. Create personal libraries, use text, photos, and explore free-form quilt settings. By the end of the class, you will have the confidence to design your own beautiful blocks and quilts. Windows and Mac users welcome. This is a great followup to the EQ8 Beginner class.
EQ8: Design for AccuQuilt Qube, #59503
Combine the power of EQ8 quilt design software with the ease of fabric die cutting. The AccuQuilt GO! Qube system is made of building blocks to create a four patch quilt block. Discover EQ8 compatible blocks, draw your own blocks, try different fabrics, and create your own block library. Your design will be ready to cut with the AccuQuilt GO! Cutter. Learn tips and tricks to use the best features of both EQ8 and AccuQuilt. Class based on the 8” Qube, with help to accommodate other sizes. Please note: This is an EQ8 software design class. No die cutters will be used. Completion of a beginner EQ8 class is helpful.
EQ8: Borders and Sashings, #59504
Are your Borders simply boring? Do you just slap on strips of fabric to add length and width to your quilt? Is your sashing simple? Take your borders from blah to beautiful and your sashing from sad to stunning with the built-in tools in EQ8. This fun class will explore a variety of borders and border styles from pieced, flying geese, appliqué, checkerboard, and more. Use borders to jazz up a panel or medallion quilt. Discover creative sashing with pieced blocks and clever design ideas. Your quilts are limited only by your imagination. NOTE: This class moves at a faster pace than Beginner EQ8 classes. PC and Mac Users welcome.
EQ8: Adding Fabrics, #59505
Grow your EQ8 skills! Learn how easy it is to add your own fabrics, panels, and photos to EQ8. Import fabrics, straighten, scale, crop and add them to your Favorites library! Add current manufacturer fabric lines to use in your quilt designs. Discover how you can scan or photograph your own stash to use in your creations. Include fabric panels to creatively design one-of-a-kind quilts. This is the perfect follow-up to any Beginner EQ8 class. Windows and Mac Users welcome.
Houston International Quilt Festival EQ8 Classes
October 30th – November 5th
George R Brown Convention Center in Houston, TX
I am teaching the whole week and there are still a few seats left for my classes in Houston.
108 EQ8 Lets Start at the Beginning
220 EQ8: I Want to Learn More
348 EQ8: Design for AccuQuilt Qube
367 EQ8: Adding Fabrics and Photos
425 EQ8: Lets Start at the Beginning
533 EQ8: Kick Start
Are you brand new to EQ8? This is the perfect class to get to know your exciting new quilt design software. Explore the workspace and start designing quilts right away! EQ8 is your virtual design wall. Use it to try out exciting color combinations, estimate fabric yardage quickly, and print blocks and rotary cutting charts to get started right away. Class nicely paced for beginners. Windows and Mac users welcome. Please note: This class is designed for brand new EQ8 users and is focused on EQ8 basics. If you have taken the full-day beginner class, this class covers similar topics.
569 EQ8: Adding Fabrics and Photos
More Ways to Learn EQ8
If you can’t attend an in person class, The Electric Quilt Company also offers online courses and books for purchase to help you learn the quilt design program.
I am a self-professed EQ8 Superfan, Pattern Designer and Quilter. Head over to my shop to find my stunning Quilt patterns and EQ8 Block libraries for AccuQuilt.
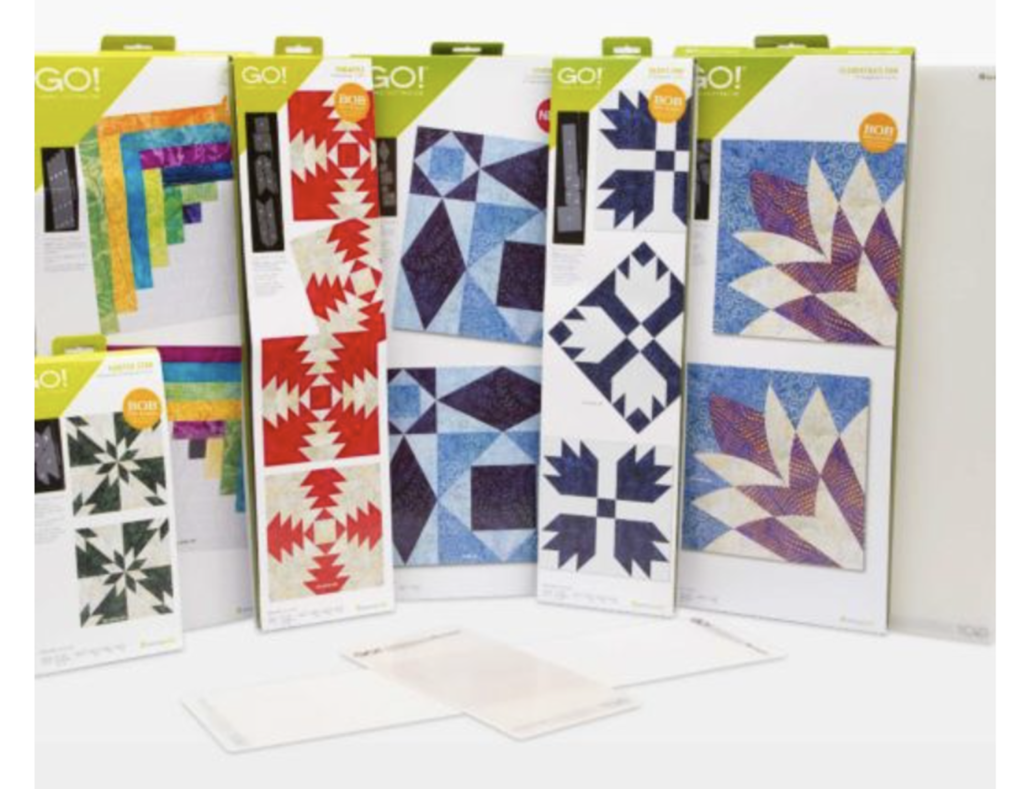
New BOB Blocks are here! This new Add-on EQ8 Block Library for AccuQuilt contains 16 gorgeous BOB blocks that were released in 2022. BOB die blocks enable you to create an entire block with one die board. Every piece needed for the block is on the design board. You can design your quilt with EQ8 and then use your AccuQuilt GO! cutter to cut it out.
This file contains SET 4 of the BOB block designs which includes 16 blocks. The blocks vary in size as indicated to match the actual size of the BOB die block. I have included the size of the block by the name reference.
The ONLY designs included in this set are:
GO! Alabama Beauty 10” (55597)
GO! Butterfly Pieced 9” (55598)
GO! Chinese Lanterns 8” (55599)
GO! Goose Tracks 9” (55536)
GO! Grandmother’s Fan 9” (55537)
GO! Lucky Star 10” (55600)
GO! Mill and Stars 8” (55601)
GO! Mosaic #4 10” (55608)
GO! North Carolina Star 12” (55605)
GO! Plaited Block 12” (55606)
GO! Priscilla Stripe 6” (55607)
GO! Road to Fortune 9” (55586)
GO! Star of the East 9” (55587)
GO! Tree of Life 14” (55588)
GO! Washington’s Puzzle 4” (55602)
GO! Whirling Star 12” (55603)
Required: A running copy of EQ8 Quilt Design Software from The Electric Quilt Company.
Required: You will need the Accuquilt BOB die set in the size that matches the EQ8 library file in order to cut out these block designs with the Accuquilt GO! Cutter. Make sure your cutter is the right size for the BOB die.
This is a downloadable digital file that you will place into your personal block library. Once you place the block file in your library, you will be able to use it immediately to draw and design quilts. I have included all of the instructions to add the files to your EQ8 Design Software. You will receive the EQ8 Block library, a block reference guide and an instruction document. The blocks are all labeled to match the reference guide.
Now you can use the power of EQ8 to recolor and combine blocks to design beautiful quilts.
Once you have designed your quilt, you can use your Accuquilt GO! Cutter to make it. I have also included tips and suggestions for determining what dies to use and how to determine fabric requirements.
I hope you enjoy these files as you create your BOB design quilts.
Happy designing with your Accuquilt Block on Board Set 4 library blocks in EQ8!
If you liked the new Add-on EQ8 Block Library files for AccuQuilt BOB Set 4, check out my other available Add-on Block libraries for EQ8 that work with AccuQuilt in my shop.
I appreciate your feedback and suggestions on this product. Please tag me on Facebook or Instagram @lorimillerdesigns with your designs, I would love to see them.
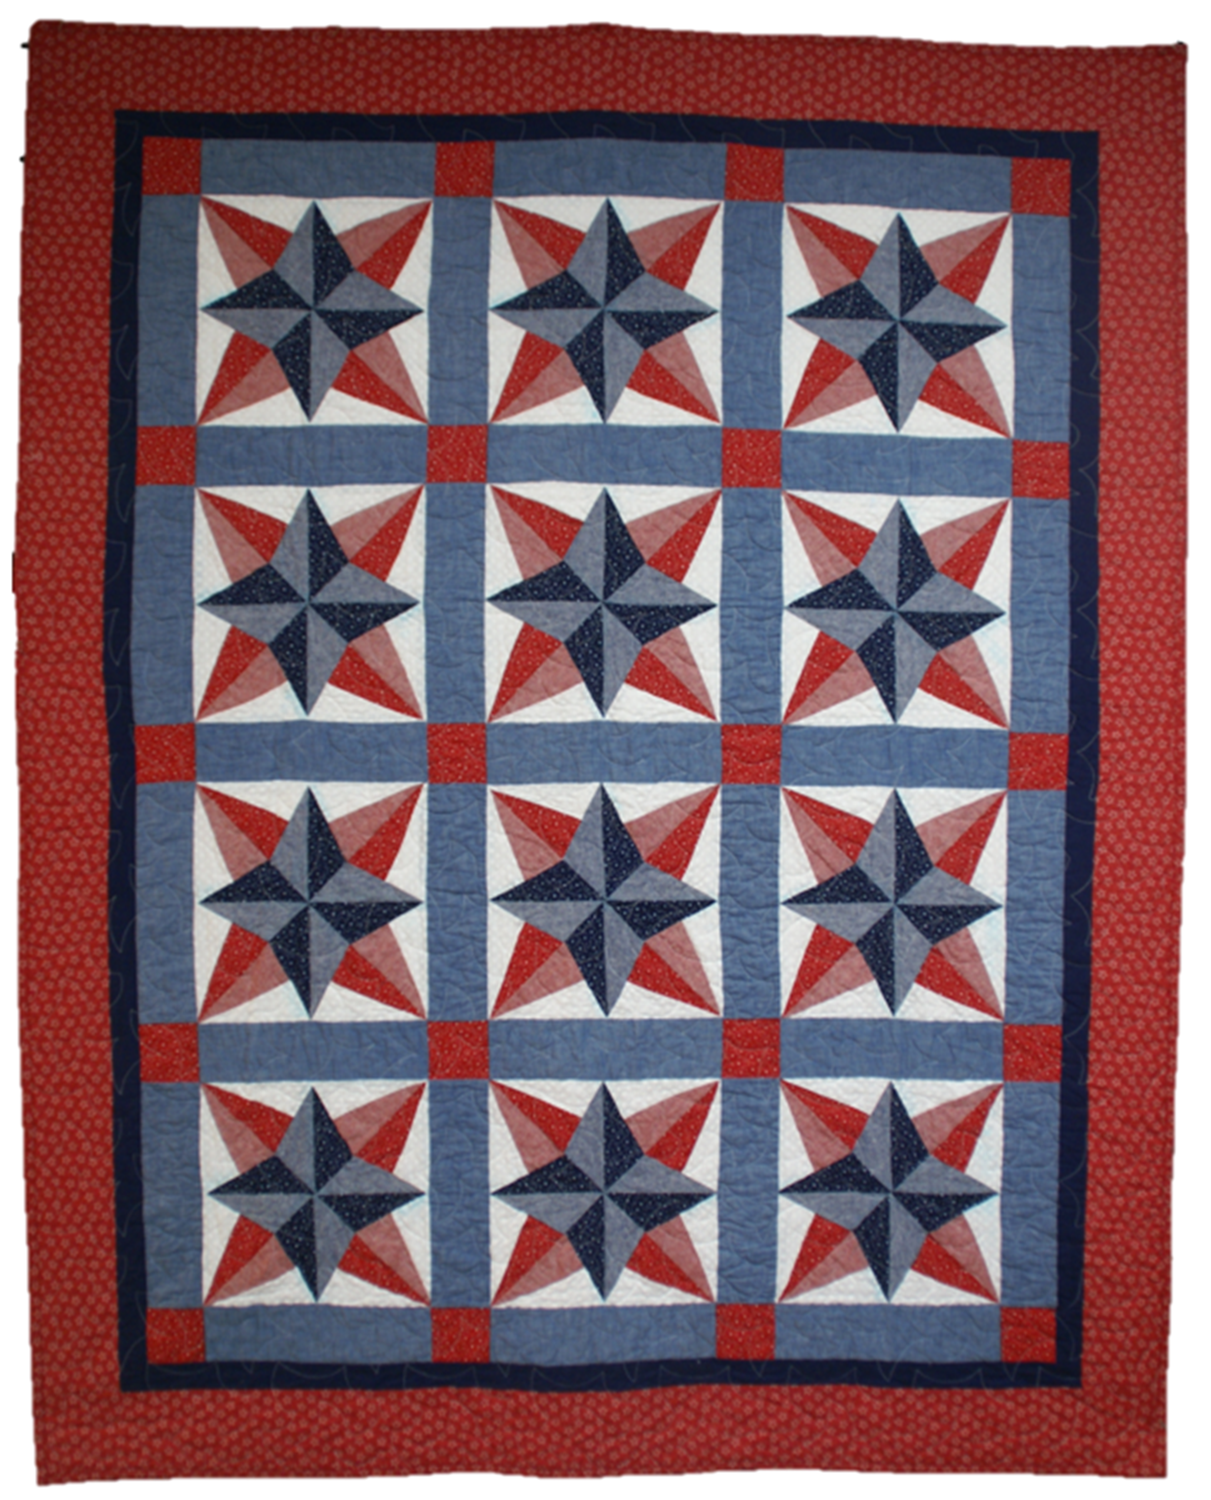
Hello Quilting friends! I wanted to share with you my Charity Quilt for the Pay It Forward Campaign called Covering the World: One Quilt at a Time 2022. This is my charming Quilt of Valor Quilt.
I am an AccuQuilt Go!Getter and I have teamed up with other quilters and designers from AccuQuilt, Moda Fabrics, and Brother to create and donate our time and quilts to a charity of our choice. Every week in 2022, one person from our teams will be donating a quilt to our favorite charity. My chosen charity is the Quilt of Valor Foundation.
The Mission of the Quilt of Valor Foundation is to cover Service Members and Veterans touched by war with comforting and healing Quilts of Valor. I have many friends and family members who have served our country and I have a special place in my heart for the veterans and members of the military who have given so much of themselves.
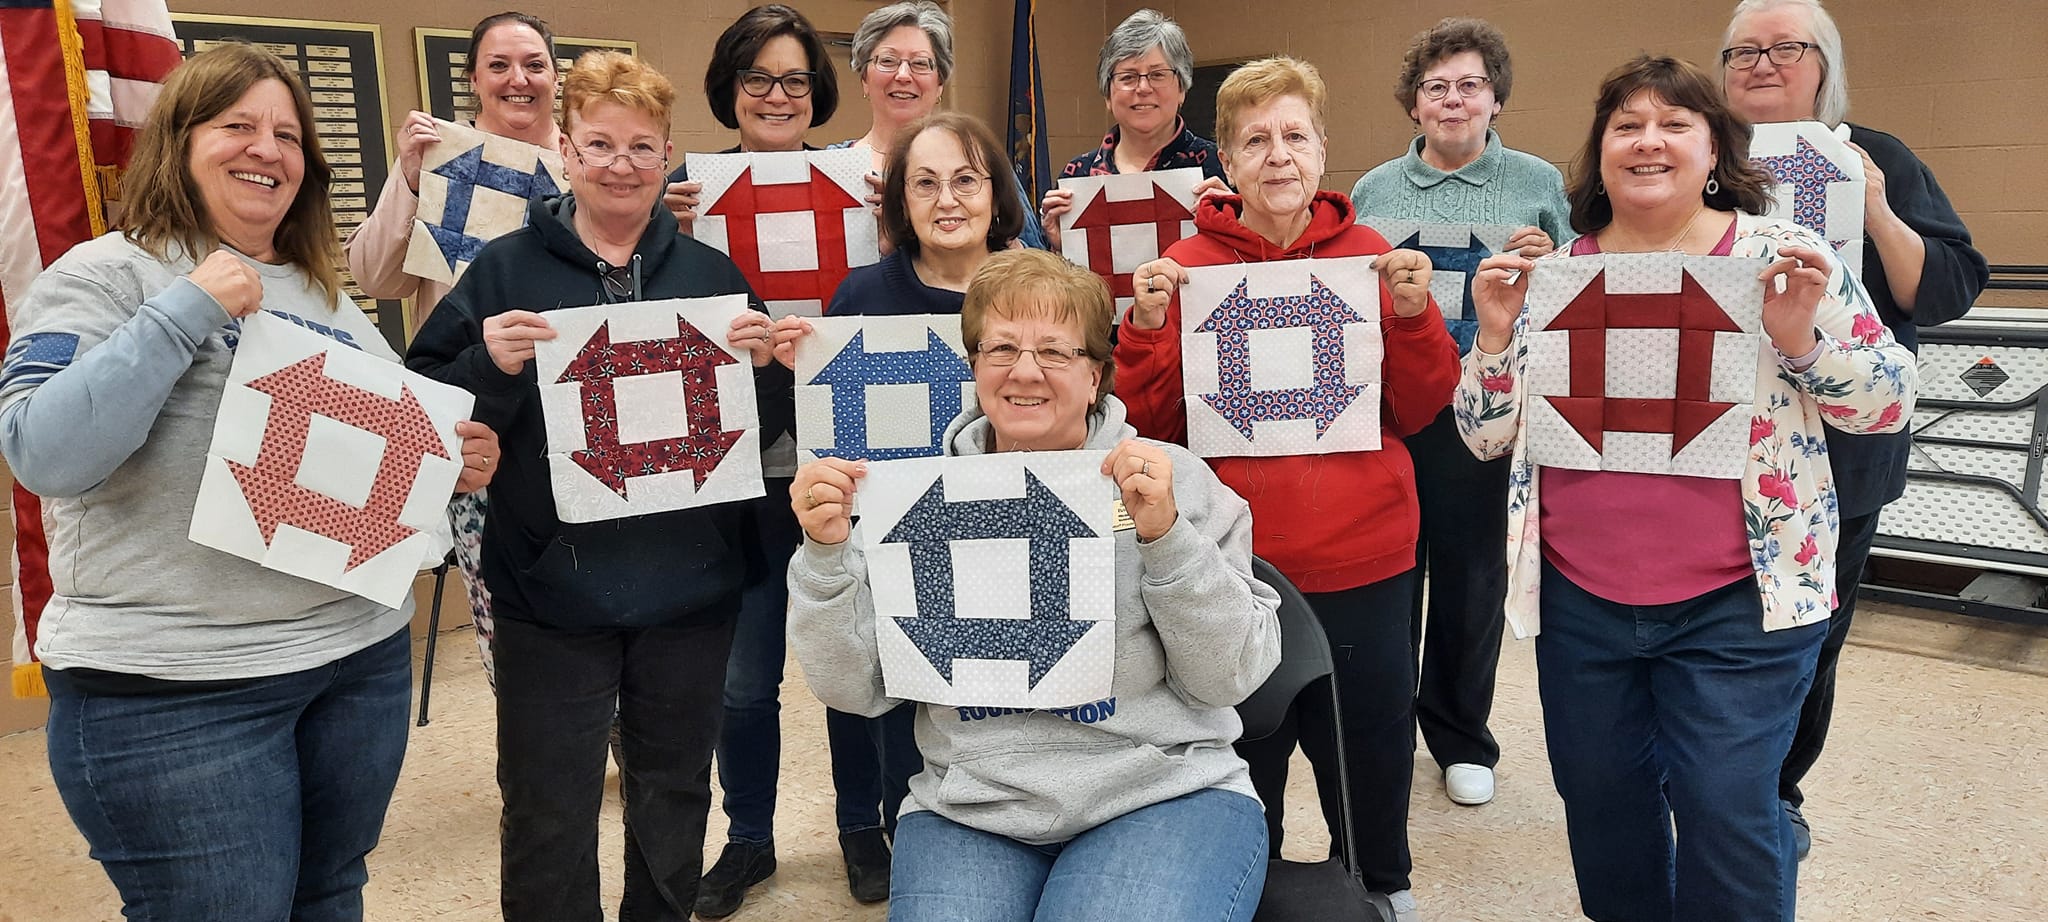
I belong to my local group, Stitching Sisters Quilts of Valor in Clawson, Michigan. We get together monthly to sew quilts in fellowship and fun. Here is a picture of our group showing some of the blocks we were making for our quilts.
This picture showing the completed quilt made with our blocks being awarded to a deserving veteran.
This is a picture of our latest group of veterans to receive their Quilts of Valor.
We often get fabric donated to our group from the local community. All of the fabrics in the quilt I made were donated. I had a selection of chambrays and red and blue cotton fabrics with tiny stars printed on them.
I used the AccuQuilt GO! Blazing Star 12” Finished die (55051) by Eleanor Burns for my quilt blocks. The contrast of the prints and chambray really make the Blazing Star stand out. I used sashing and cornerstones to pull it all together. My friend, Sue Baker, did a beautiful job of completing the long arm quilting. She was one of the sisters who founded our Stitching Sisters QOV group.
Do you make quilts for Quilt of Valor? I have a FREE TUTORIAL to make this GO! Rising Star Quilt of Valor quilt on the Accuquilt Blog.
I hope you enjoyed seeing my Quilt of Valor charity quilt. Would you like to join us in making a quilt for charity? For more information on making and donating a charity quilt as part of the Quilt the World 2022 project, visit AccuQuilt.
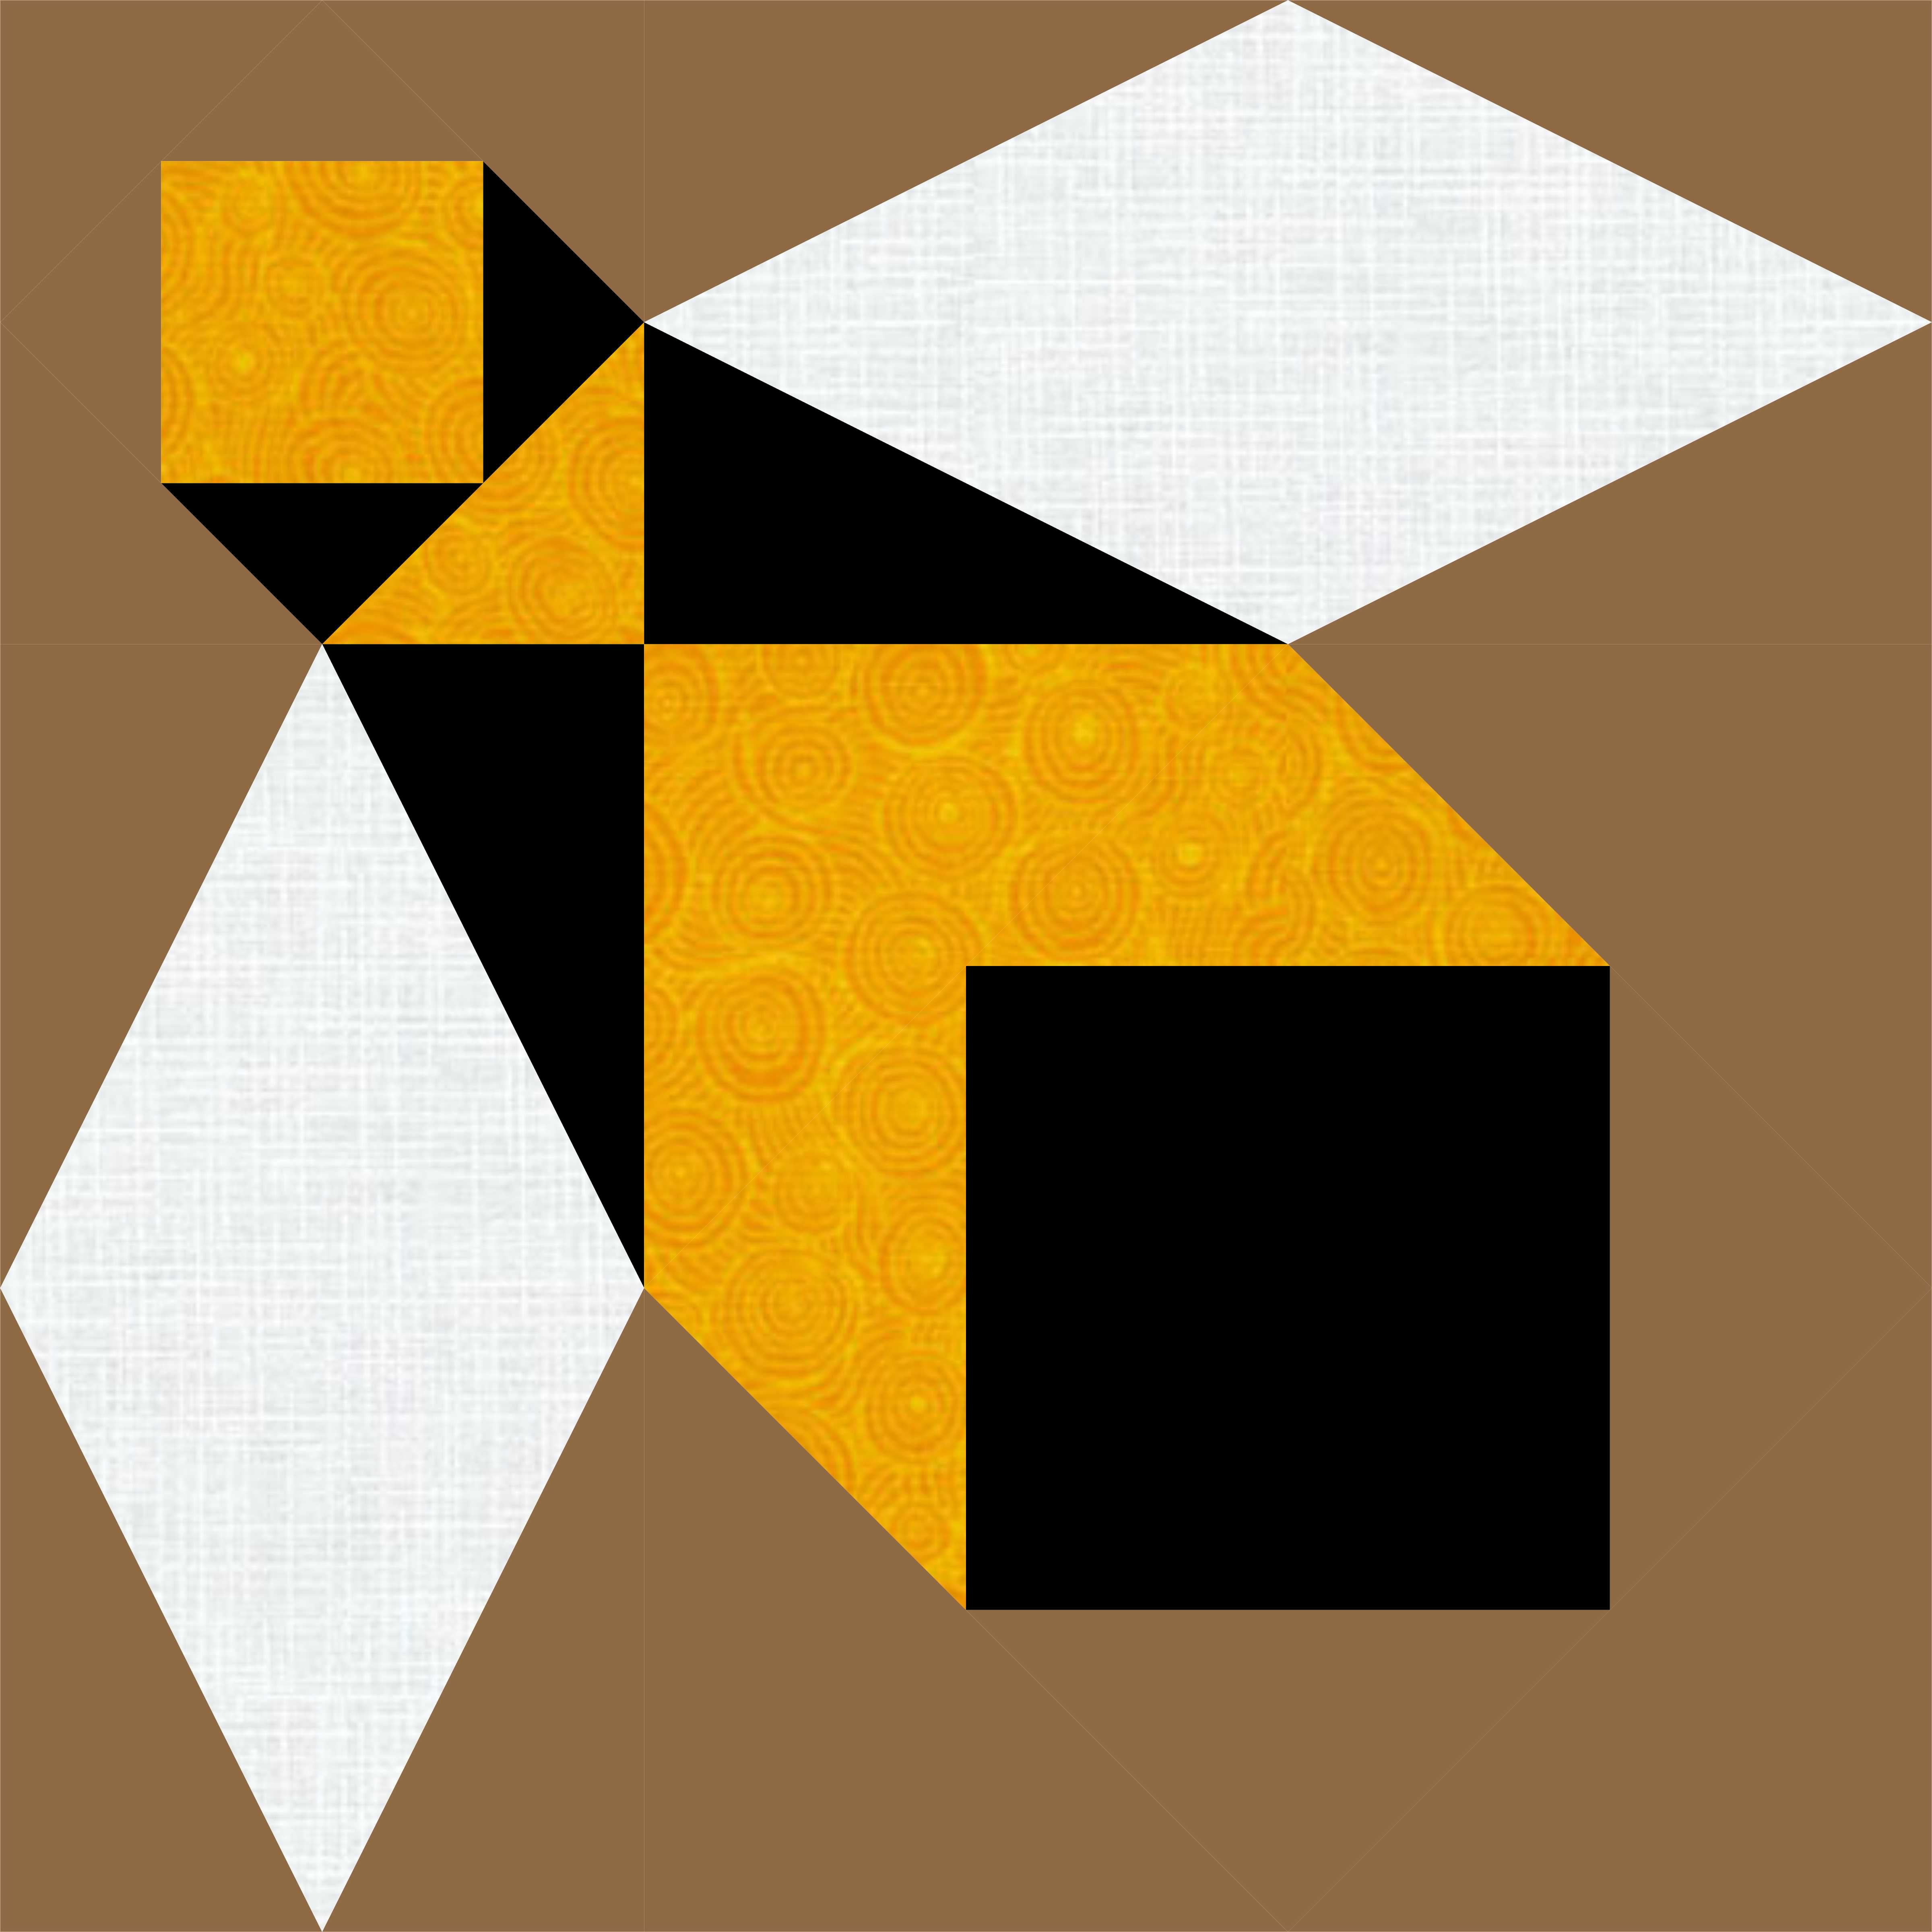
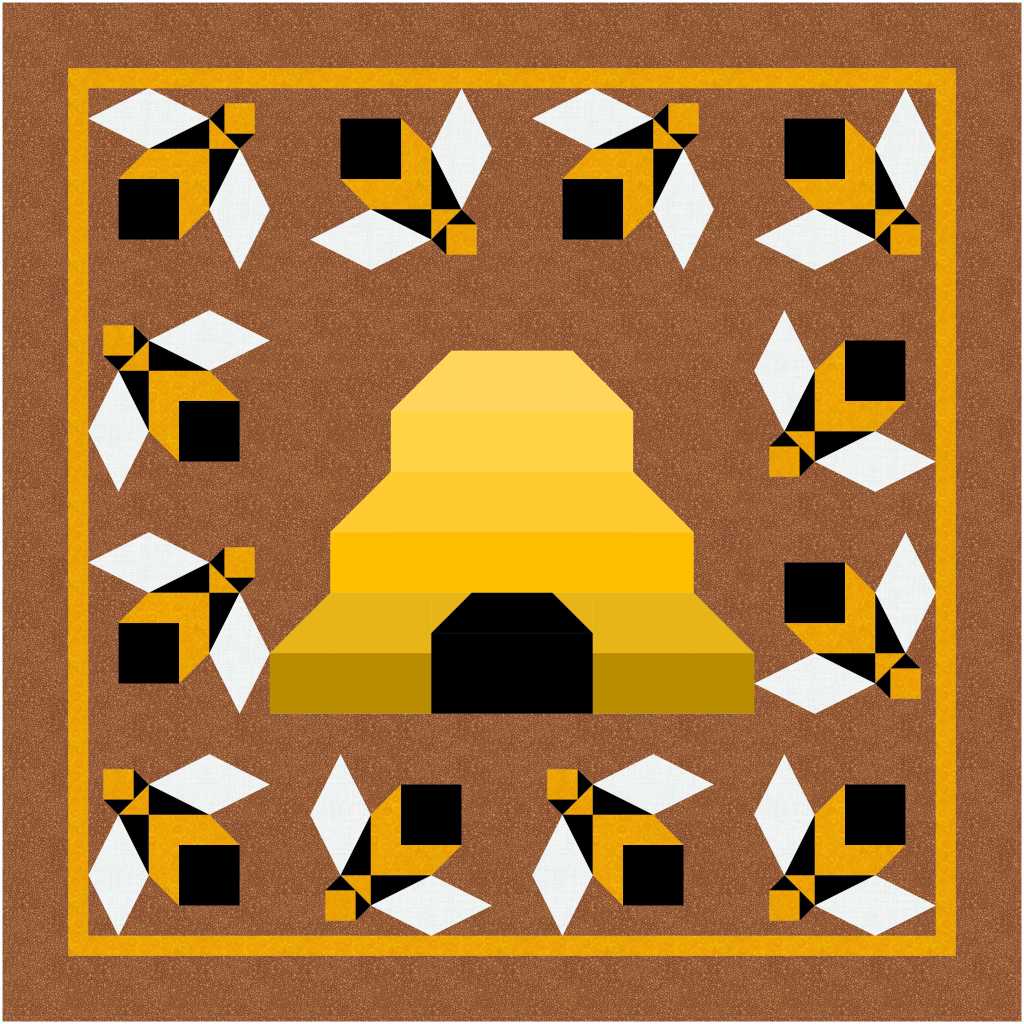
Introducing Honey Bee Hive, this pattern has been all of the buzz. This is an AccuQuilt GO! Friendly pattern. It uses the Storm at Sea Block on Board Die and several strip dies.
Honey Bee Block by Lori Miller Designs
This little quilt has a special place in my heart. My Dad was a beekeeper for over 50 years. I used to go and help him work the bees and take off the honey. The honey was so delicious.
Honey Bee Hive – Baby or Wall Hanging by Lori Miller Designs
I designed my quilt using Electric Quilt Design software. Honey Bee Hive comes in three sizes, Baby or Wall hanging, Throw Size and Queen, of course.
This pattern only comes with AccuQuilt GO! Cutter instructions. You will need the following dies:
GO Storm at Sea Die (9” Finished) (55221)
GO! Strip Cutter 3 ½” (3” Finished Strip Die (55032)
You have been asking for them and they are finally here! This Add-on EQ8 Block Library for AccuQuilt contains another 15 lovely BOB blocks. BOB die blocks enable you to create an entire block with one die board. Every piece needed for the block is on the design board. You can design your quilt with EQ8 and then use your AccuQuilt GO! cutter to cut it out.
This file contains SET 3 of the BOB block designs which includes 15 blocks. The blocks vary in size as indicated to match the BOB die. I have included the size of the block by the name reference.
The ONLY designs included in this set are:
GO! Basket of Lilies 12” Finished (55530)
GO! Carpenter’s Wheel 18” Finished (55531)
GO! Cornucopia 10” Finished (55532)
GO! Crossroads 9” Finished (55533)
GO! Drunkards Path 3.5” Finished (55070)
GO! Drunkards Path 4” Finished (55338)
GO! Drunkards Path 7” Finished (55034)
GO! Feather Star 16” Finished (55535)
GO! Goose Tracks 9” Finished (55536)
GO! Pickle Dish 10” Finished (55539)
GO! Prairie Star 14” Finished (55540
GO! Rising Star 10” Finished (55541)
GO! Schoolhouse 9” Finished (55542)
GO! Tangled Star 10” Finished (55543)
GO! Weathervane 8” Finished (55544)
Required: A running copy of EQ8 Quilt Design Software from The Electric Quilt Company.
Required: You will need the Accuquilt BOB die set in the size that matches the EQ8 library file in order to cut out these block designs with the Accuquilt GO! Cutter. Make sure your cutter is the right size for the BOB die.
This is a downloadable digital file that you will place into your personal block library. Once you place the block file in your library, you will be able to use it immediately to draw and design quilts. I have included all of the instructions to add the files to your EQ8 Design Software. You will receive the EQ8 Block library, a block reference guide and an instruction document. The blocks are all labeled to match the reference guide.
Now you can use the power of EQ8 to recolor and combine blocks to design beautiful quilts.
Once you have designed your quilt, you can use your Accuquilt GO! Cutter to make it. I have also included tips and suggestions for determining what dies to use and how to determine fabric requirements.
I hope you enjoy these files as you create your BOB design quilts.
Happy designing with your Accuquilt Block on Board Set 3 library blocks in EQ8!
If you liked the new Add-on EQ8 Block Library files for AccuQuilt BOB Set 3, check out my other available Add-on Block libraries for EQ8 that work with AccuQuilt in my shop.
I appreciate your feedback and suggestions on this product. Please tag me on Facebook or Instagram @lorimillerdesigns with your designs, I would love to see them.
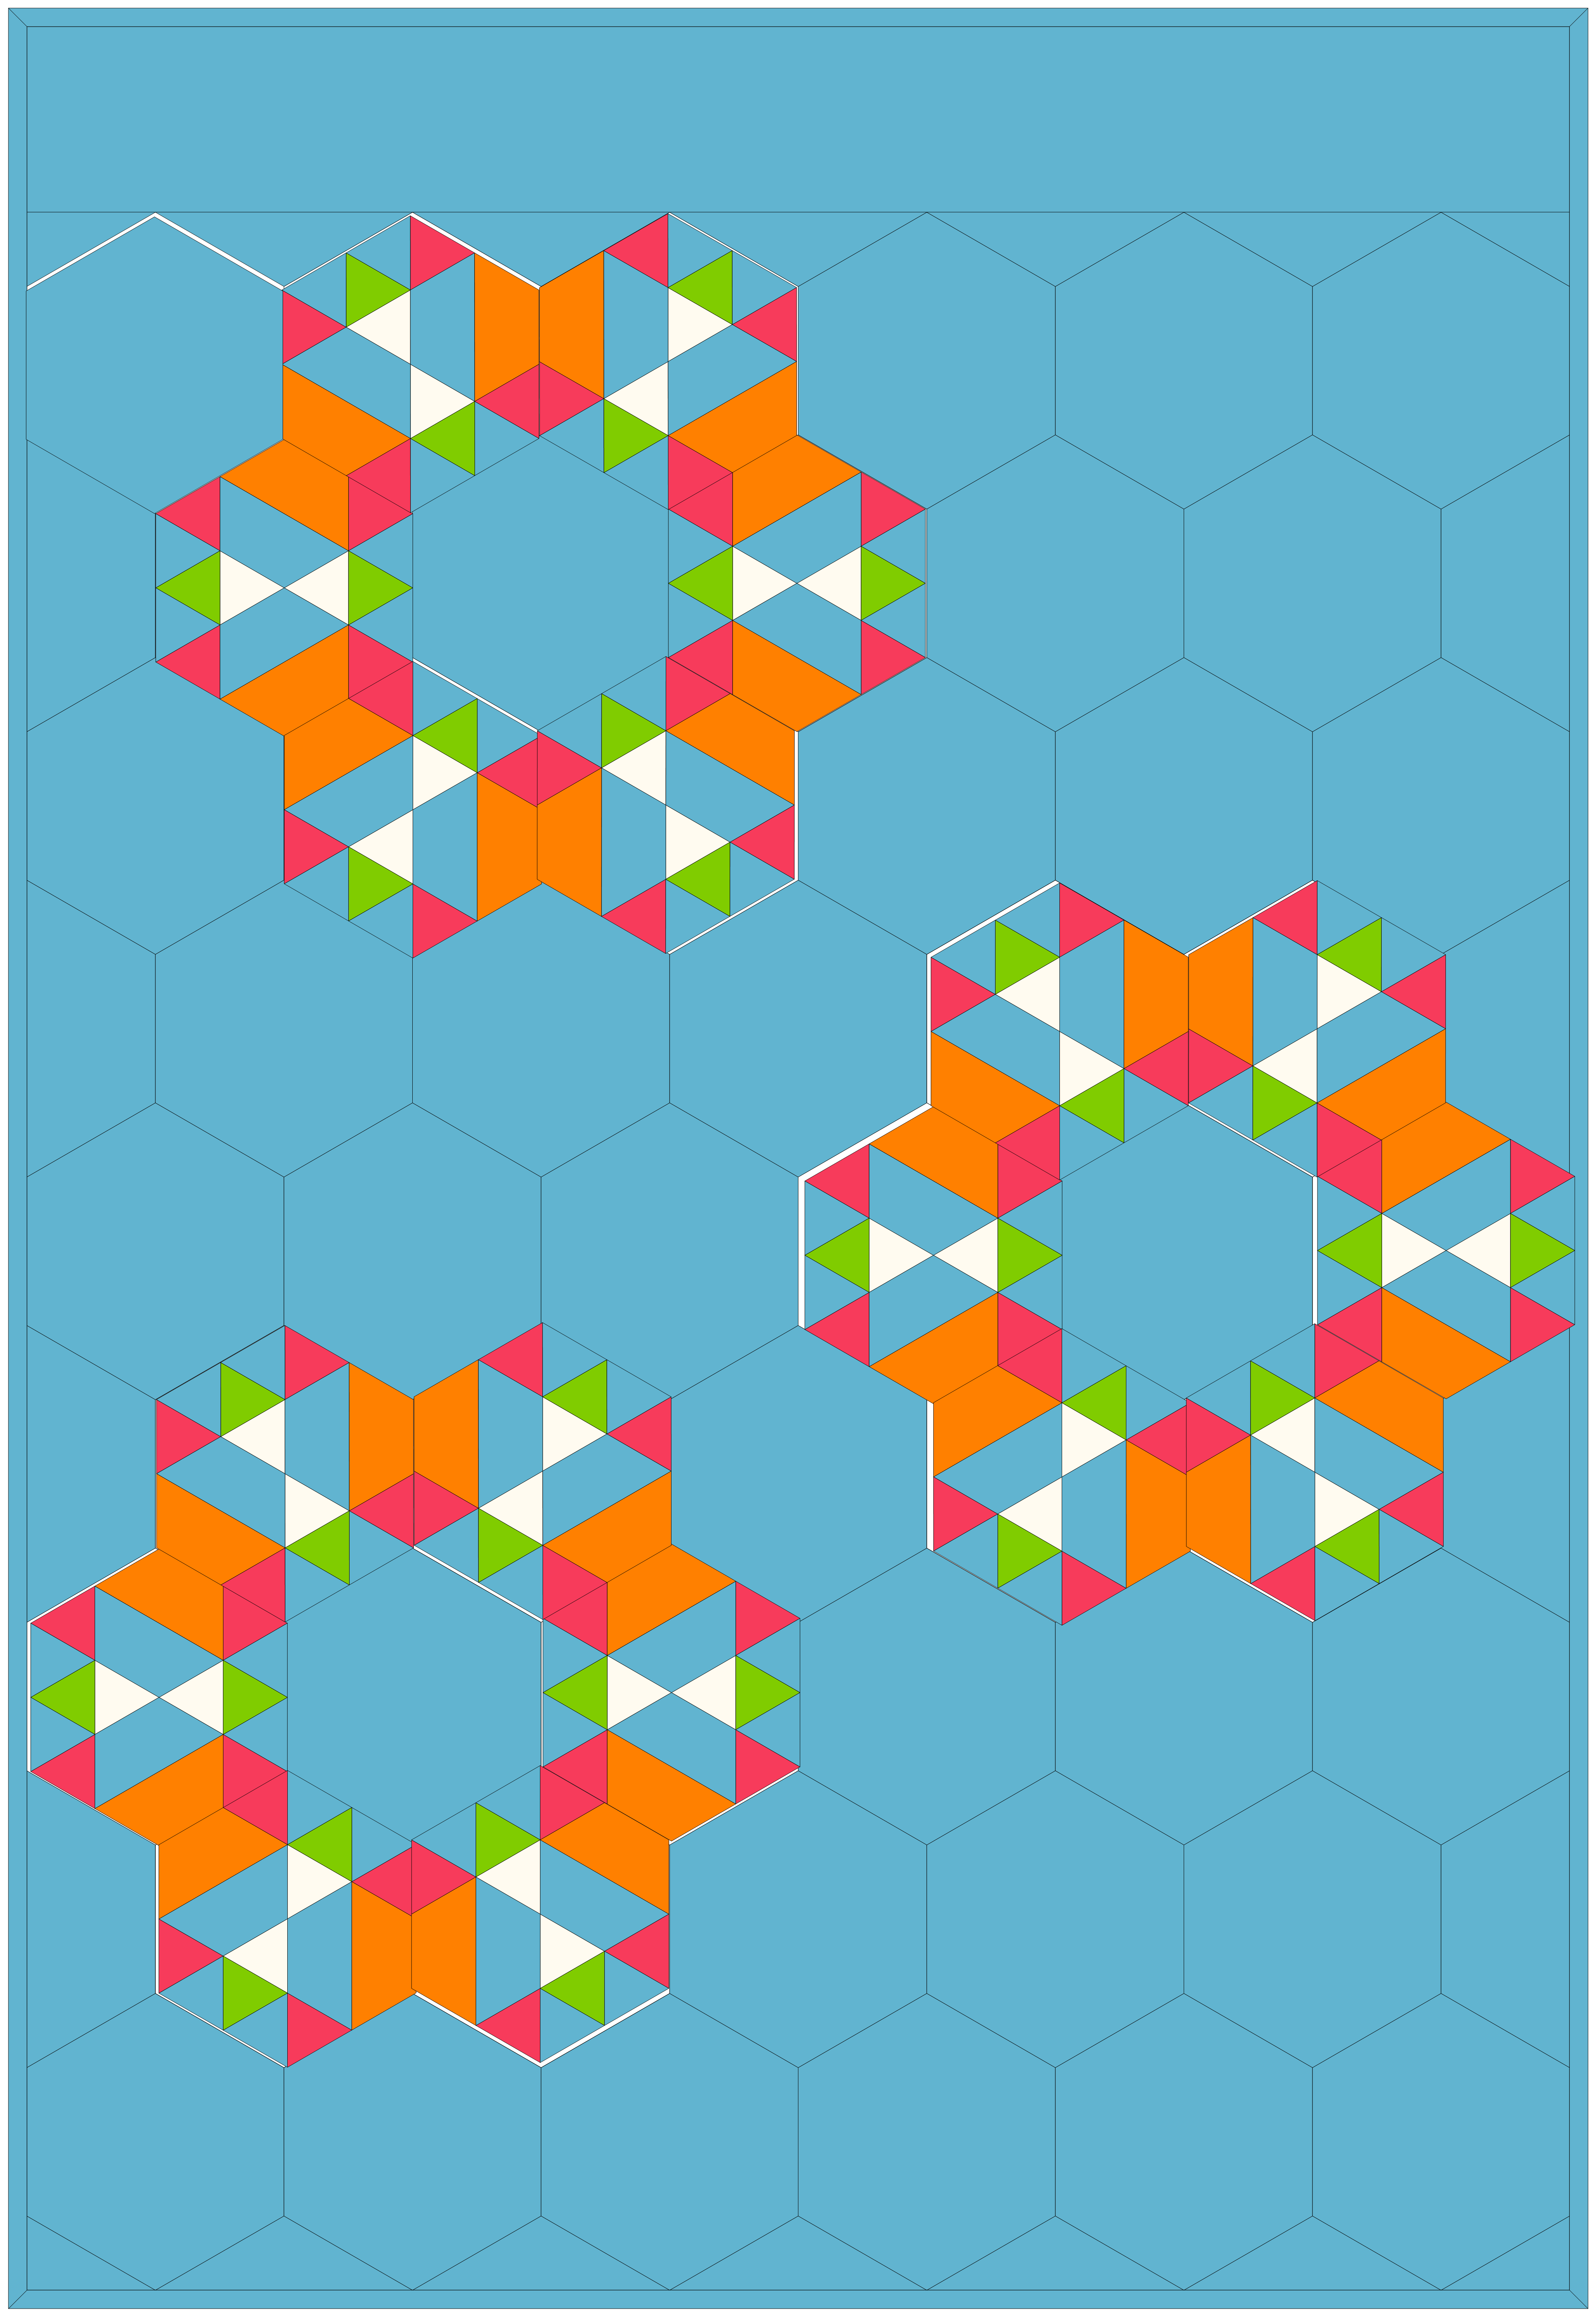
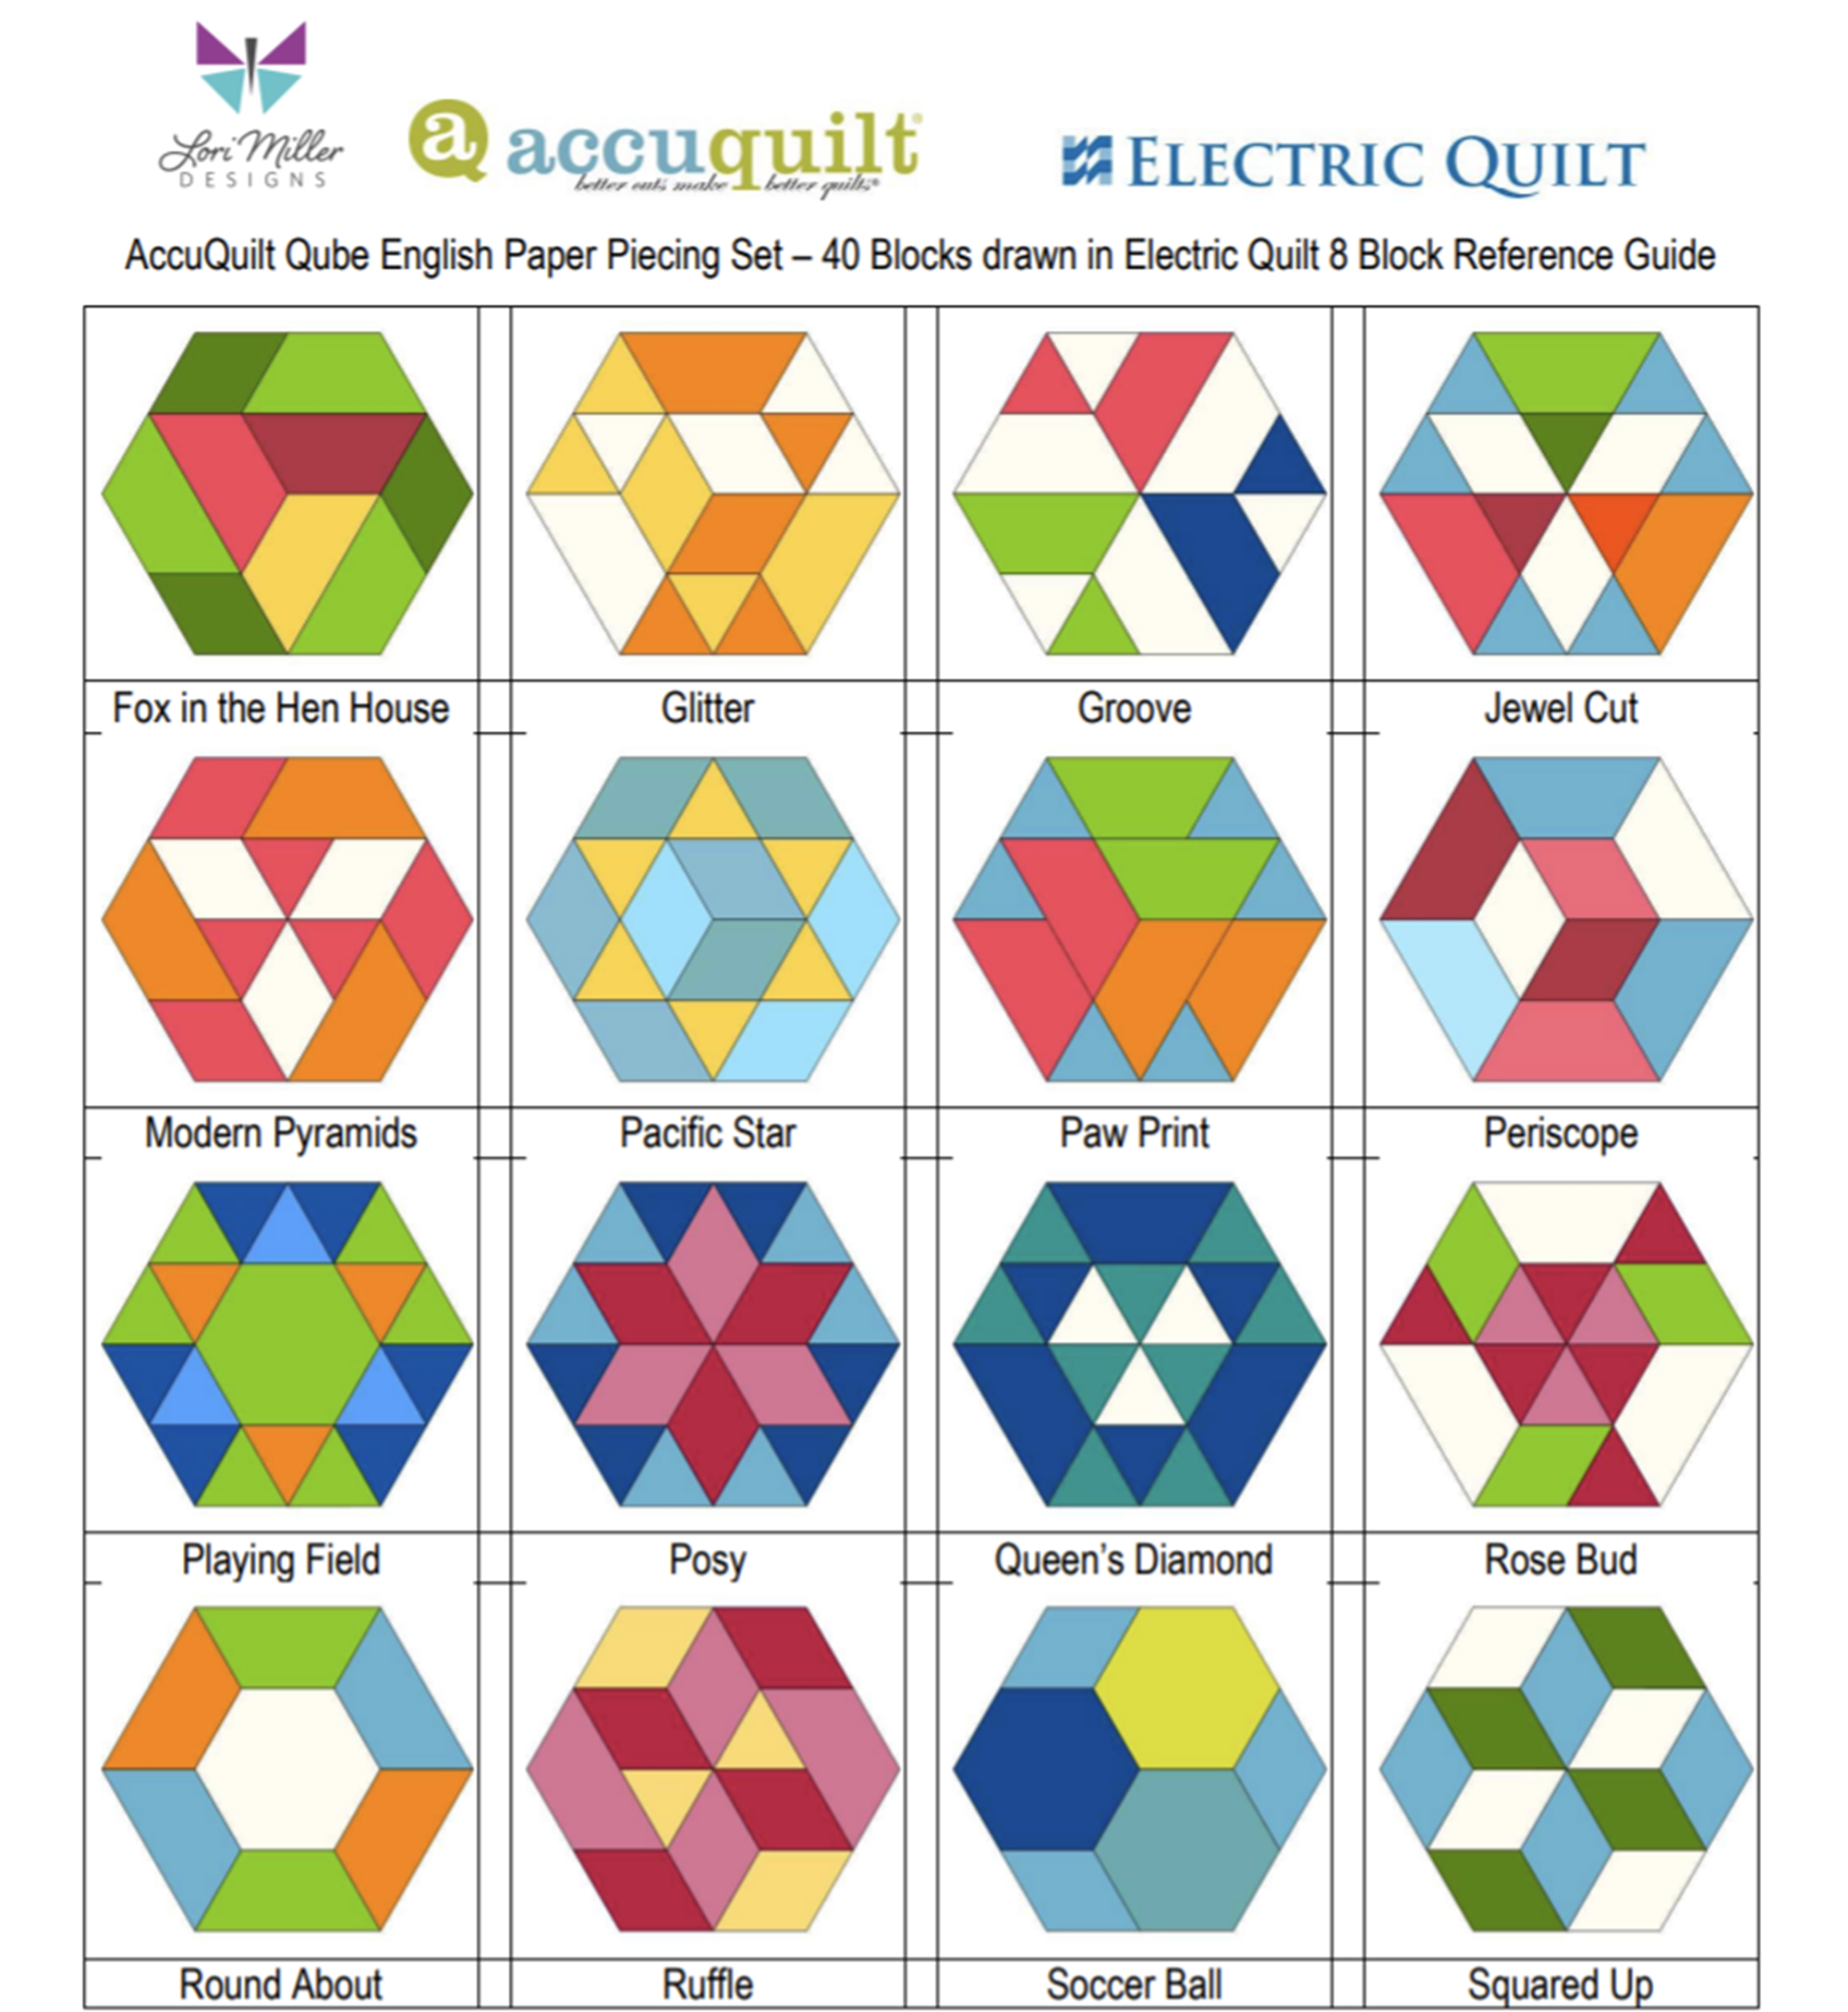
Introducing my latest Add-on EQ8 Block Library file, AccuQuilt Qube English Paper Piecing. Included are 40 Pieced Hexagon blocks to load into EQ8 Quilt design software.
Add-on EQ8 Block Libraries and AccuQuilt are a genius combination!
Convenient, predrawn pieced blocks
Visual reference of 40 unique block designs
Design in EQ8 quickly, Cut out with speed and accuracy with your AccuQuilt GO!
Download and installation instructions included
Bonus FREE EQ8 layout lessons
EQ8 is Quilt Design Software by The Electric Quilt Company. I design my quilts in EQ8, I teach EQ8 and I use EQ8 in my original patterns. I love this design software!
These block designs work with the Accuquilt GO! Qube English Paper Piecing (EPP) (1″ Finished Sides) Die set. You can use the Die Shapes in the GO! Qube EPP to cut out these blocks. These pieced blocks finish with a 2″ side.
These EQ8 Block Library files are downloadable digital files that are designed to work with your EQ8 Quilt Design Software. They are only compatible with EQ8. Once you place the block file in your library, you will be able to use it immediately to draw and design quilts.
Required: A running copy of EQ8 Quilt Design Software.
40 Pieced Hexagon Blocks!
I have included the 36 Pieced Hexagon Blocks included in the GO! Qube English Paper Piecing Brochure plus 4 bonus blocks. These pieced blocks finish as a hexagon shape with 2″ finished sides.
These blocks are Pieced Hexagon EPP Blocks that can be cut out with your Qube English Paper Piecing die set.
Designing with the EQ8 Block library lets you play with fabrics and colors using these shapes to design and tailor your own beautiful quilt to your unique style.
Complete Instructions including EQ8 Hexagon Quilt layout design lessons!
Each set of library blocks comes with a complete set of Instructions, a Visual Block Reference Guide and four EQ8 Hexagon Quilt layout design lessons.
AccuQuilt provides detailed sewing instructions to piece the 36 pieced blocks on their website, a link is provided in the Instruction document.
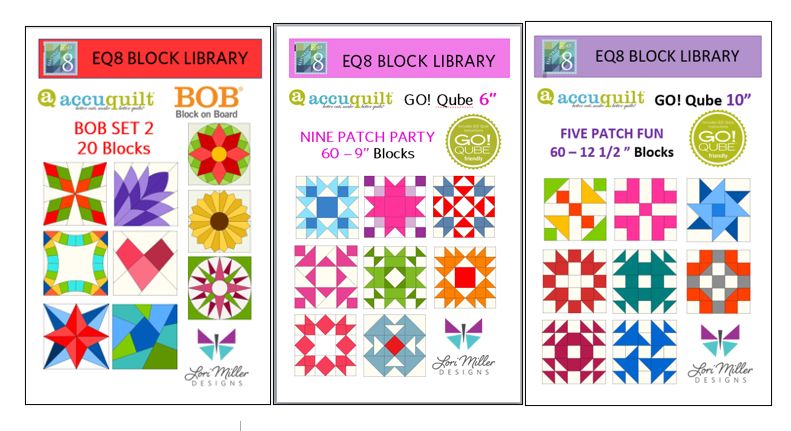
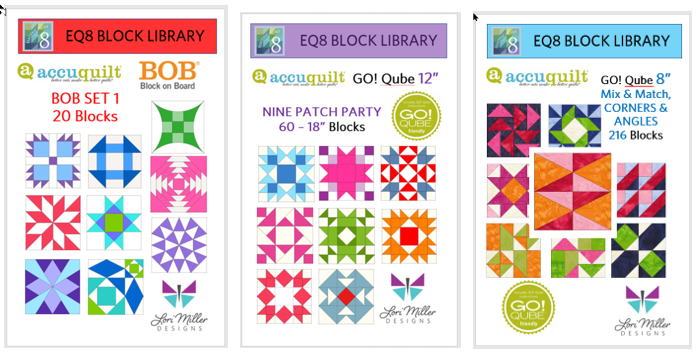
I have Add-on EQ8 Block Libraries for the Accuquilt Qube original 216 Four Patch designs, Nine Patch Party, Five Patch Fun, Sweet Sixteen and three sets of BOB libraries.
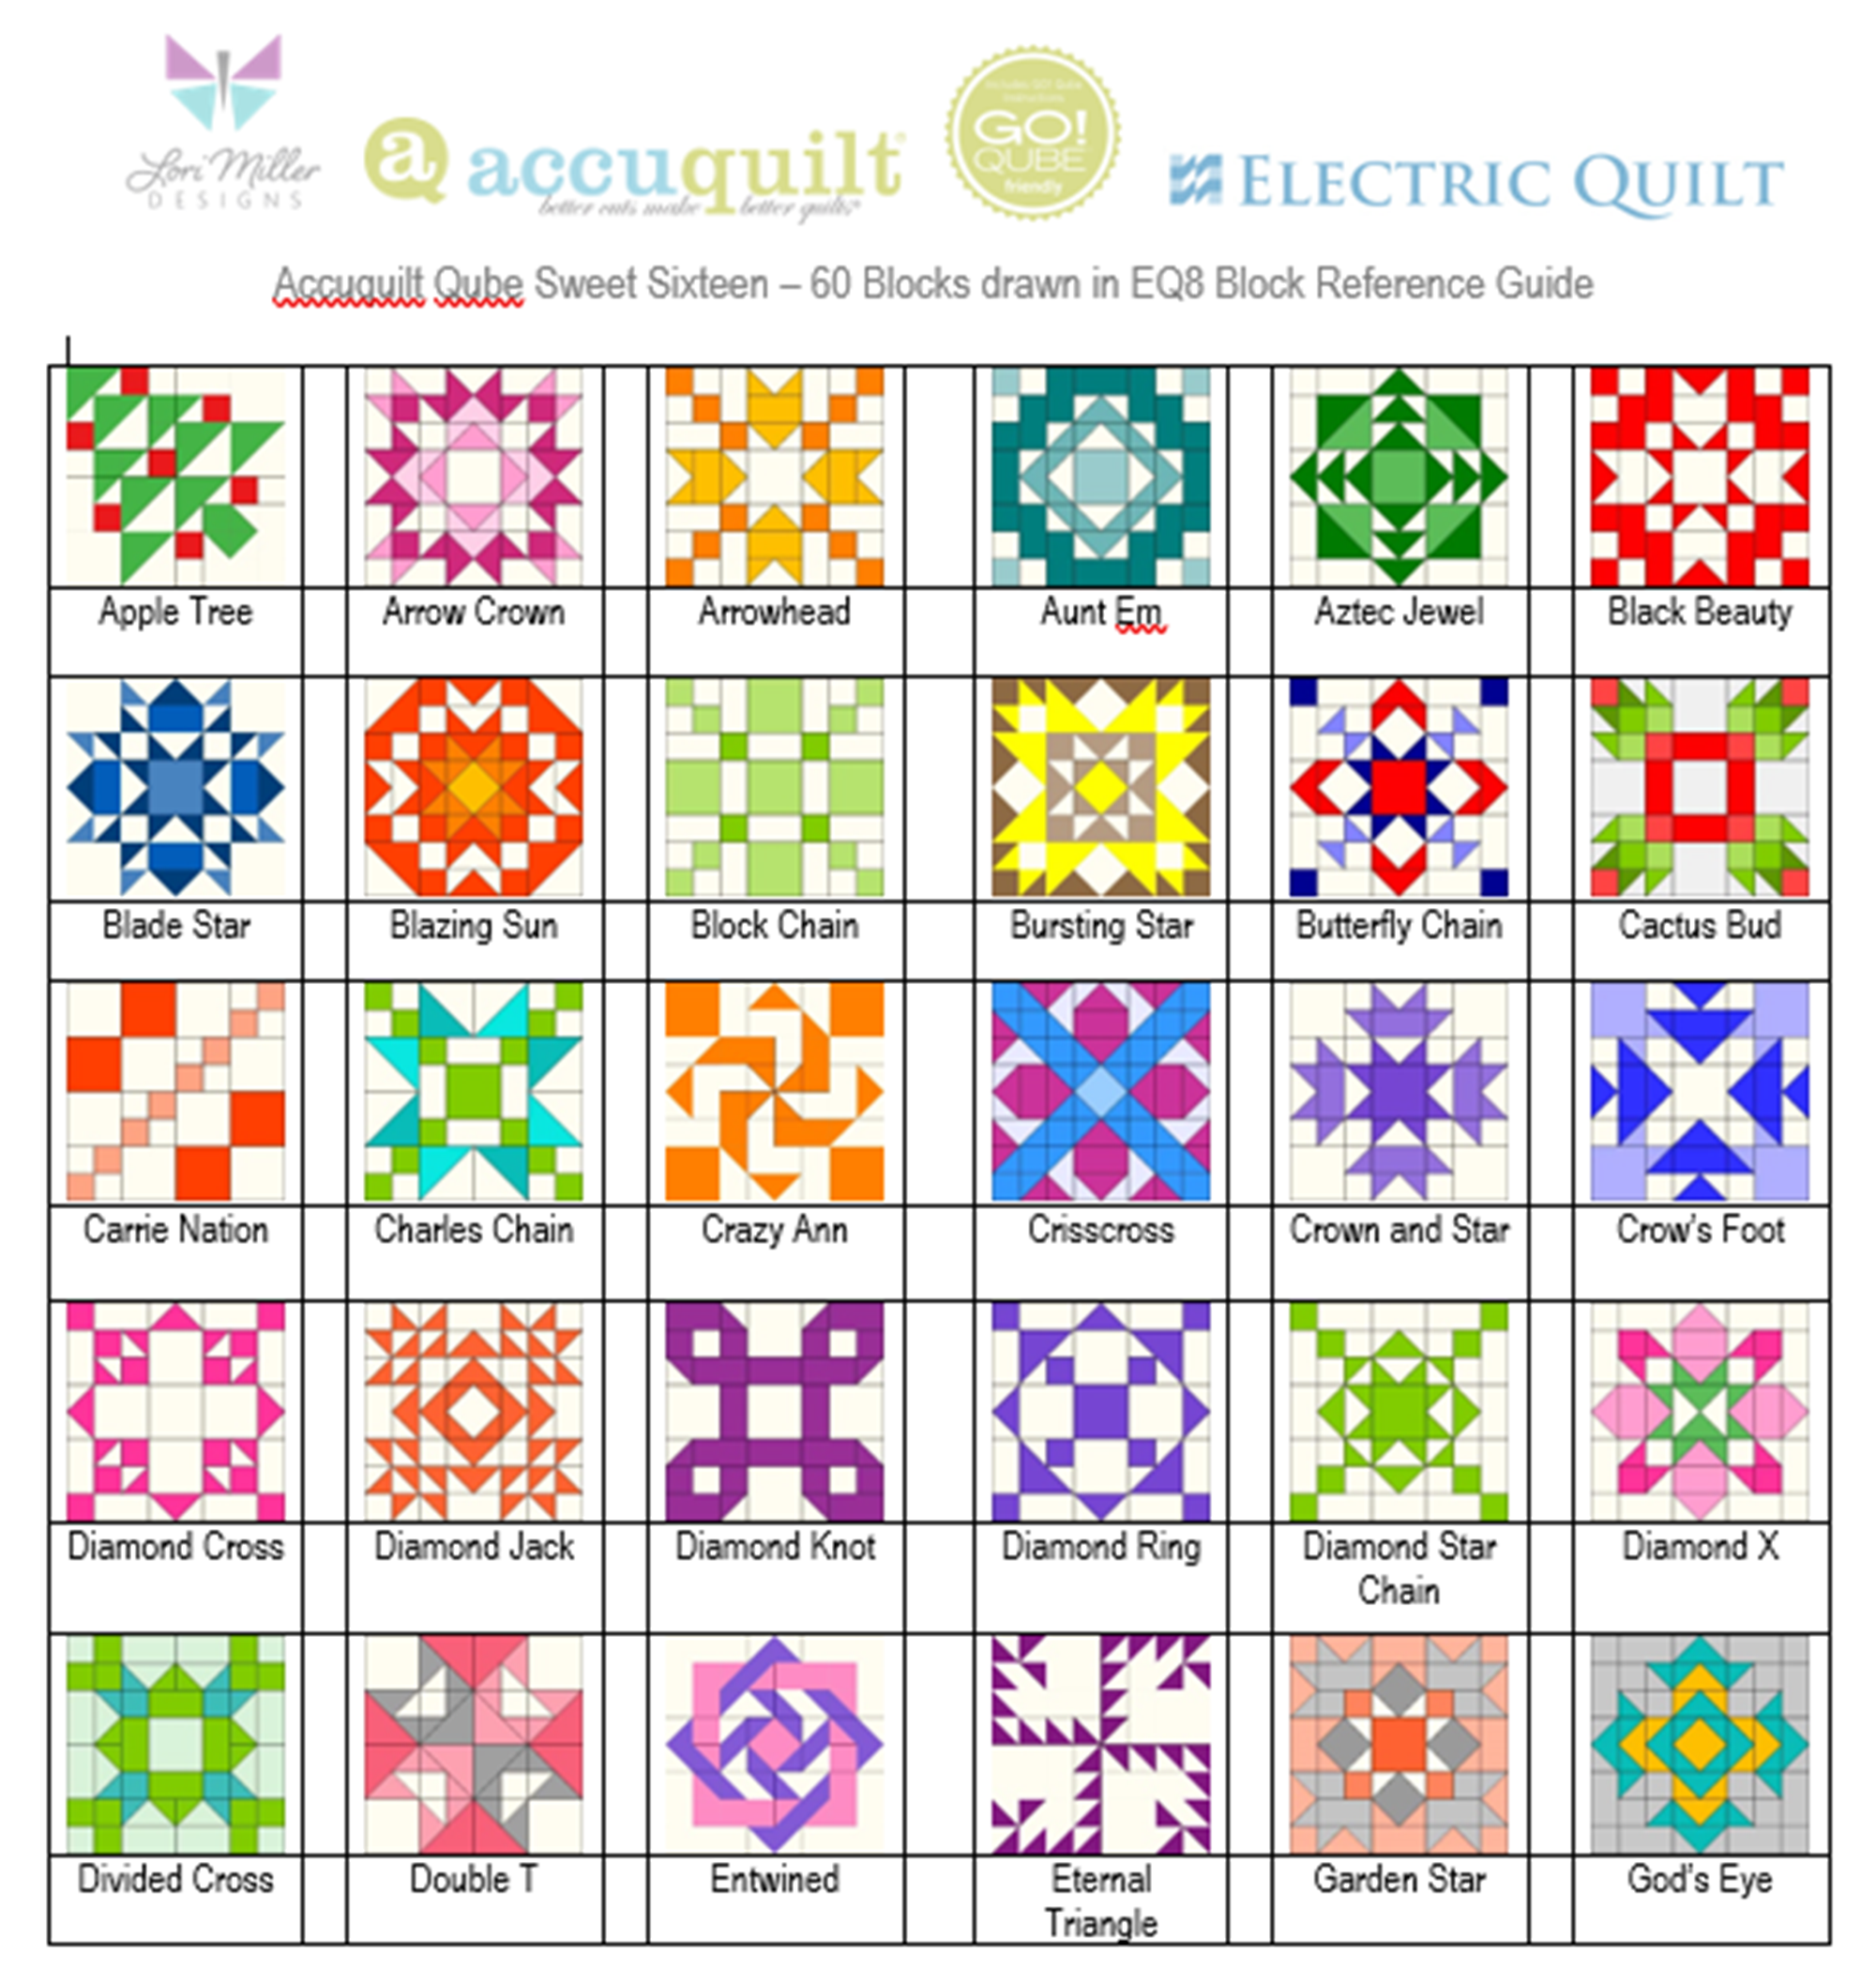
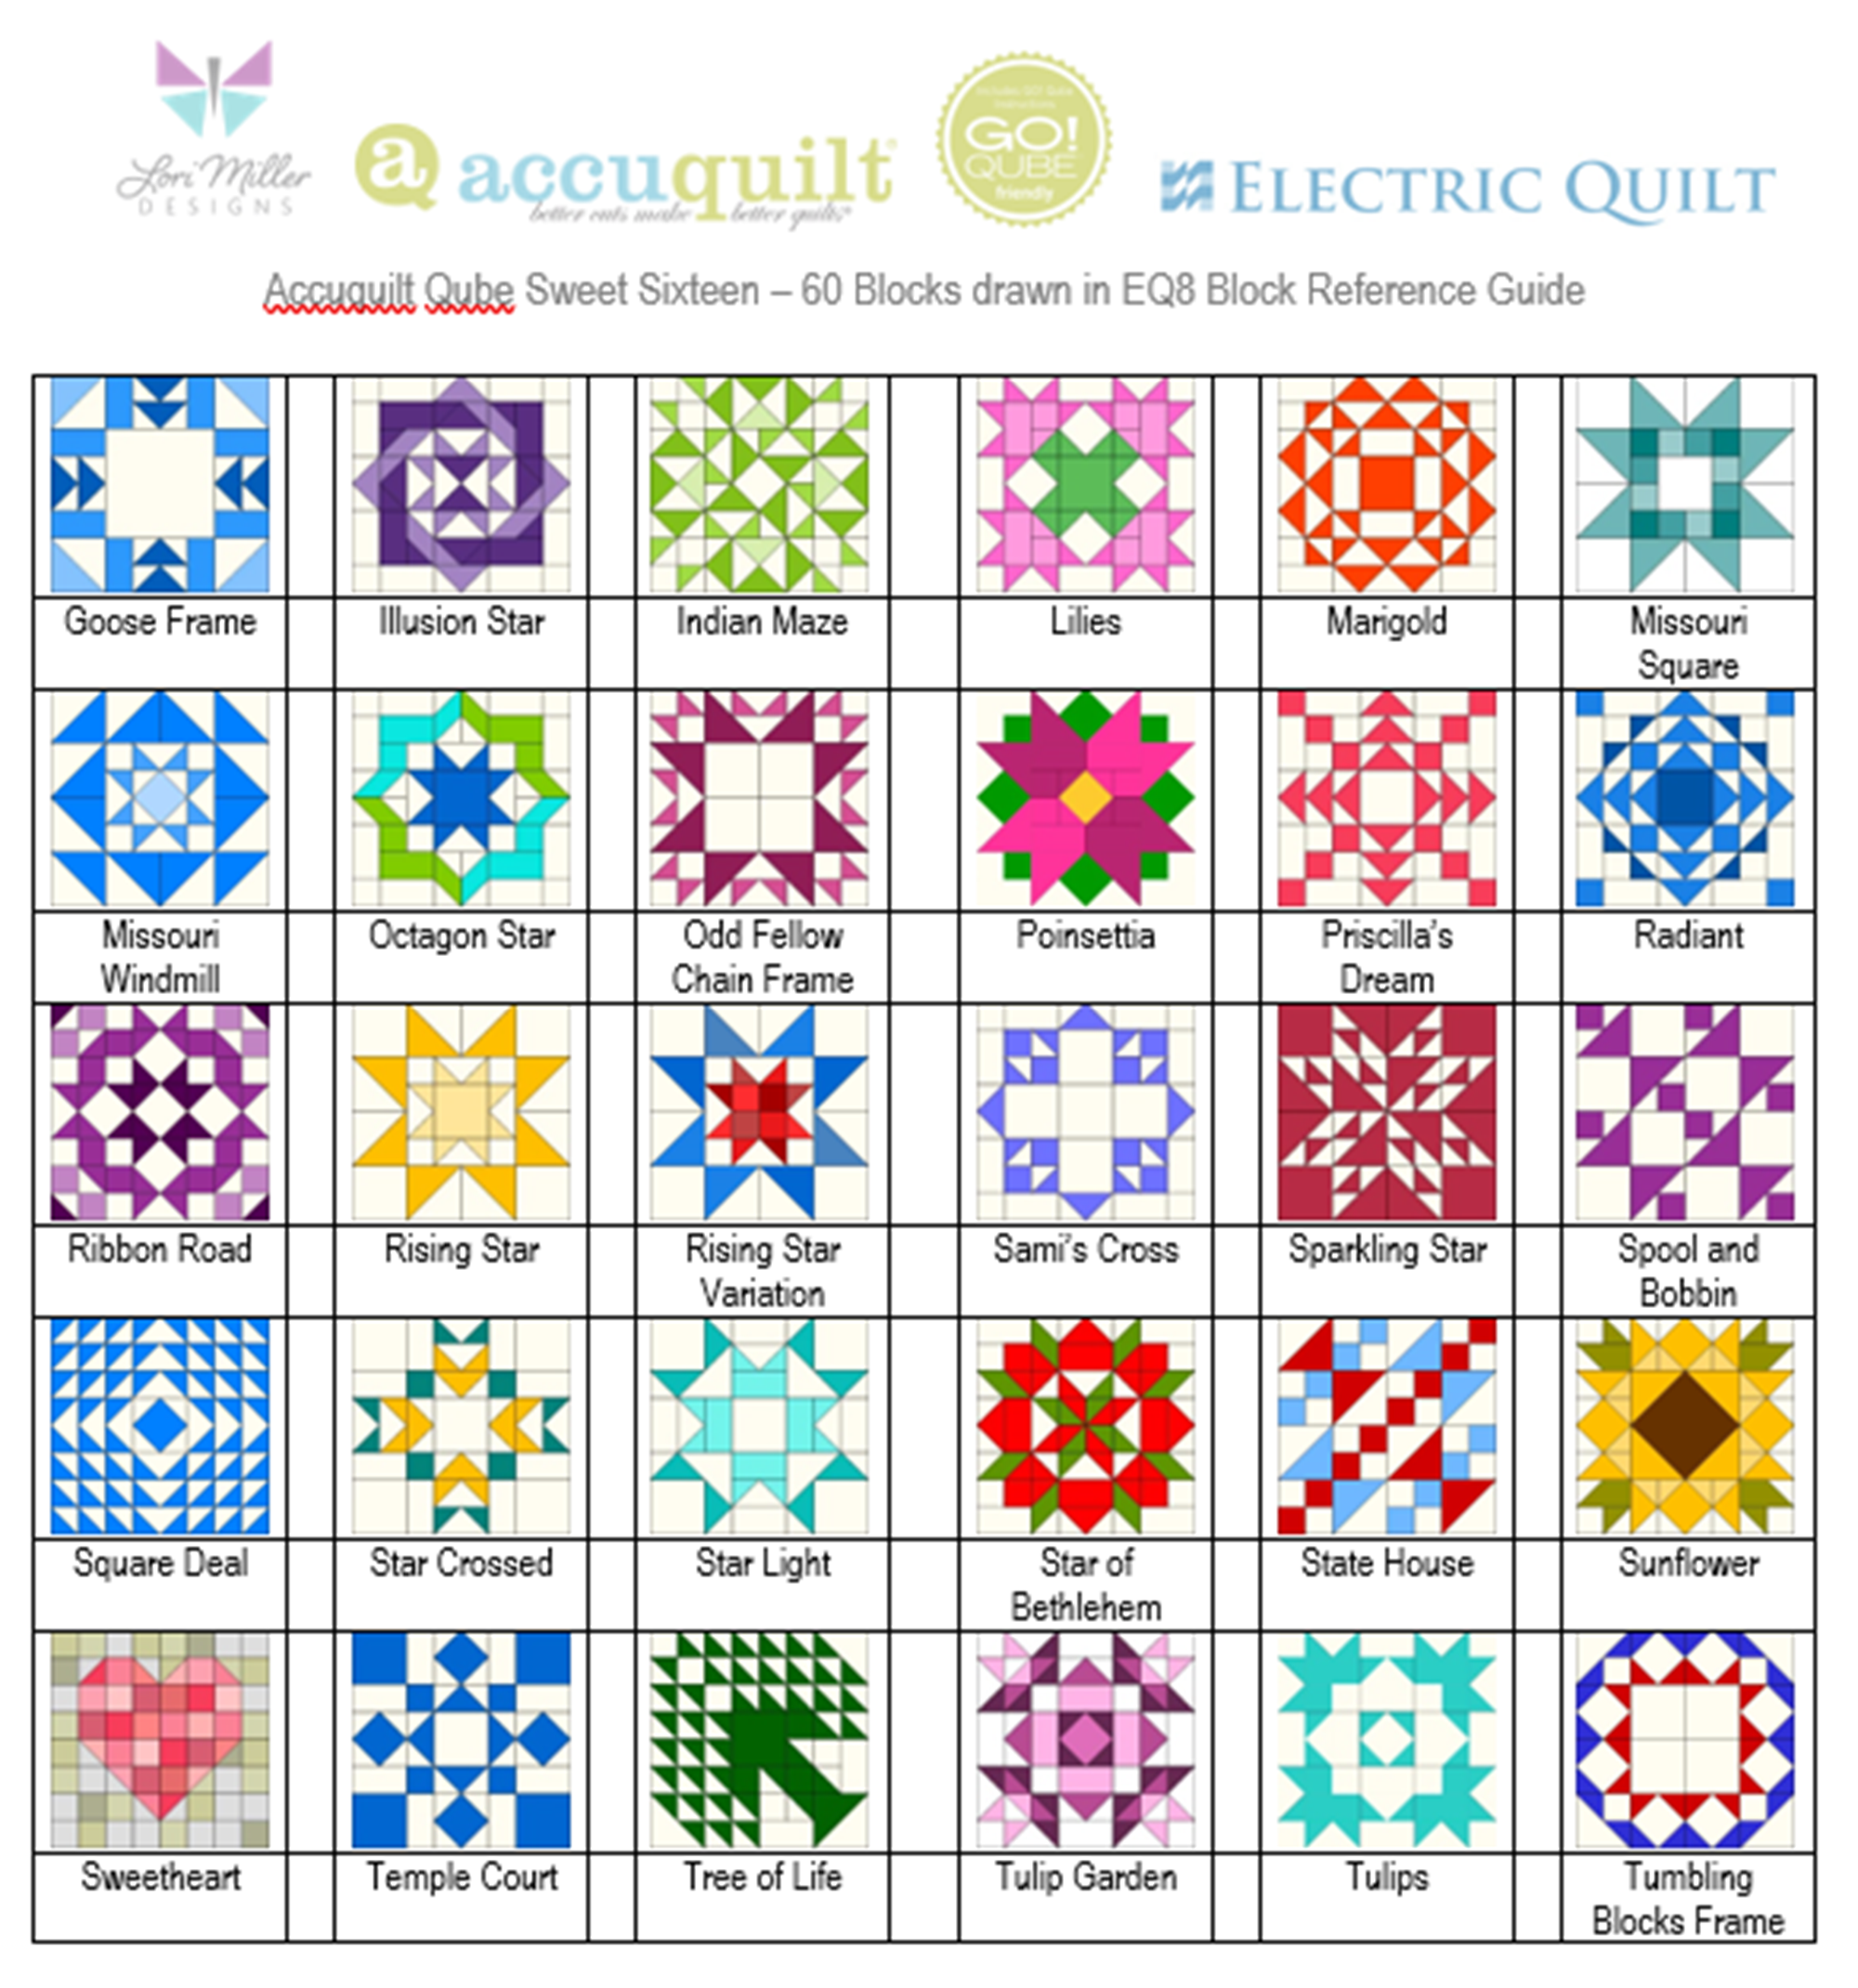
Introducing my newest Add-on EQ8 Block Library file, Sweet Sixteen! I am excited to offer the next set of digital EQ8 Block Library files for the AccuQuilt Qubes. These files include 60 gorgeous Sixteen patch Patch variation block designs that you can load into EQ8 Quilt design software.
EQ8 is Quilt Design Software by The Electric Quilt Company. I design my quilts in EQ8, I teach EQ8 and I use EQ8 in my original patterns. I love this design software! It is so versatile and let’s you design your own beautiful quilts with any block design.
These block designs work with the AccuQuilt GO! Qube Mix & Match Block die sets. You can use the Die Shapes in the GO! Qubes to cut out these blocks.
These EQ8 Block Library files are downloadable digital files that are designed to work with your EQ8 Quilt Design Software. They are only compatible with EQ8. Once you place the block file in your library, you will be able to use it immediately to draw and design quilts.
Required: A running copy of EQ8 Quilt Design Software.
60 Beautiful Sixteen Patch Blocks!
I have included 60 Sweet Sixteen Block designs with brand new, traditional and even familiar blocks. There are so many design possibilities in EQ8.
These blocks are Sixteen Patch Blocks that can be cut out with your Go! Qube Mix & Match Set, no companion dies are needed.
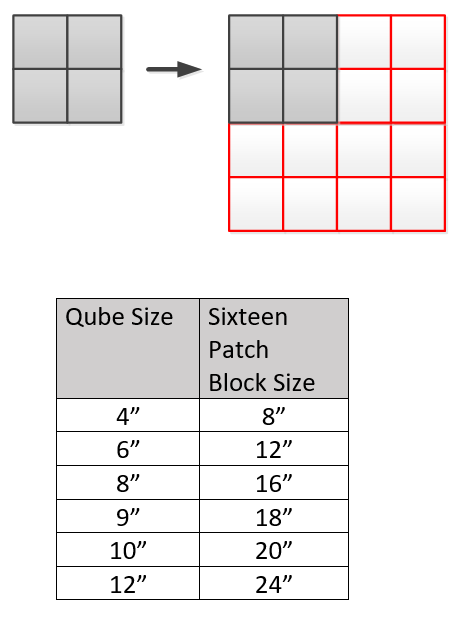
Since the Sixteen Patch design is based upon a 8 x 8 grid, your finished block sizes will finish larger as indicated in the chart below.
The Sweet Sixteen block files are available for all Qube sizes. You only need one size of EQ8 Qube files as EQ8 will let you resize the blocks.
Complete Instructions including Die Cutting Guide!
Each set of library blocks comes with a complete set of Instructions, a Block Reference Guide and a Die Cutting Guide.
The Die Cutting Guide provides pictures of the Sweet Sixteen blocks and which shapes are needed from the Qube to cut out that block similar to the picture above.
Please note: If you have more than one size of Qube, you only need one size of library. Once you have the EQ8 Library for AccuQuilt installed into EQ8, you can easily resize to your other size Qubes as it will scale properly. You can certainly purchase other sizes for convenience, but it is not necessary.
If you like designing and making your own quilts with EQ8 and AccuQuilt, check out some of my other products.
Find GO! Friendly patterns and more Add-on EQ8 Block Libraries including the original 216 Four Patch Mix & Match designs, Nine Patch Party, Five Patch Fun, Sweet Sixteen, English Paper Piecing and four sets of BOB libraries.
Hello Friends! I have a new pattern available called Bundle Up Holiday Coasters. Featuring four mix and match designs, these super cute little guys are the perfect last minute homemade gift. All of the designs are centered around my Bundle Up for Winter theme, a mitten, stocking, Knit Cap and Turtleneck with Sweater Vest.
This pattern started out with the Mini Mitten which was published by itself in Modern Patchwork Gifts back in 2016. It was so cute, I had to add a few more coaster designs to create a collection.
Want to add a little pizazz to your coasters? Try fussy cutting and piecing the sweater vest with adorable prints like these. You can go crazy creating these. For these coasters, I quilted by using straight stitch quilting on the diagonal with a walking foot about 1/4″ apart.
Need to whip up the coasters in a jiffy, go for the simple stocking and just a 3 way color scheme. Those polkadots are just too cheery. Again I am straight line quilting with a walking foot, this time straight up and down.
These coasters don’t take much fabric either, you could easily make them with your holiday fabric scraps.
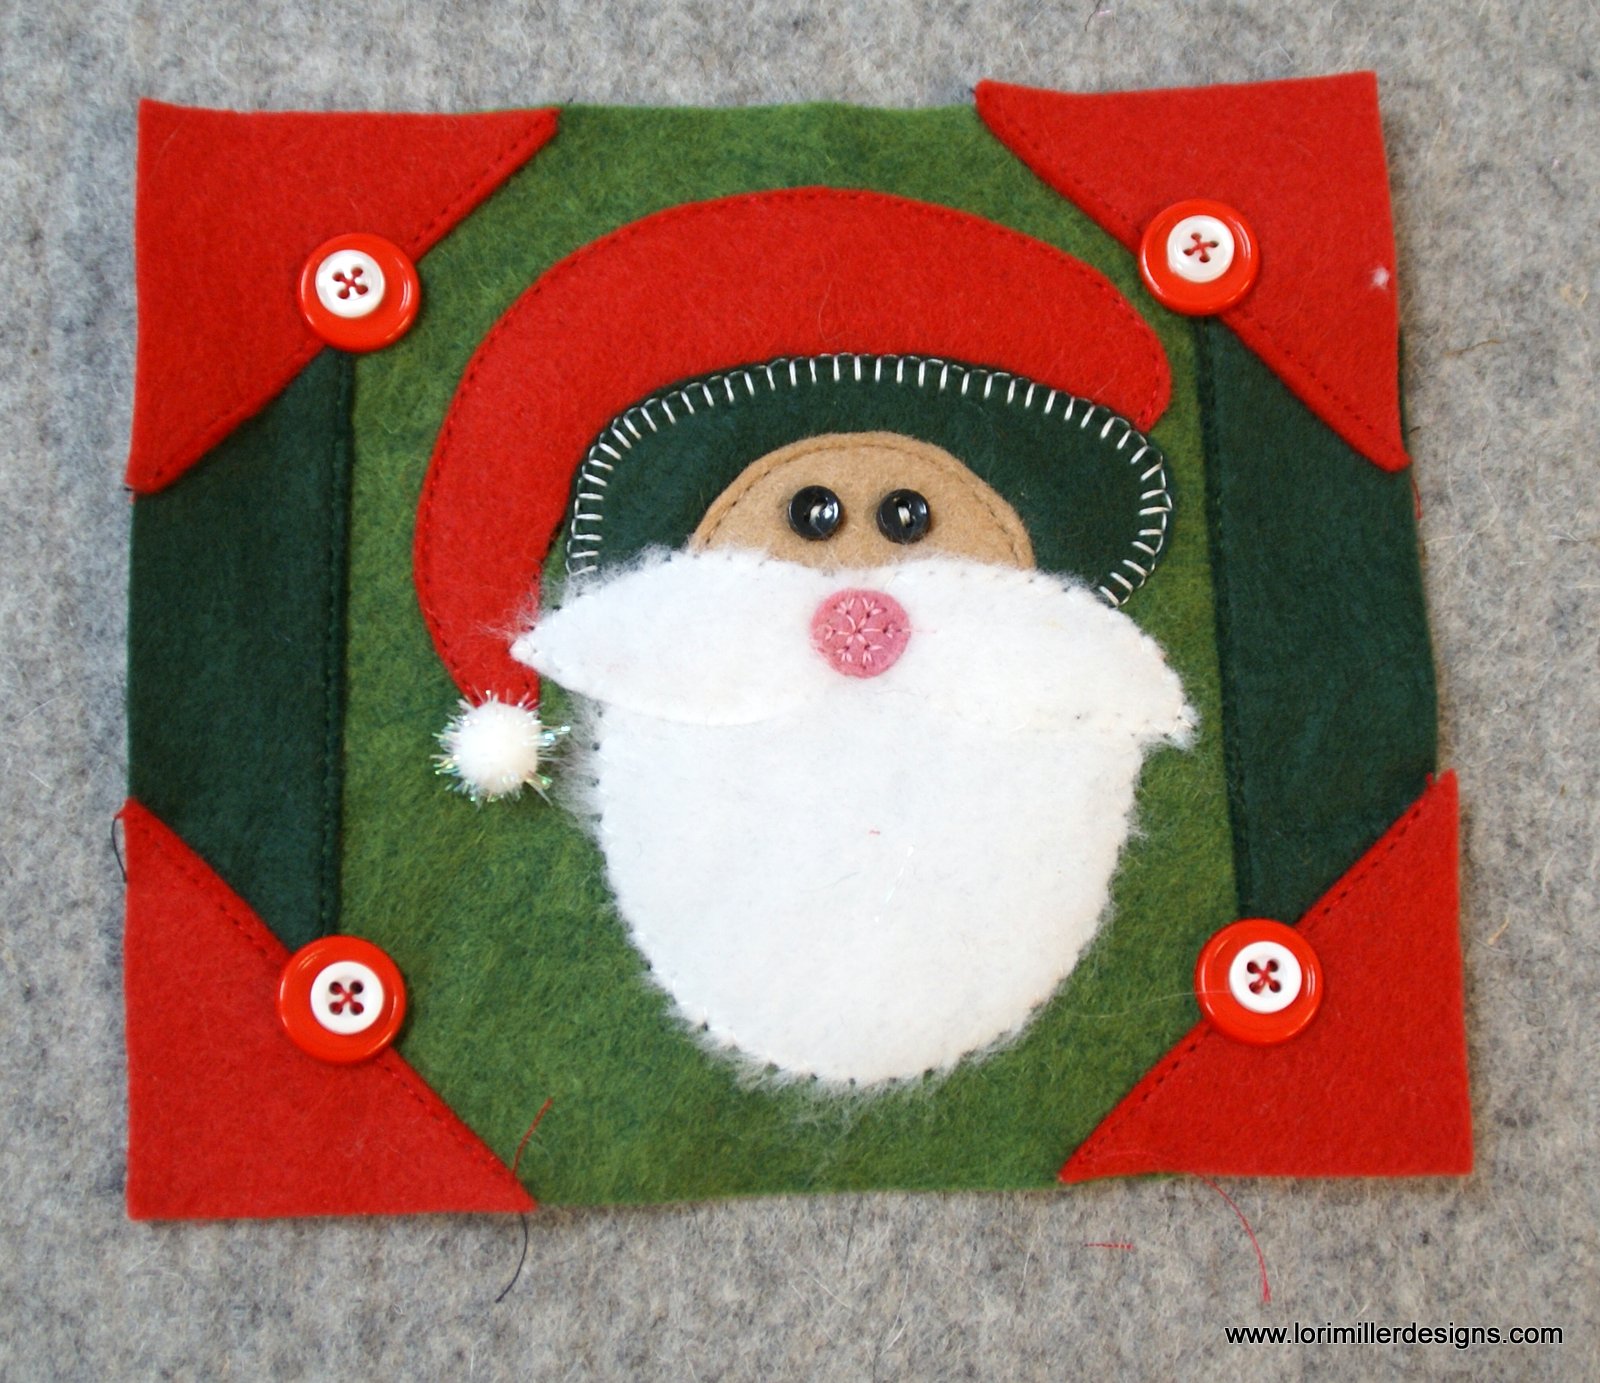
HO HO HO! Santa Claus is coming to town! This adorable Santa Baby Door Hanger is a festive way to celebrate the season. I am so proud to have it featured in Quilts & More Magazine. It is made with wool felt applique and embellishments. A great gift idea for friends and family too.
My Santa Baby Door Hanger is featured in the Winter 2022 issue of Better Homes & Gardens Quilts & More Magazine available now.
I designed this little project with my trusty EQ8 Quilt Design Software. I used it to create the little applique shapes and the background piecing. I love that you can add or remove a seam allowance around the applique shapes depending on the applique technique you are using.
The little guy really starts to take shape as you add embellishements like buttons, pom pom and the fuzzy wool felt I found for the beard and mustache.
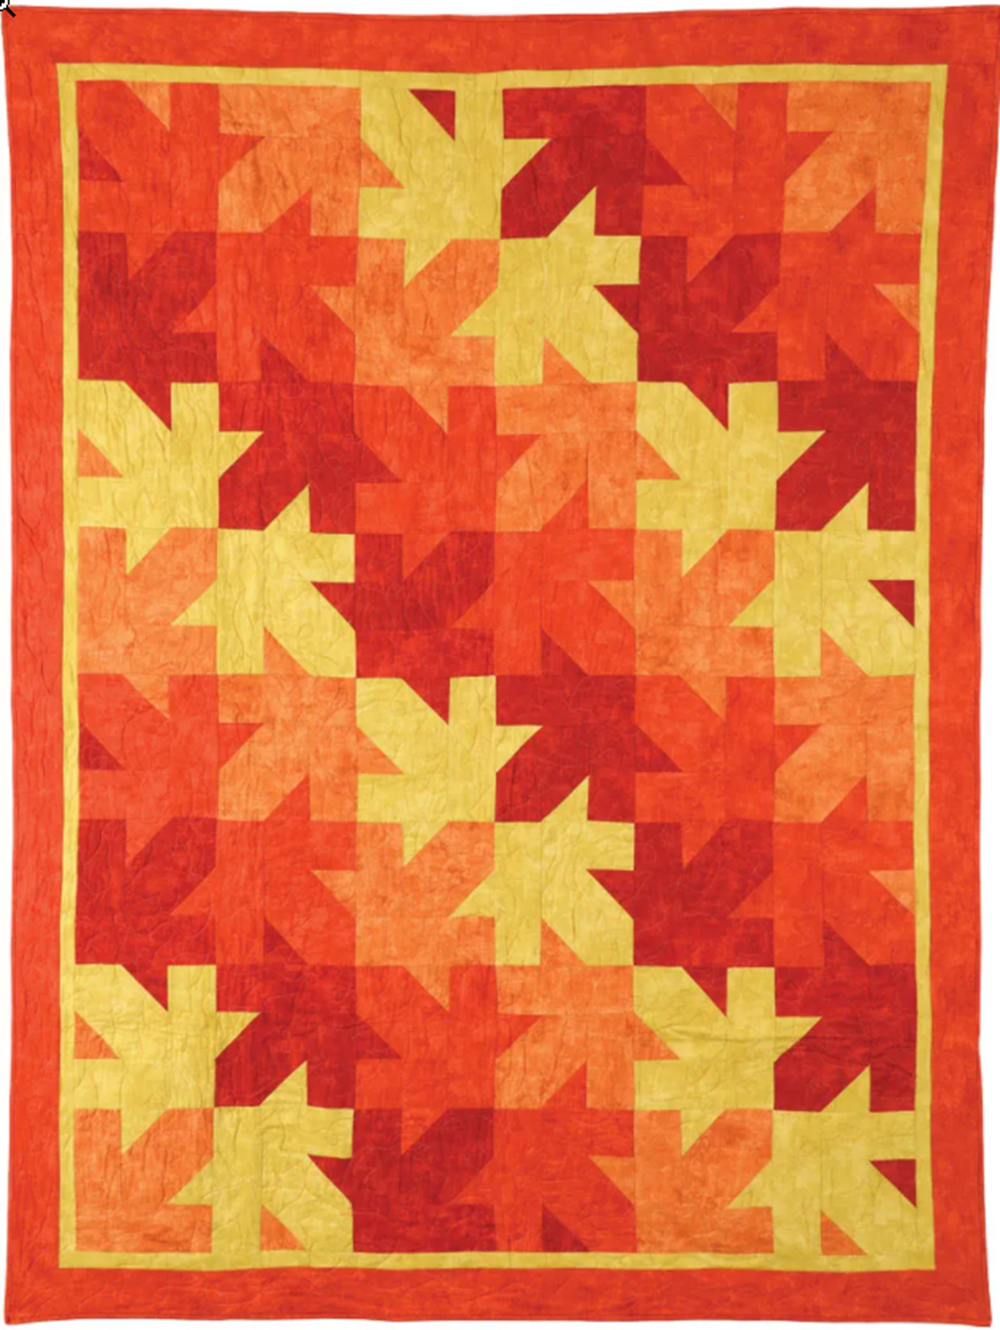
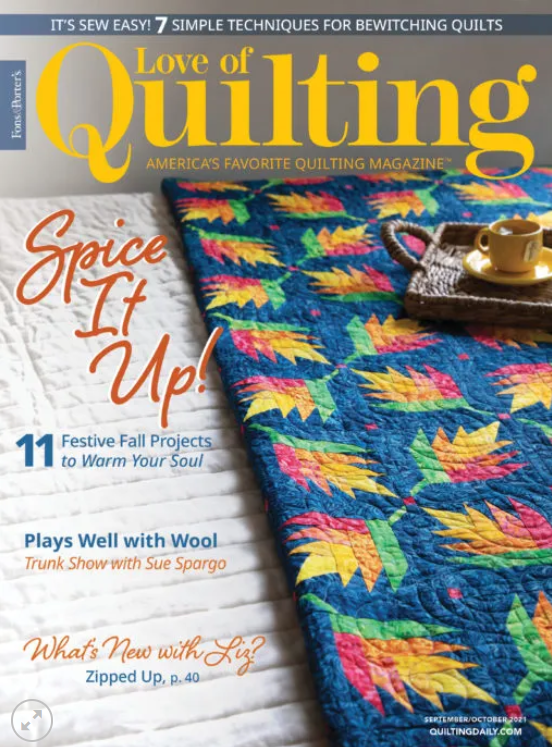
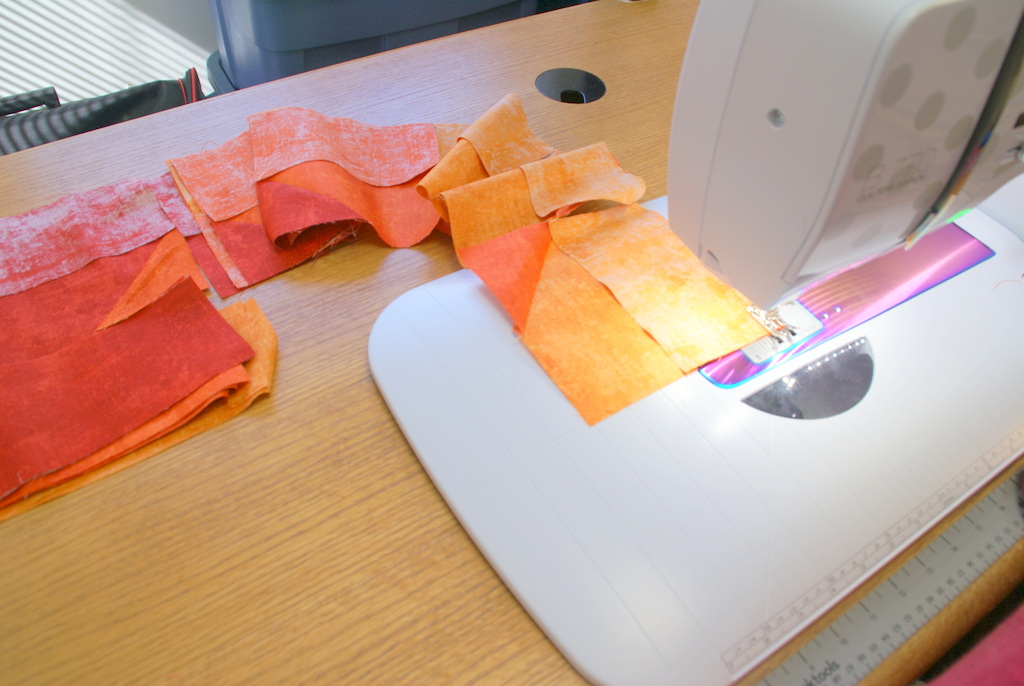
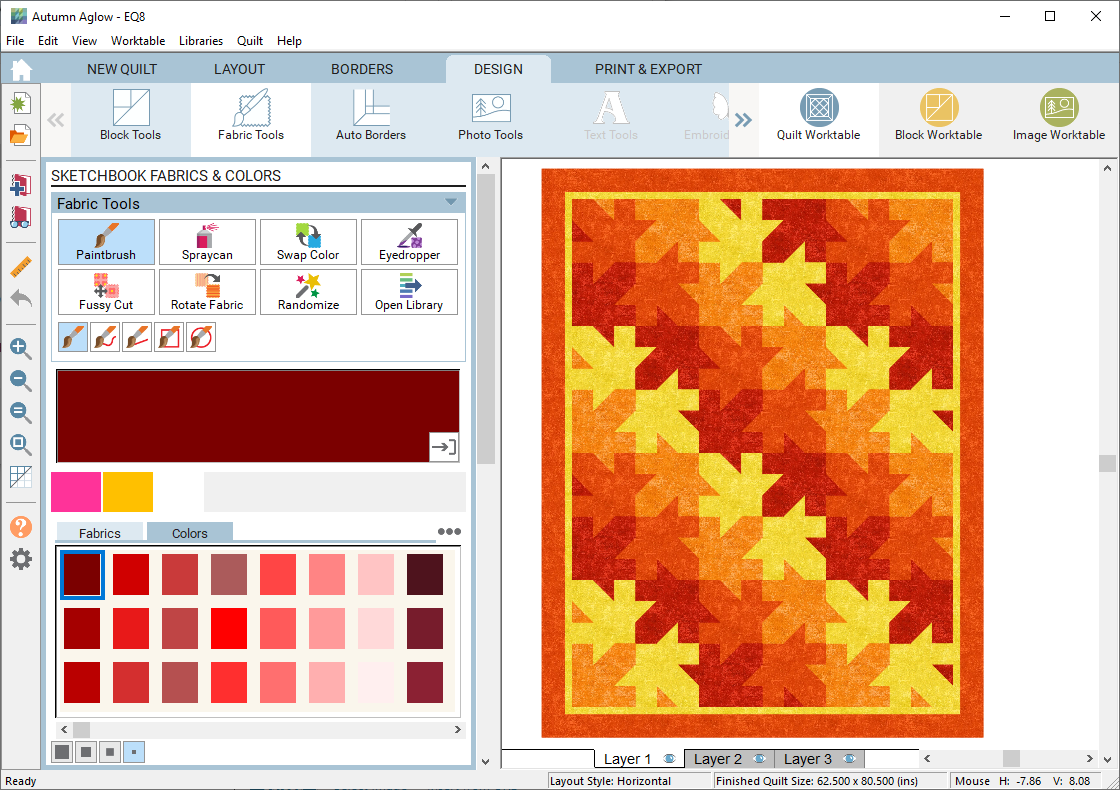
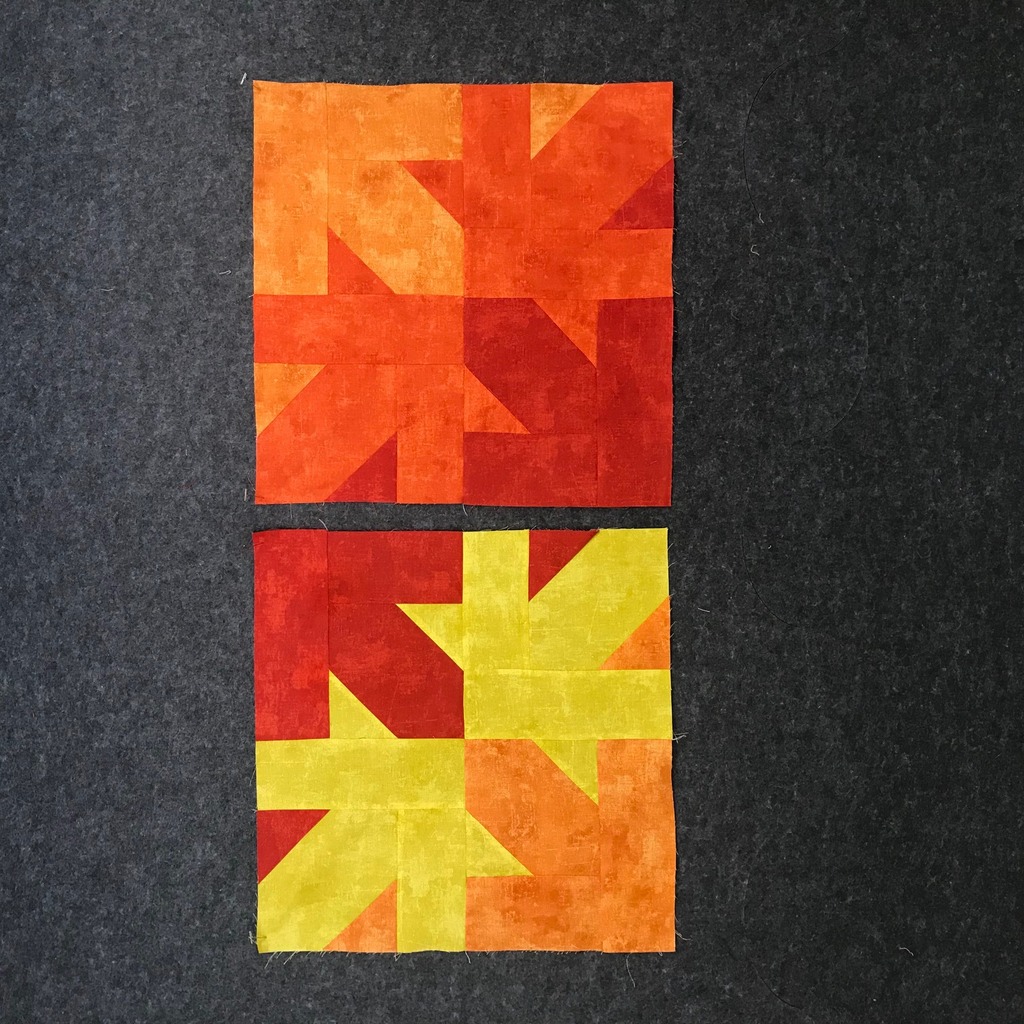
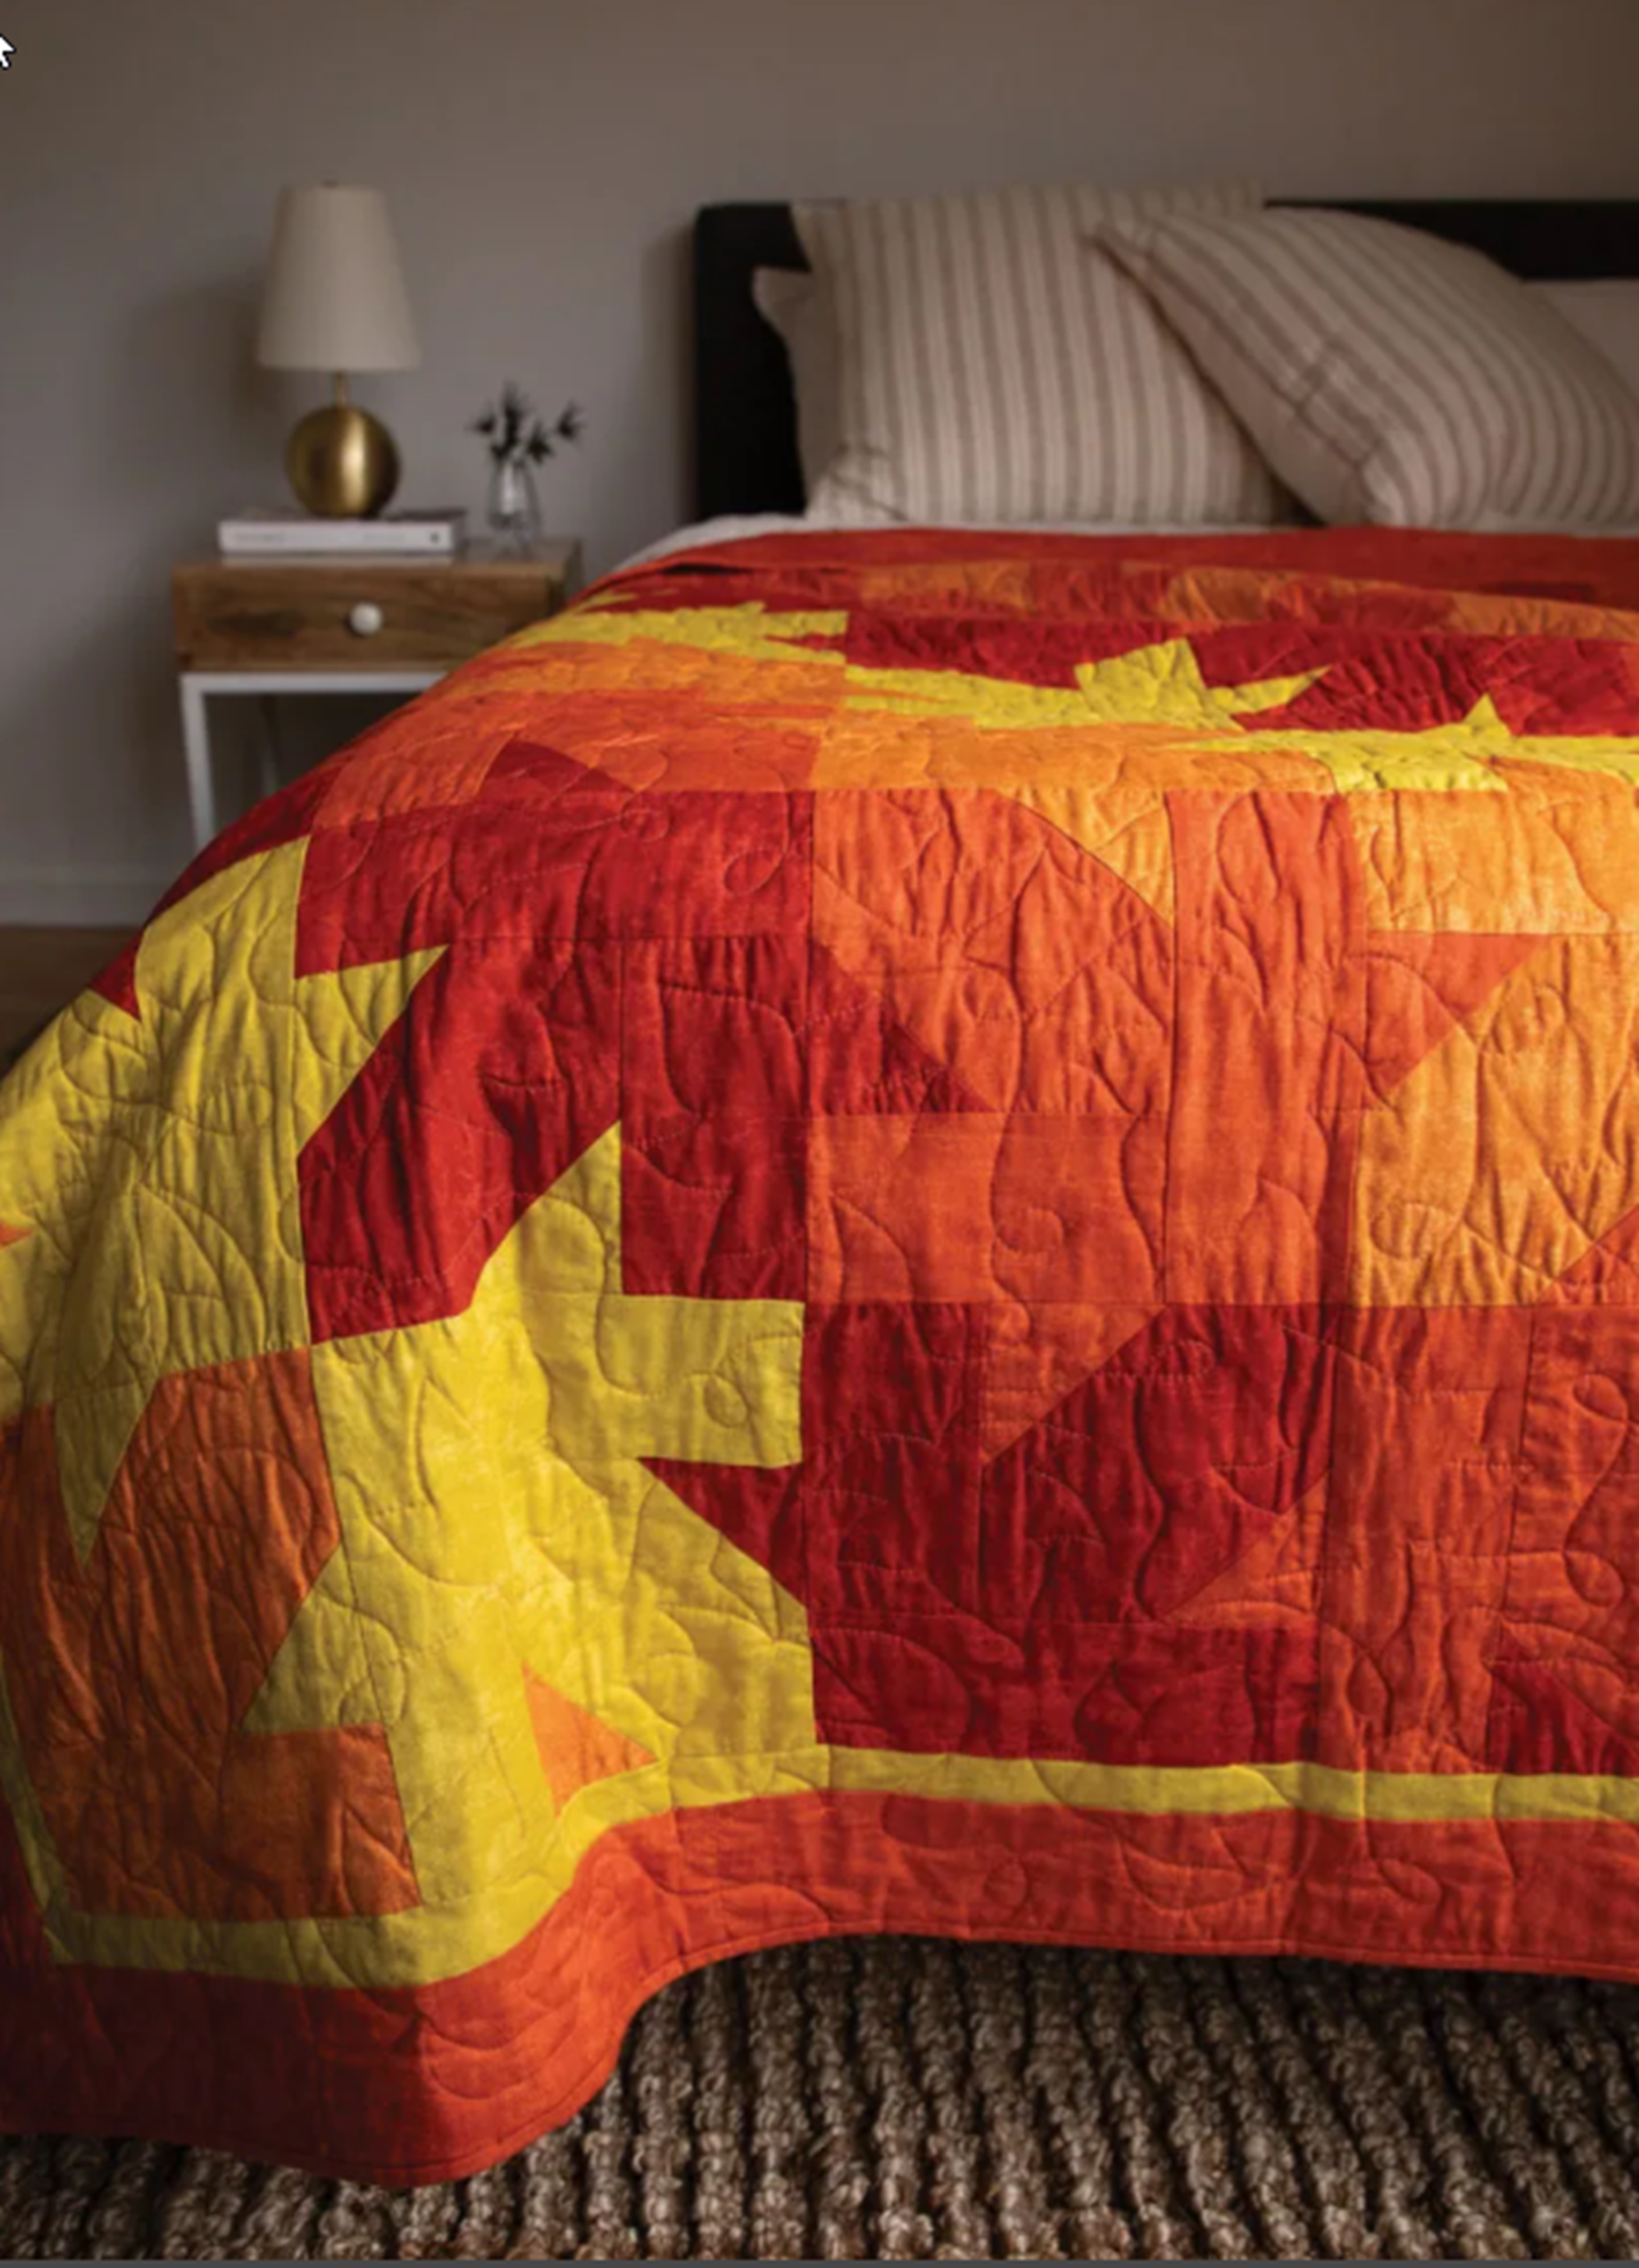
I think it is too early to think of fall, yet here I come with a colorful fall quilt call Autumn Aglow. This gorgeous quilt is reminiscent of falling leaves. The large block is simple to piece and when put together creates a unique tesselating quilt design. I love the cheery fall colors.
Featured in the September/ October 2021 issue of Fons and Porter’s Love of Quilting magazine, this issue is full of delightful fall, leafy projects… including my Autumn Aglow quilt.
I used blender cottons called Canvas by Deborah Edwards for Northcott. The blenders are perfect for creating the maple leaf pattern in the blocks.
I designed this quilt with EQ8 Quilt Design Software. It made it so easy to try different colors and draw up the blocks.
This quilt uses only four colors and you only make multiples of these two blocks for the design. Looks complicated but it is super easy.
Photo courtesy of Fons & Porter Love of Quilting Magazine, Quiltingdaily.com Copyright 2021
I used an allover edge to edge maple leaf design. The batting is Tuscany Cotton/Wool batting 80/20 generously provided by Hobbs. This is my favorite batting as the loft really shows off the quilting.
Pick up a copy of Fons & Porter’s Love of Quilting September/October issue for my pattern and more information.
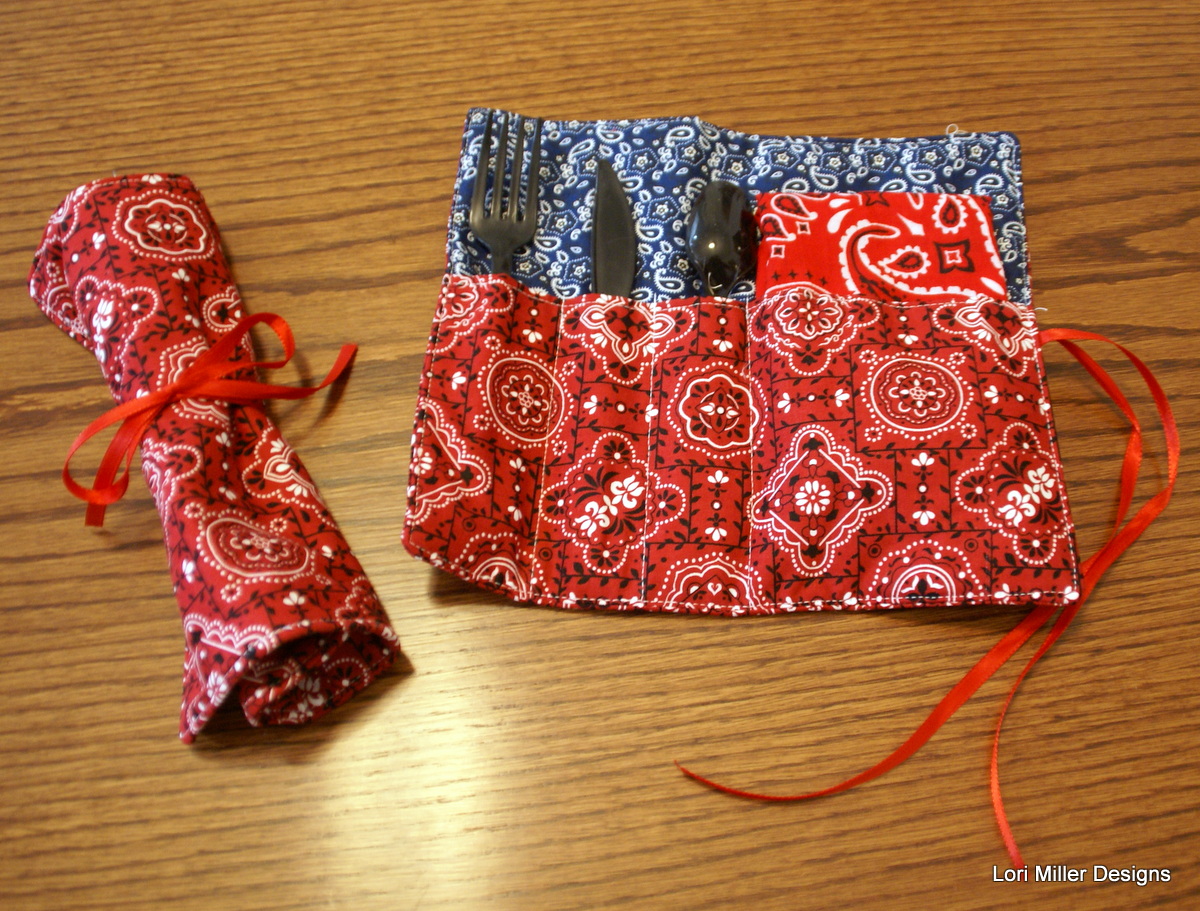
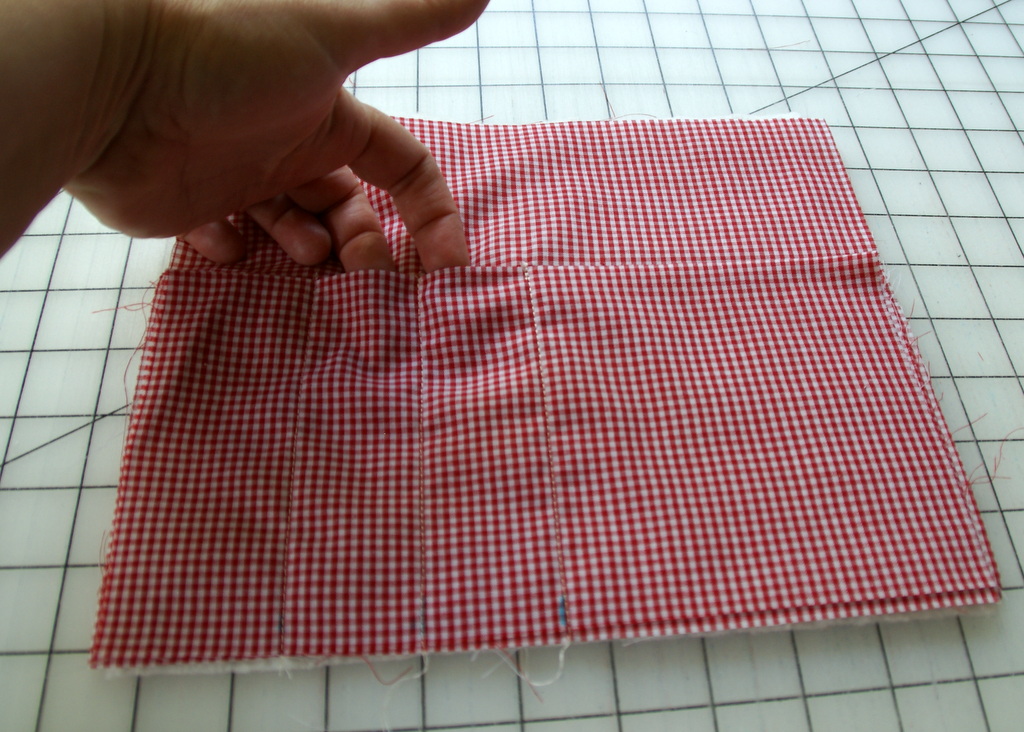
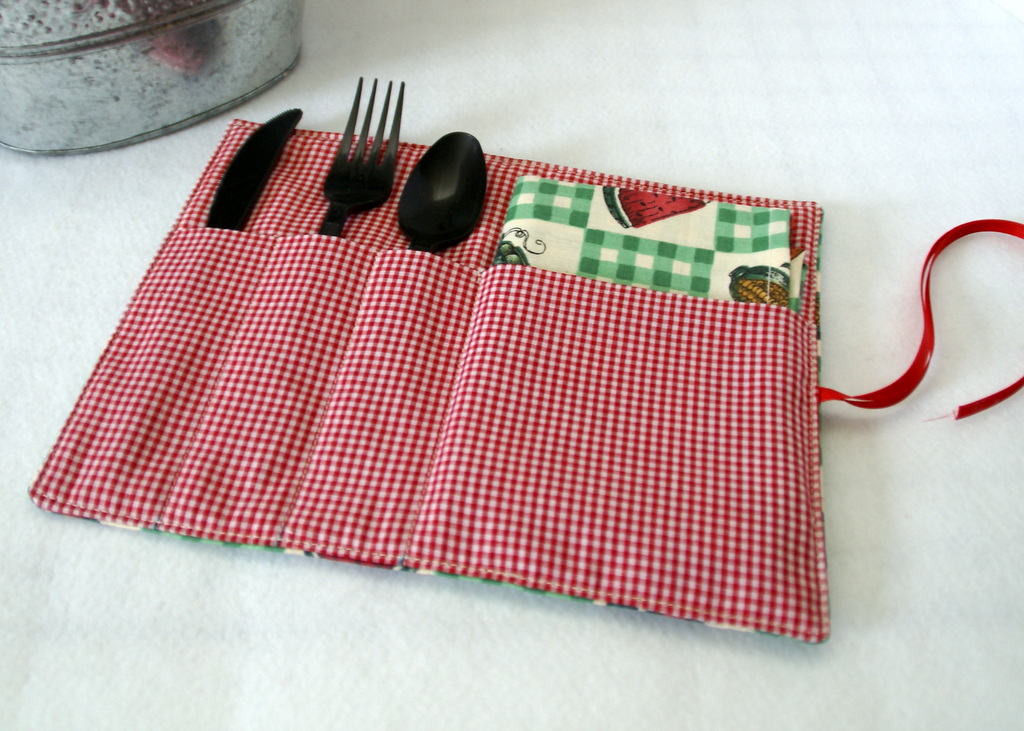
I first introduced these handy little silverware rolls back in 2015. They are such a great project that I have revisited the pattern and updated the design. They are still great for picnics, family reunions and bbq’s, or just throw them in the car when you grab some take out and go to the park.
They are sized perfectly to fit plastic or regular silverware and a napkin. Make one or tuck in a paper napkin, they all work well.
These stitch up so fast that you will want to make several and give some away. My quilt guild used to hold holiday potlucks and these made perfect gifts for my quilty friends for those dinners. I love that you can just wash them up, refill and use again and again.
Materials Needed:
This will make 4 silverware rolls.
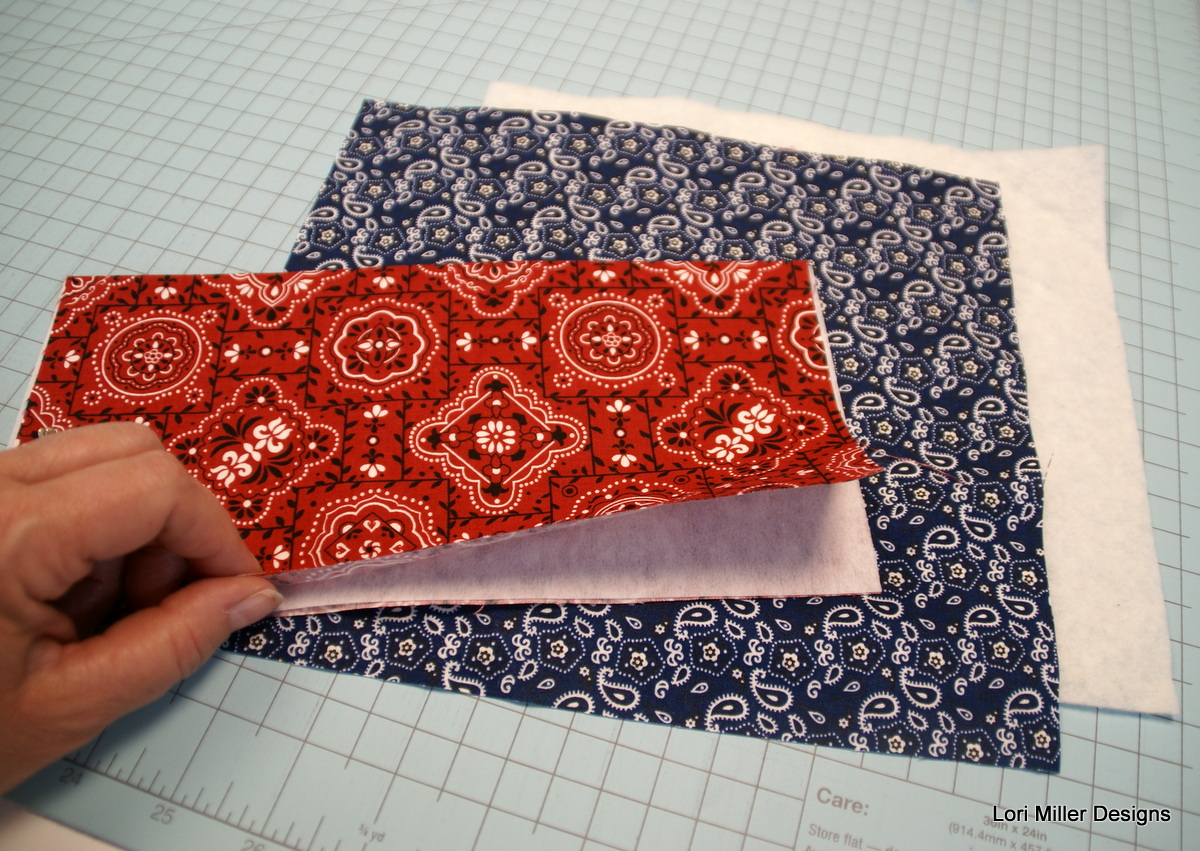
5/8 yd red print fabric for outside and pocket
3/8 yd blue print fabric for lining
3/8 yd of batting
1/4 yd Medium Weight iron-on interfacing
3-4 yards of coordinating ribbon
Coordinating thread
Directions:
Cut
For each silverware roll (Make 4)
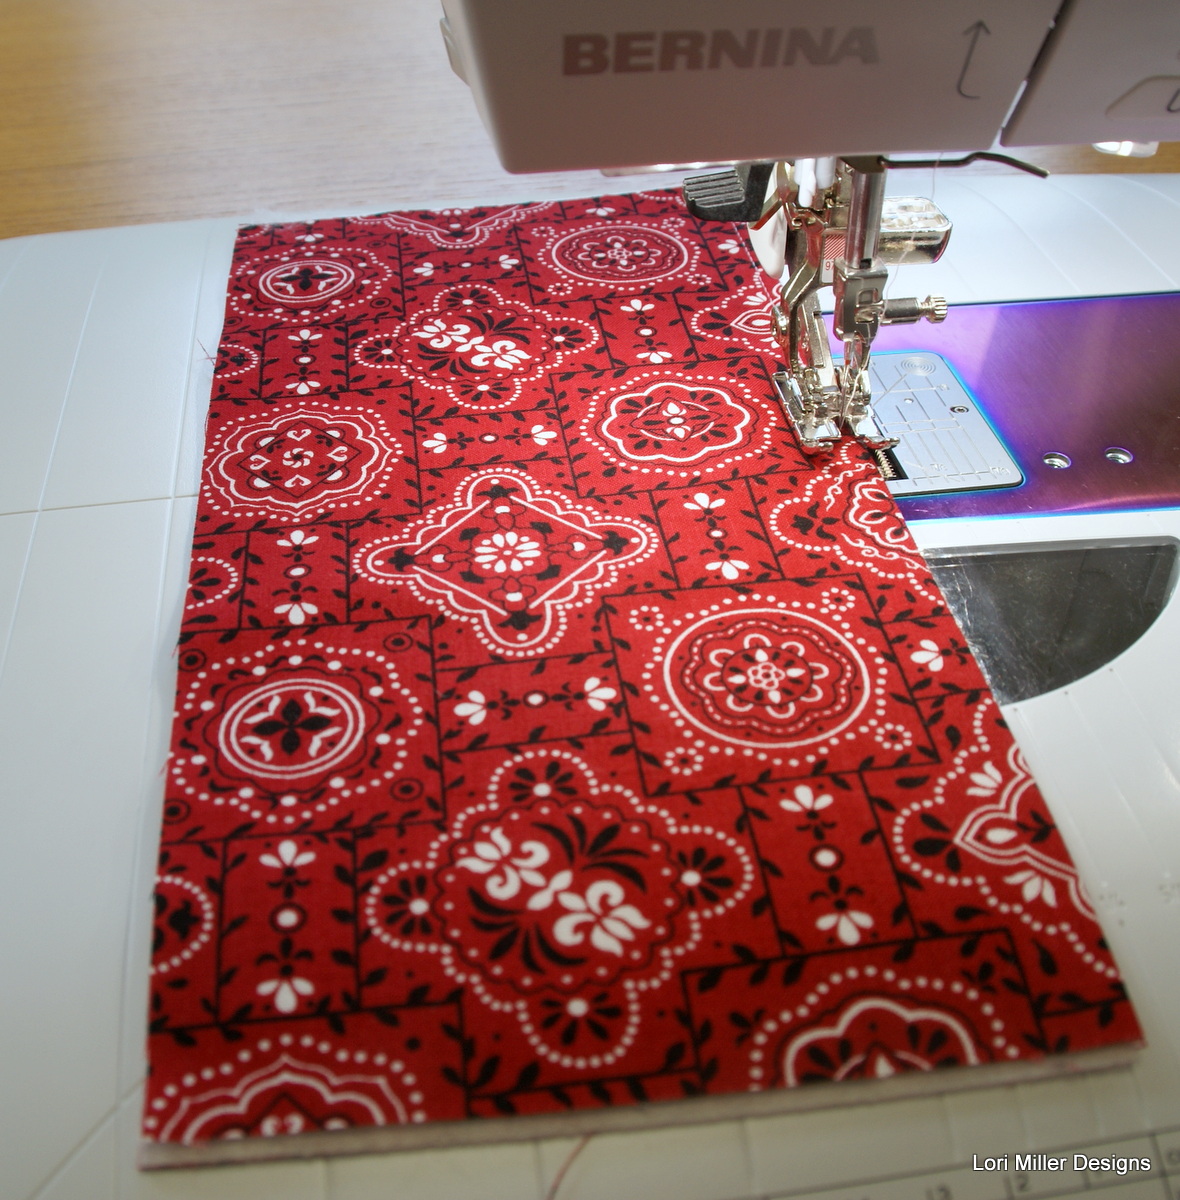
1 — 9″ x 10″ rectangle of red print fabric for outside
1 — 9″ x 10″ rectangle of batting
1 — 9″ x 10″ rectangle of blue print fabric for lining
1 — 10″ x 10″ rectangle of red print fabric for pocket
1 – 4 1/2″ x 10″ rectangle of interfacing
22″ of ribbon for the tie
Stitch
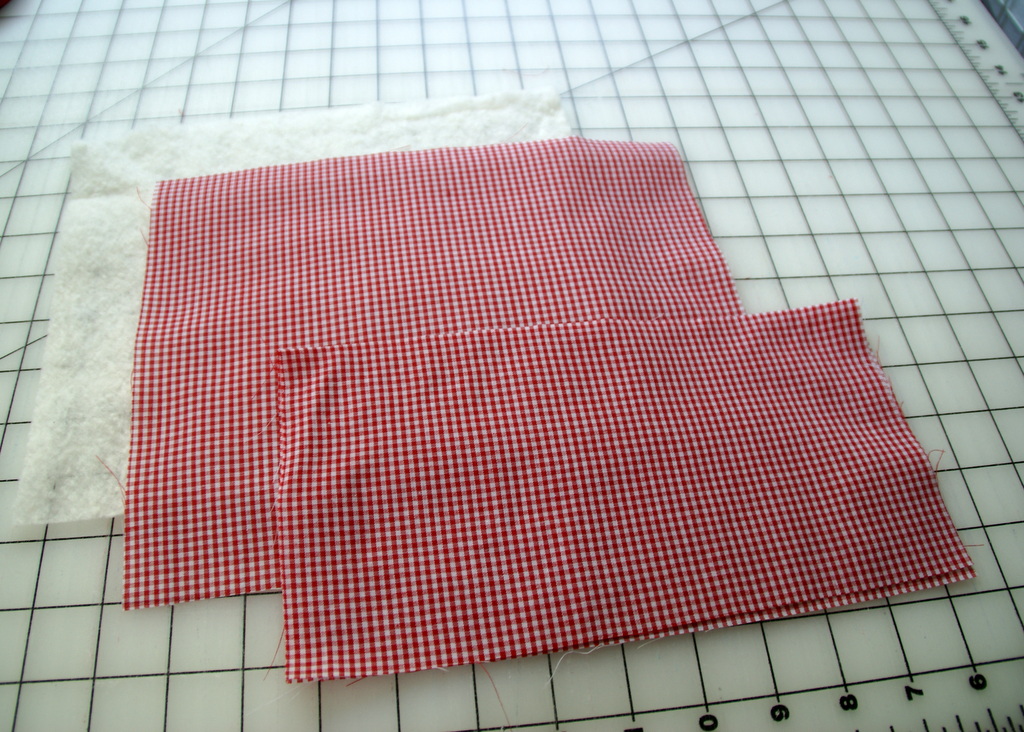
Take the 10″ x 10″ pocket and fold in half and press flat.
Place the strip of interfacing inside and press.
Top stitch the top of the pocket at the fold stitching two lines, 1/8″ and 3/8″ away from the fold.
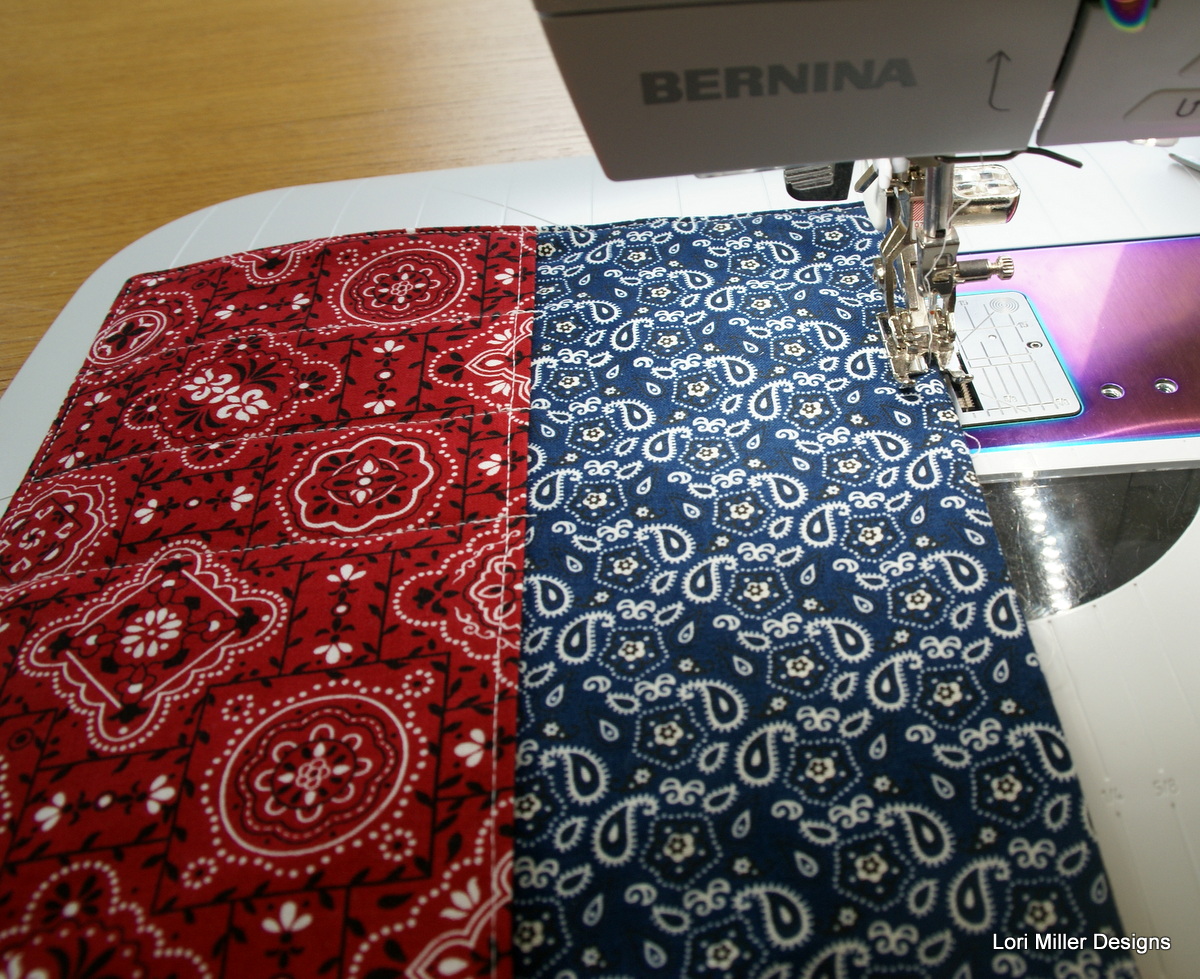
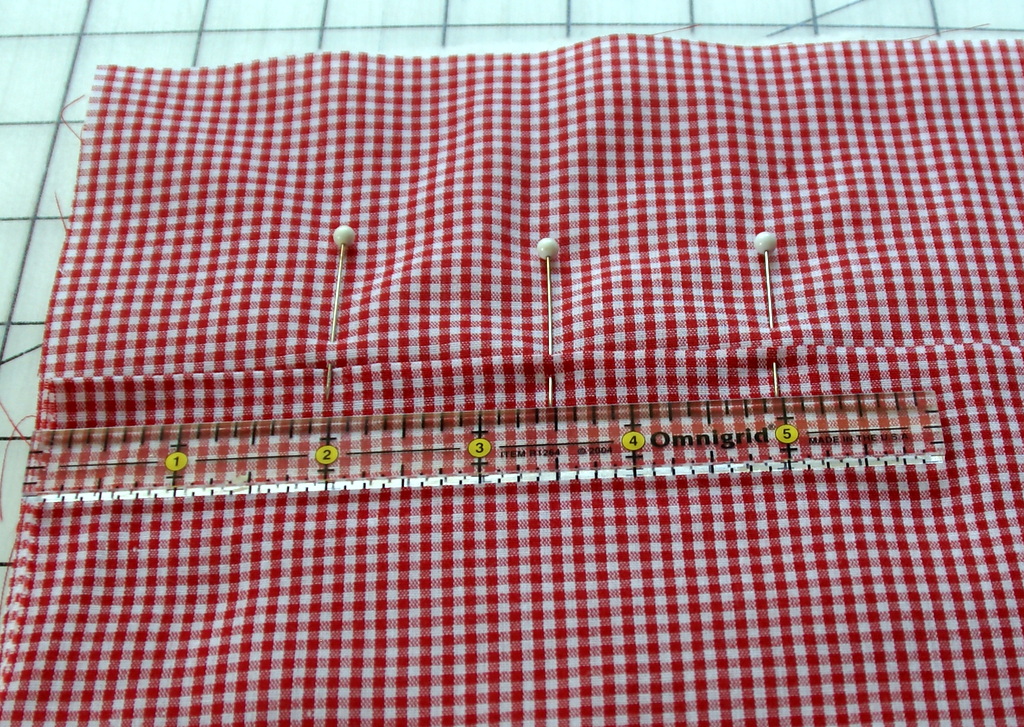
Layer the batting, the lining and the pocket all facing up as shown.
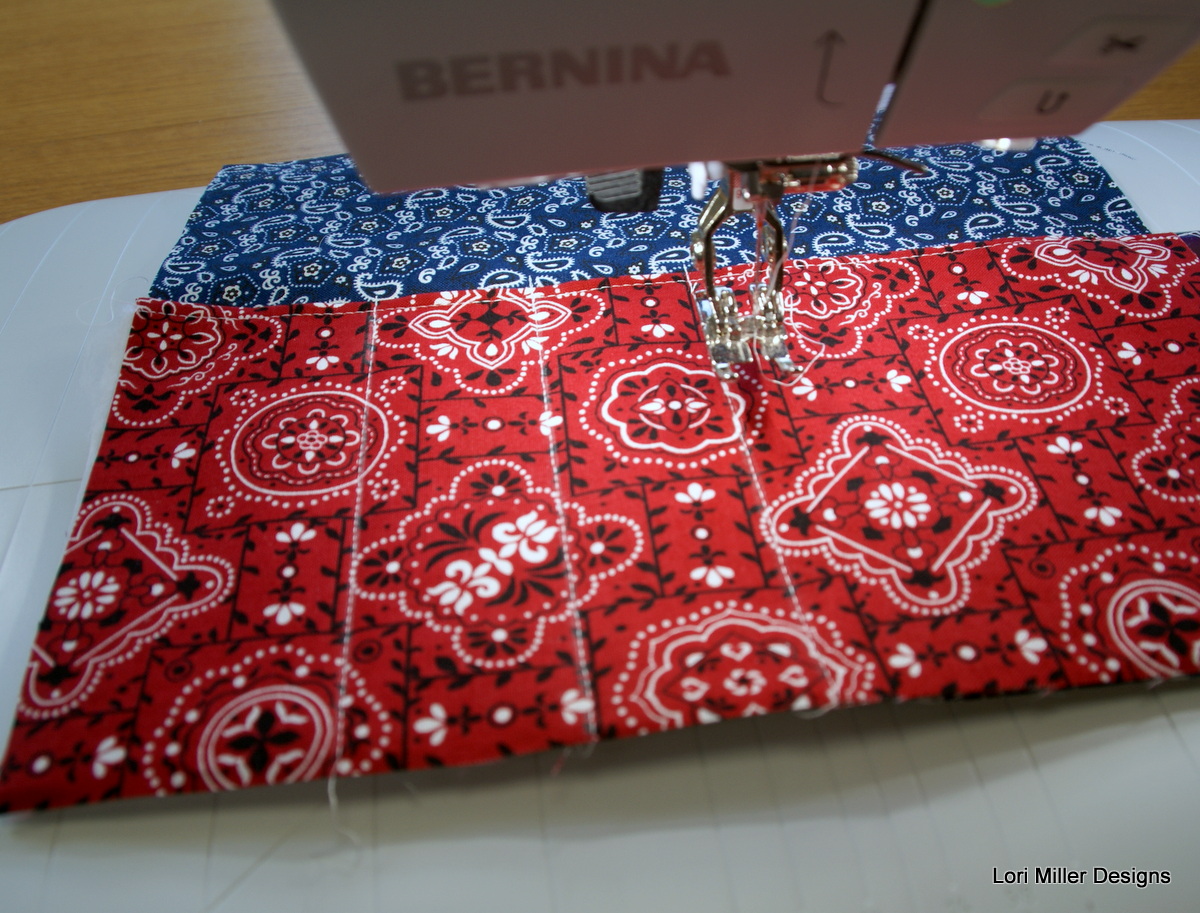
From the left side of the pocket, measure 2 inches, 3 1/2″ and 5″ at the top and bottom of the pocket. These will mark the stitch lines to make the channels for the silverware.
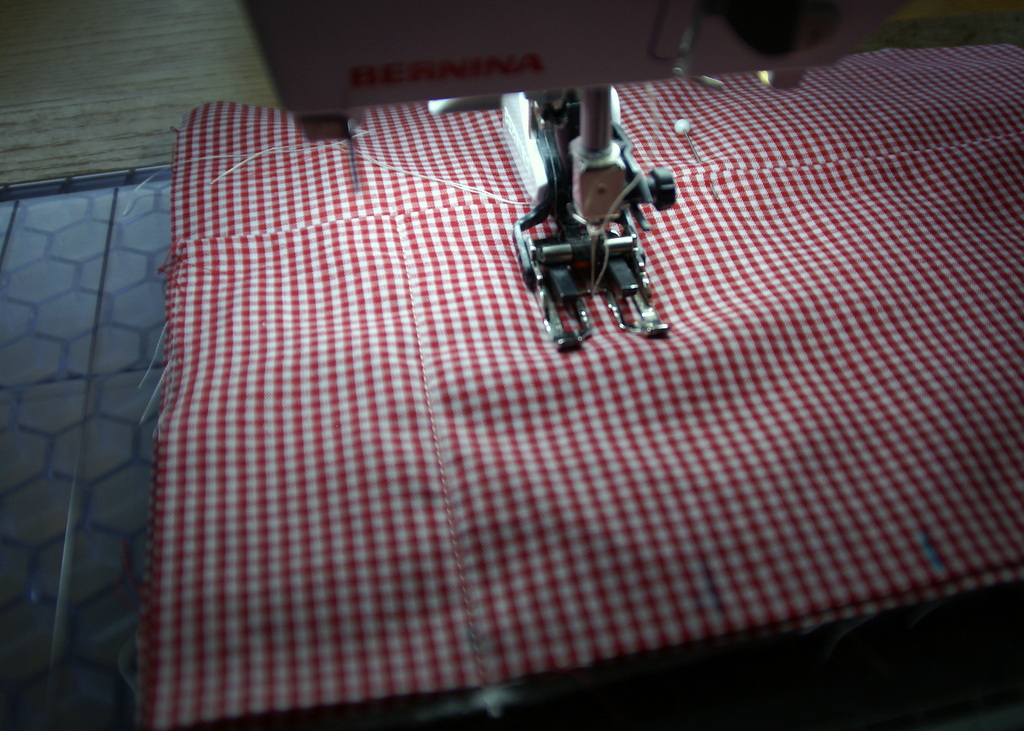
Stitch down from the markings on the pocket to make the silverware channels. You will have three stitch lines. Do a couple of back stitches at the top to secure the channels.
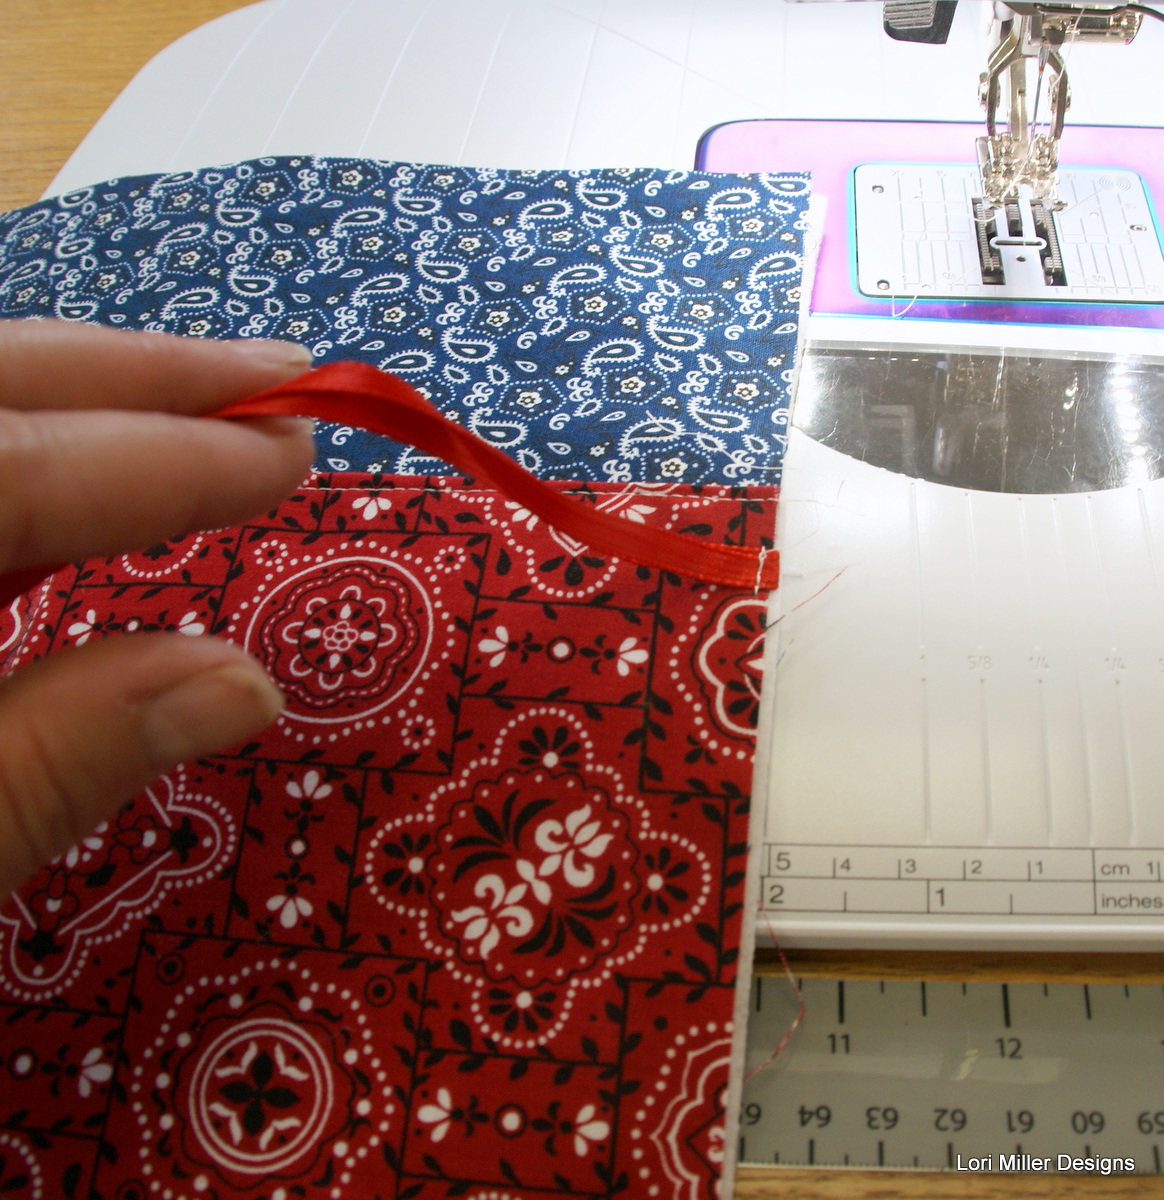
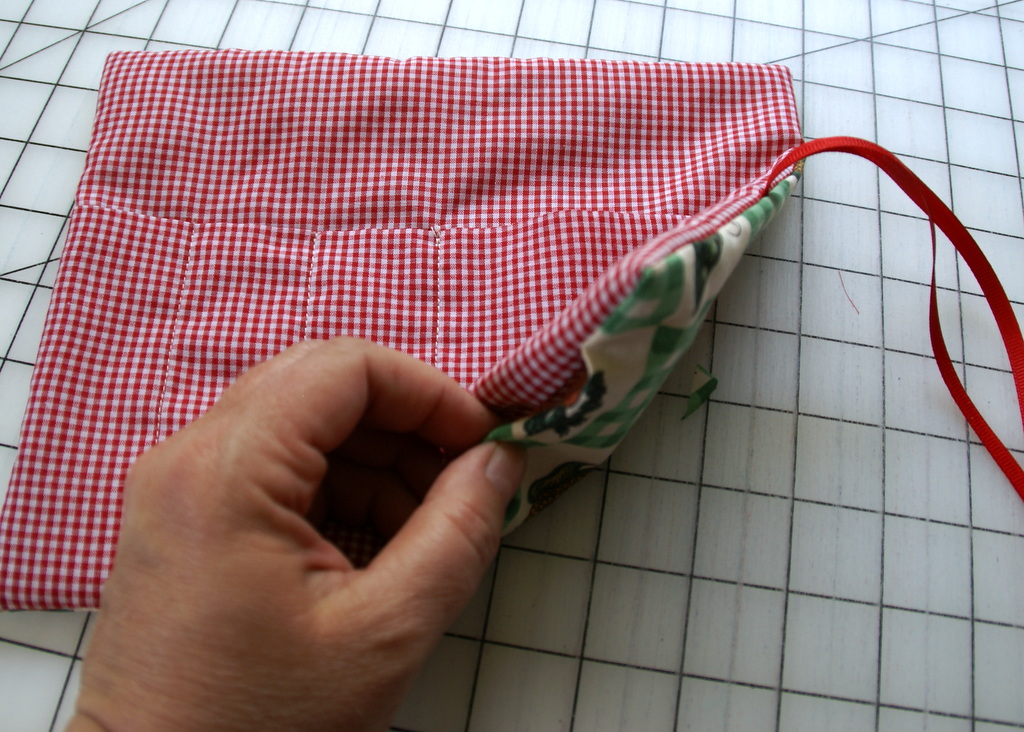
Next, take your 22 inch ribbon and fold almost in half leaving one end about one inch longer than the other. Pin the ribbon flat on the right side of the pocket about halfway down the side of the roll. Make sure that you will catch the ribbon when you stitch the side seam. Tuck the ends out of the way so that you do not catch them in the side seams.
Layer the rectangle from the print fabric over the pocket, right sides together and pin in place.
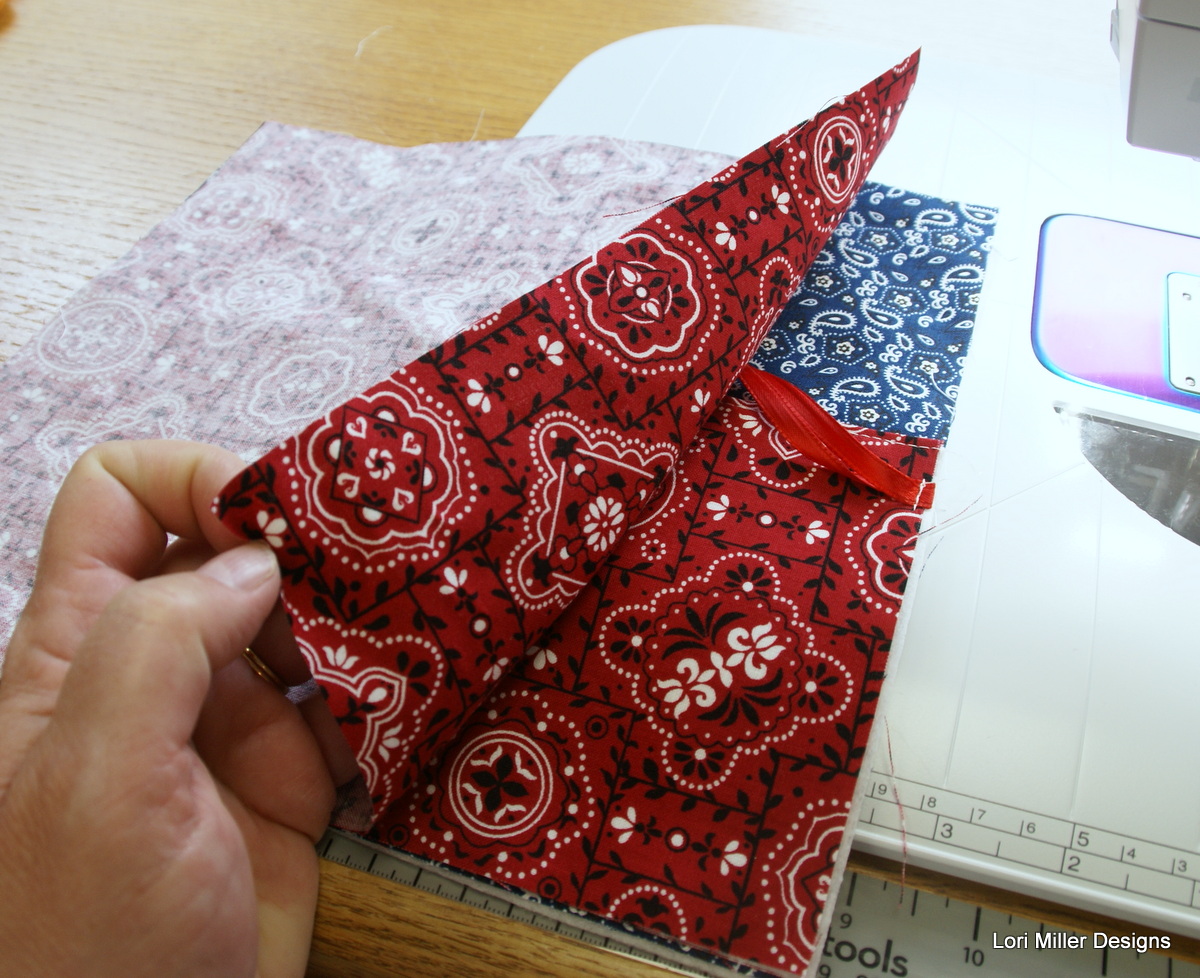
With a 1/4″ seam, stitch all the way around the roll leaving an opening for turning on the bottom. Clip corners.
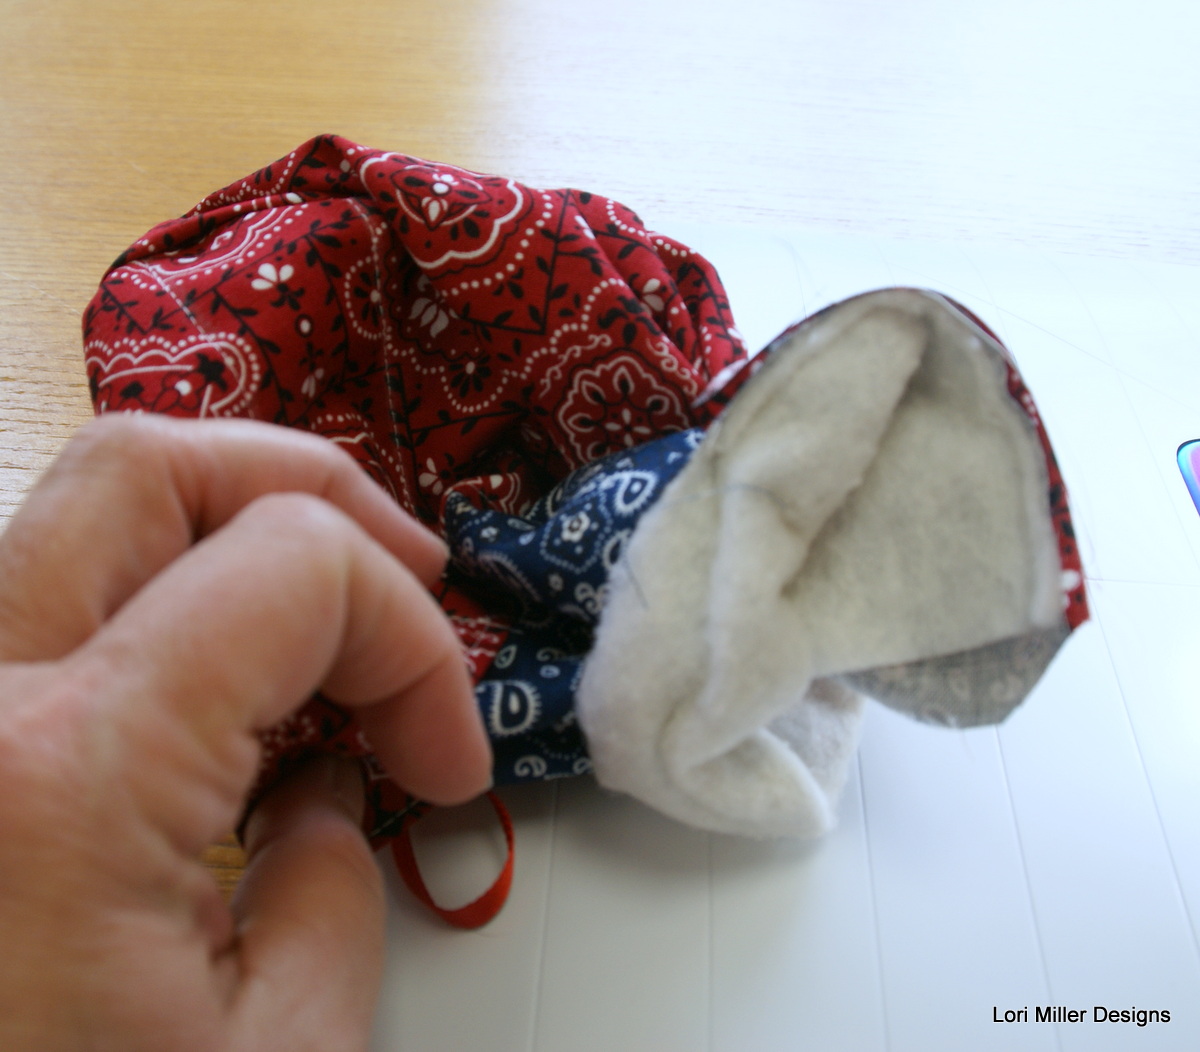
Turn the roll right side out and tuck in the raw edges on the opening. Iron the silverware roll flat.
Top stitch close to the edge of the roll all the way around being sure to catch the edges of the opening and sew them shut.
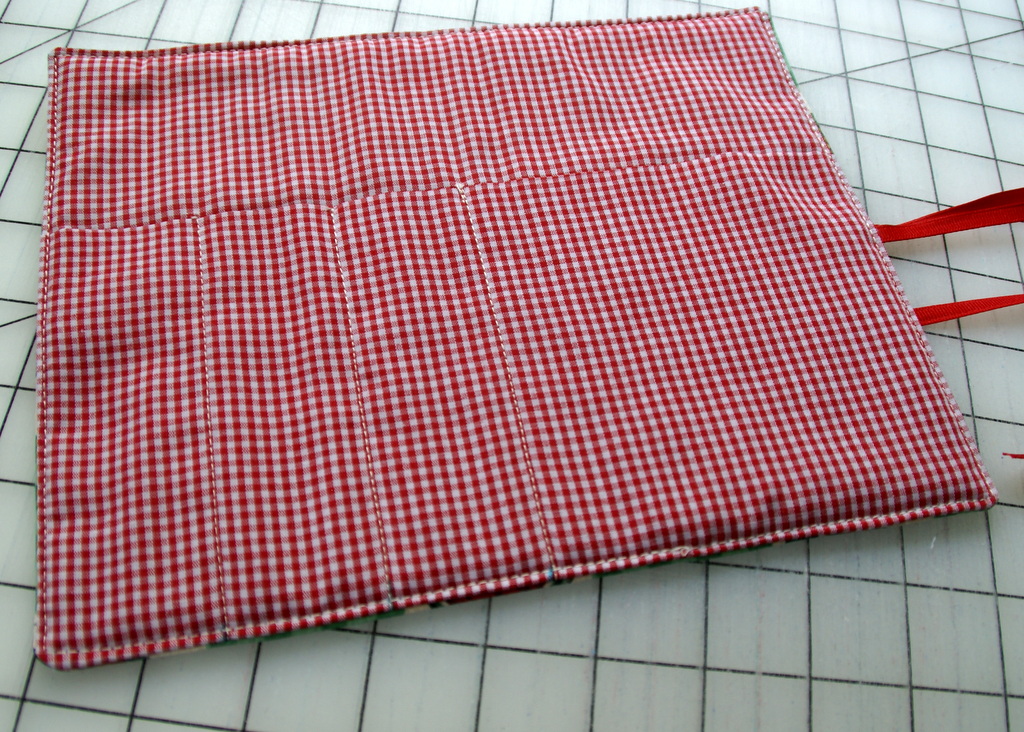
Your first silverware roll is completed, now just make three more! These really do stitch up fast, sew them assembly line style! To store, just roll them up and tie with the ribbon.
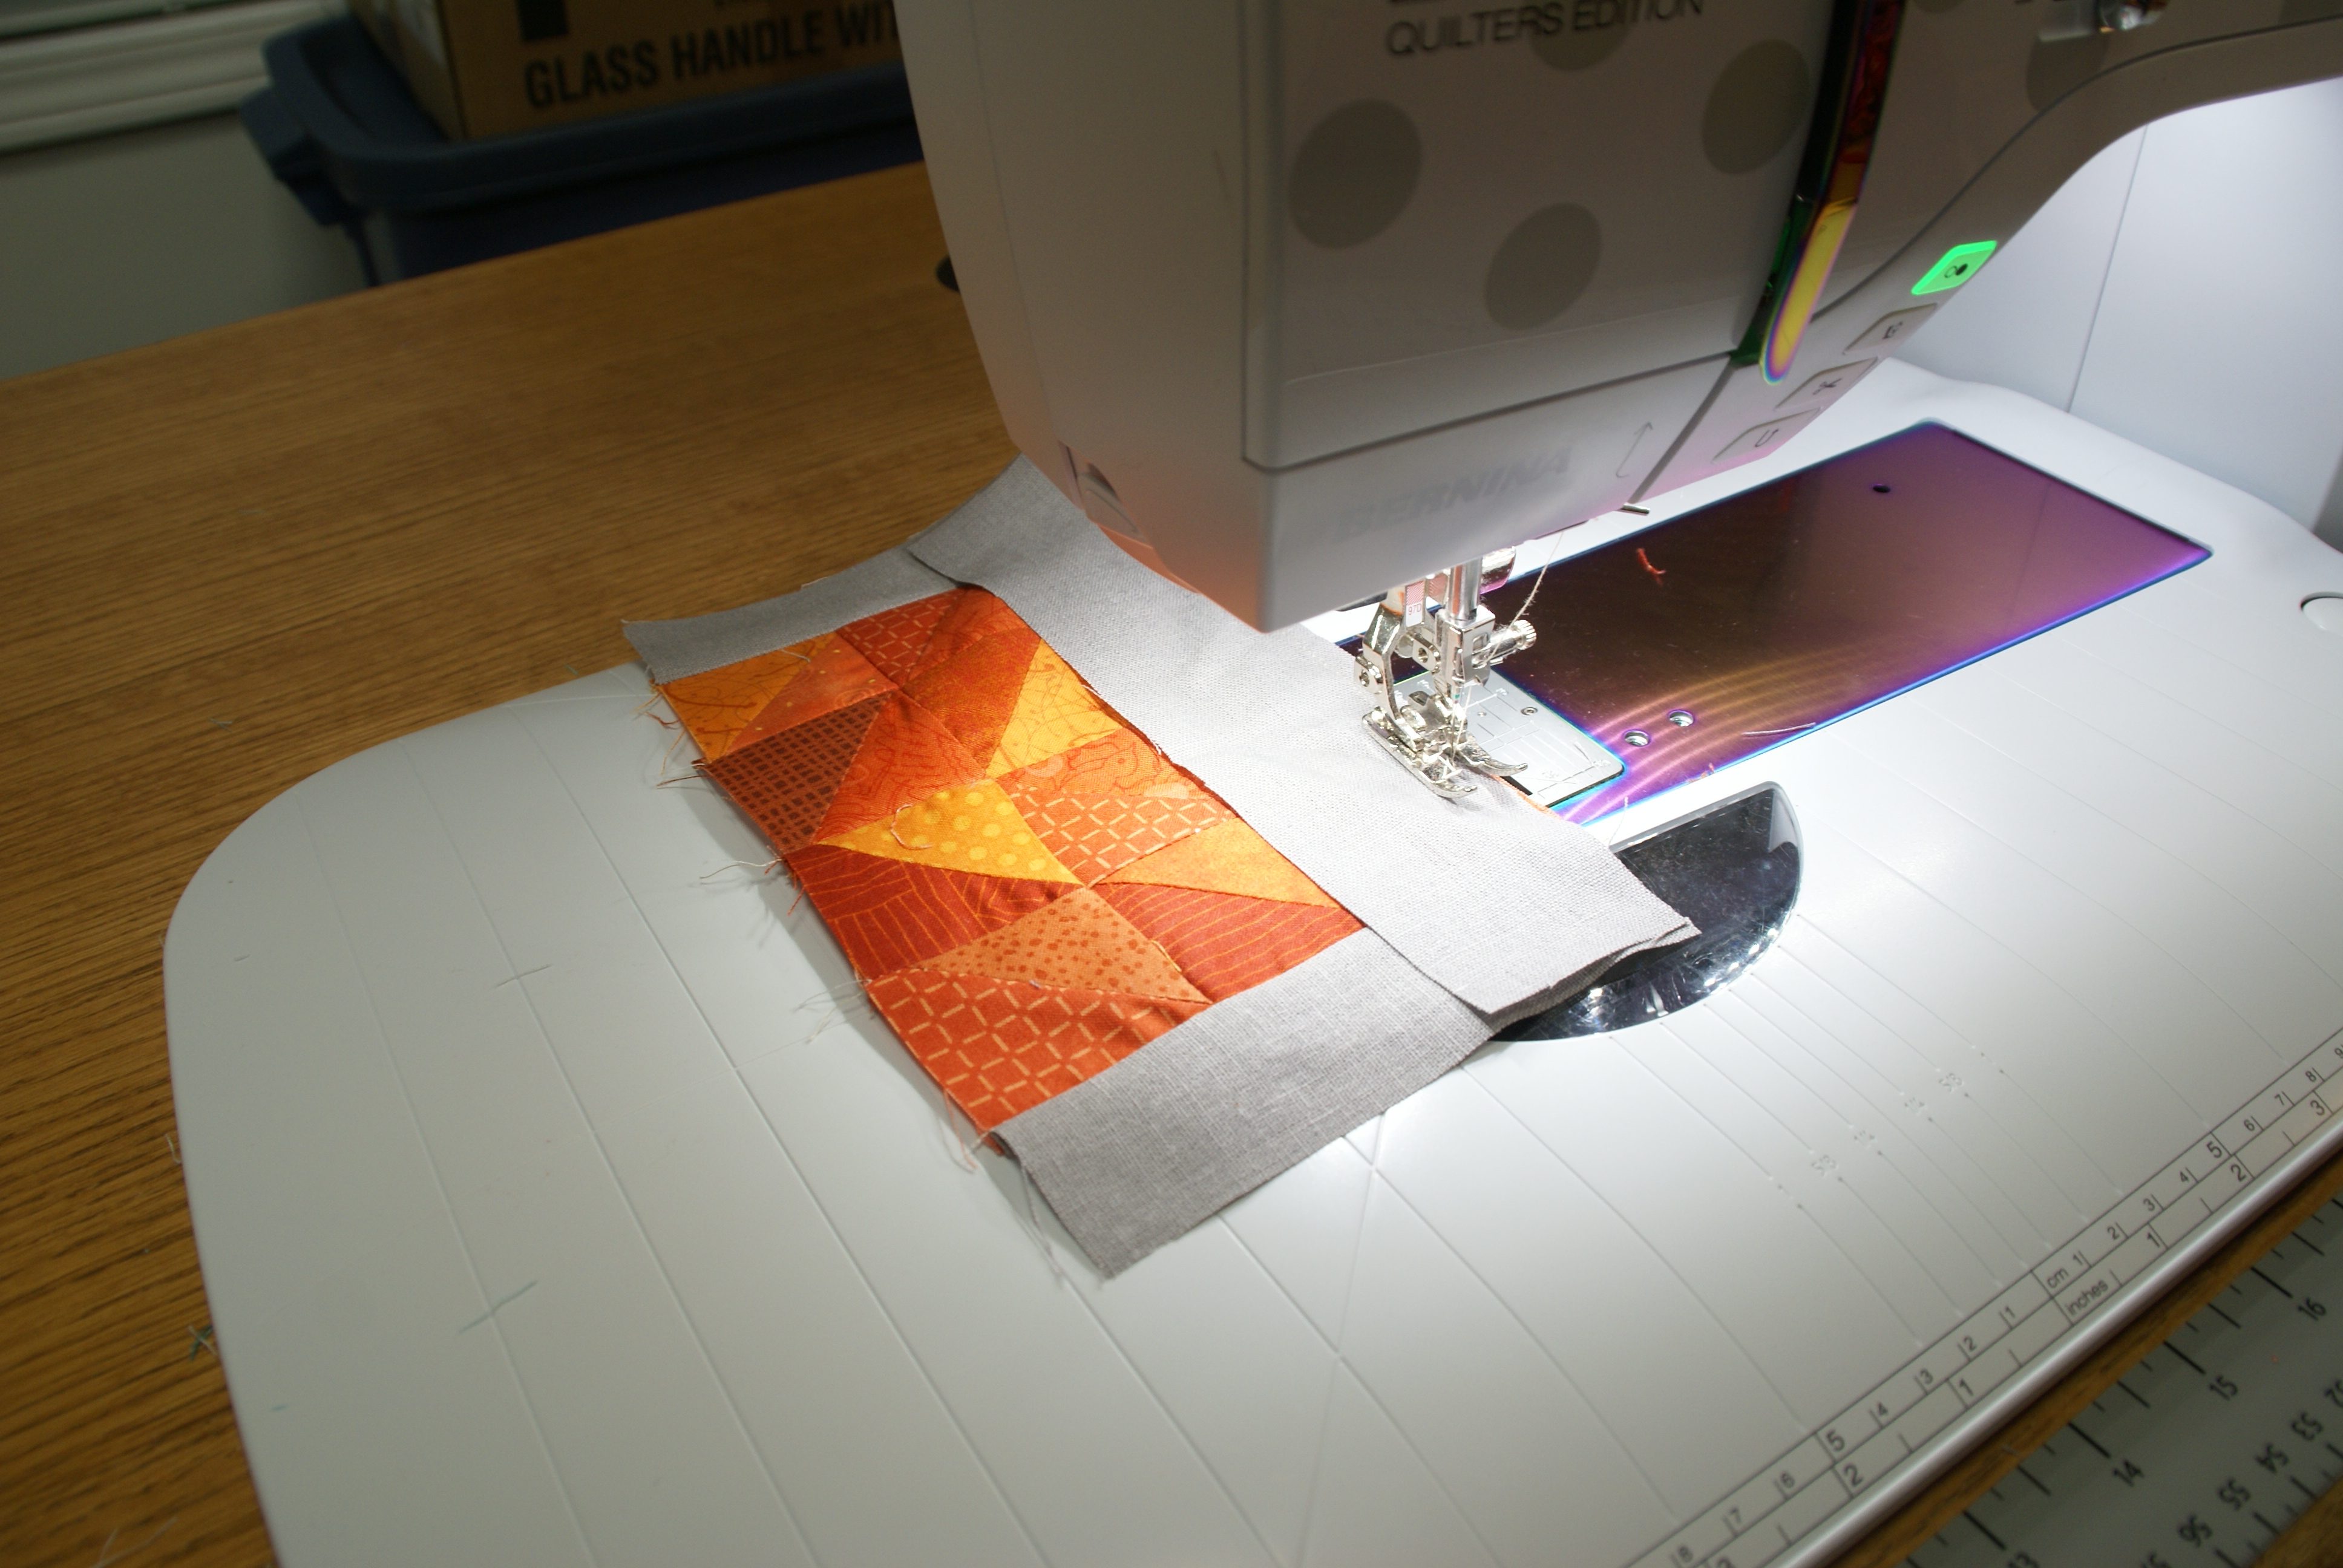
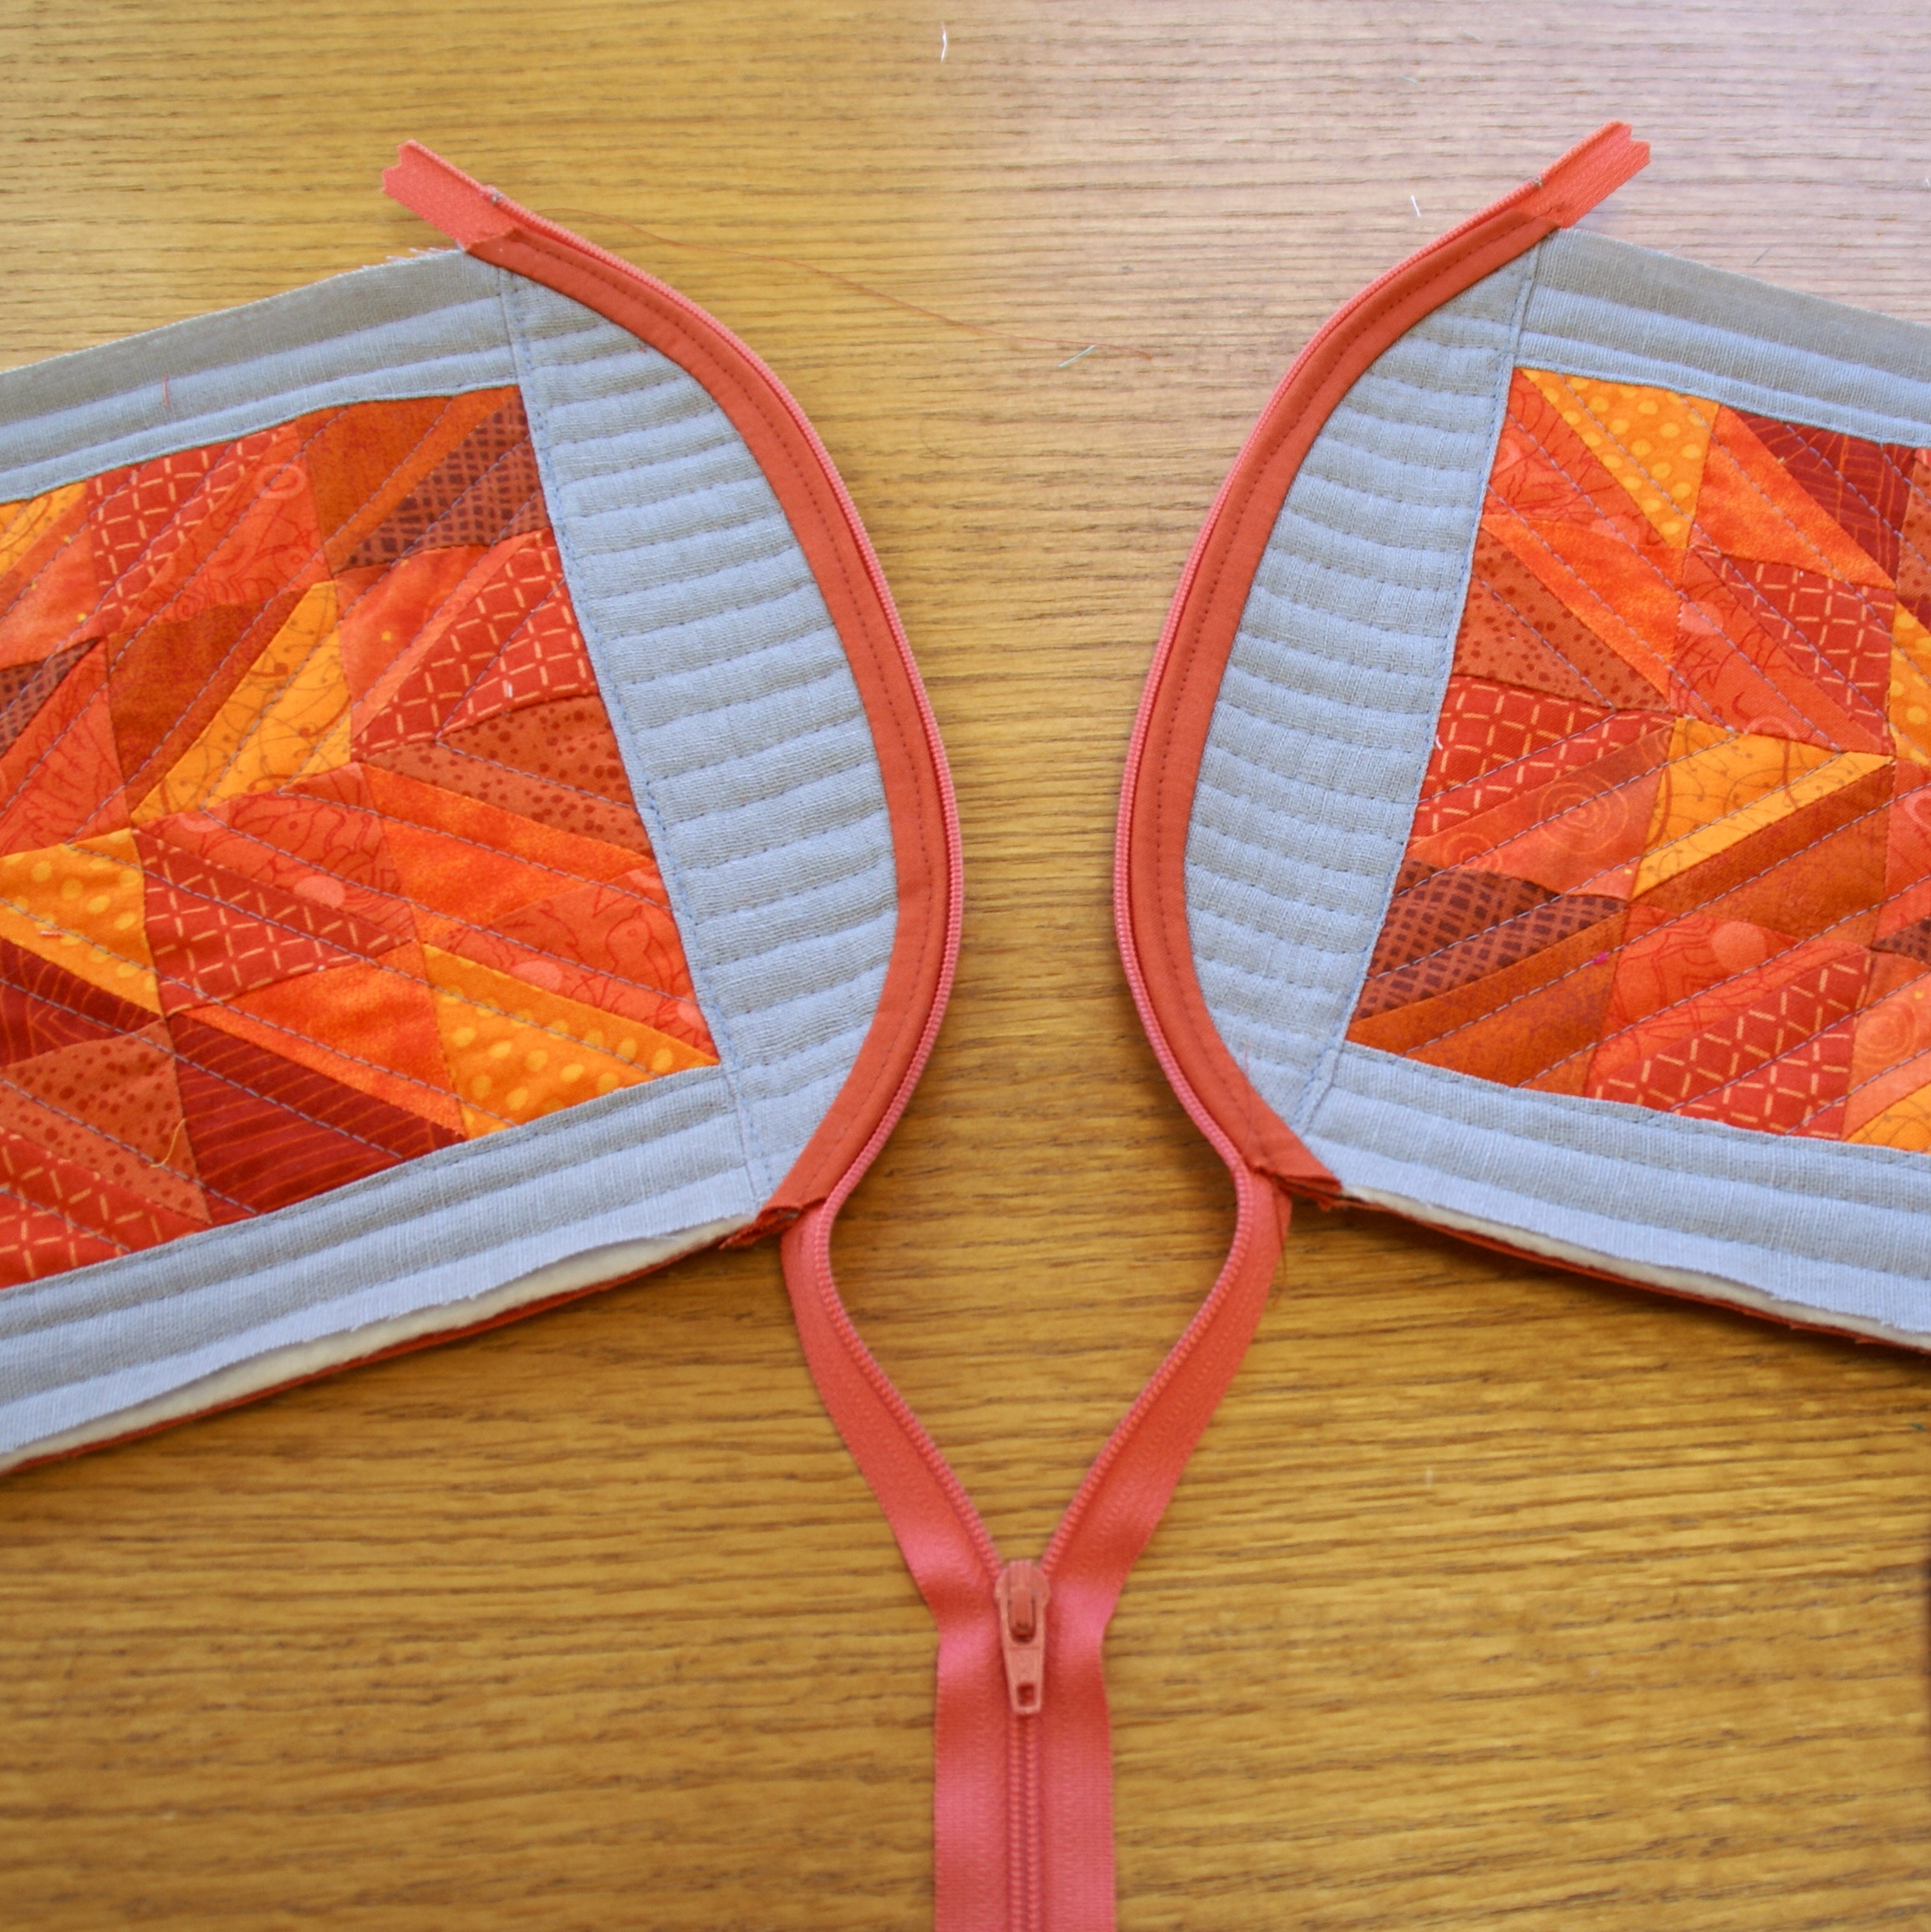
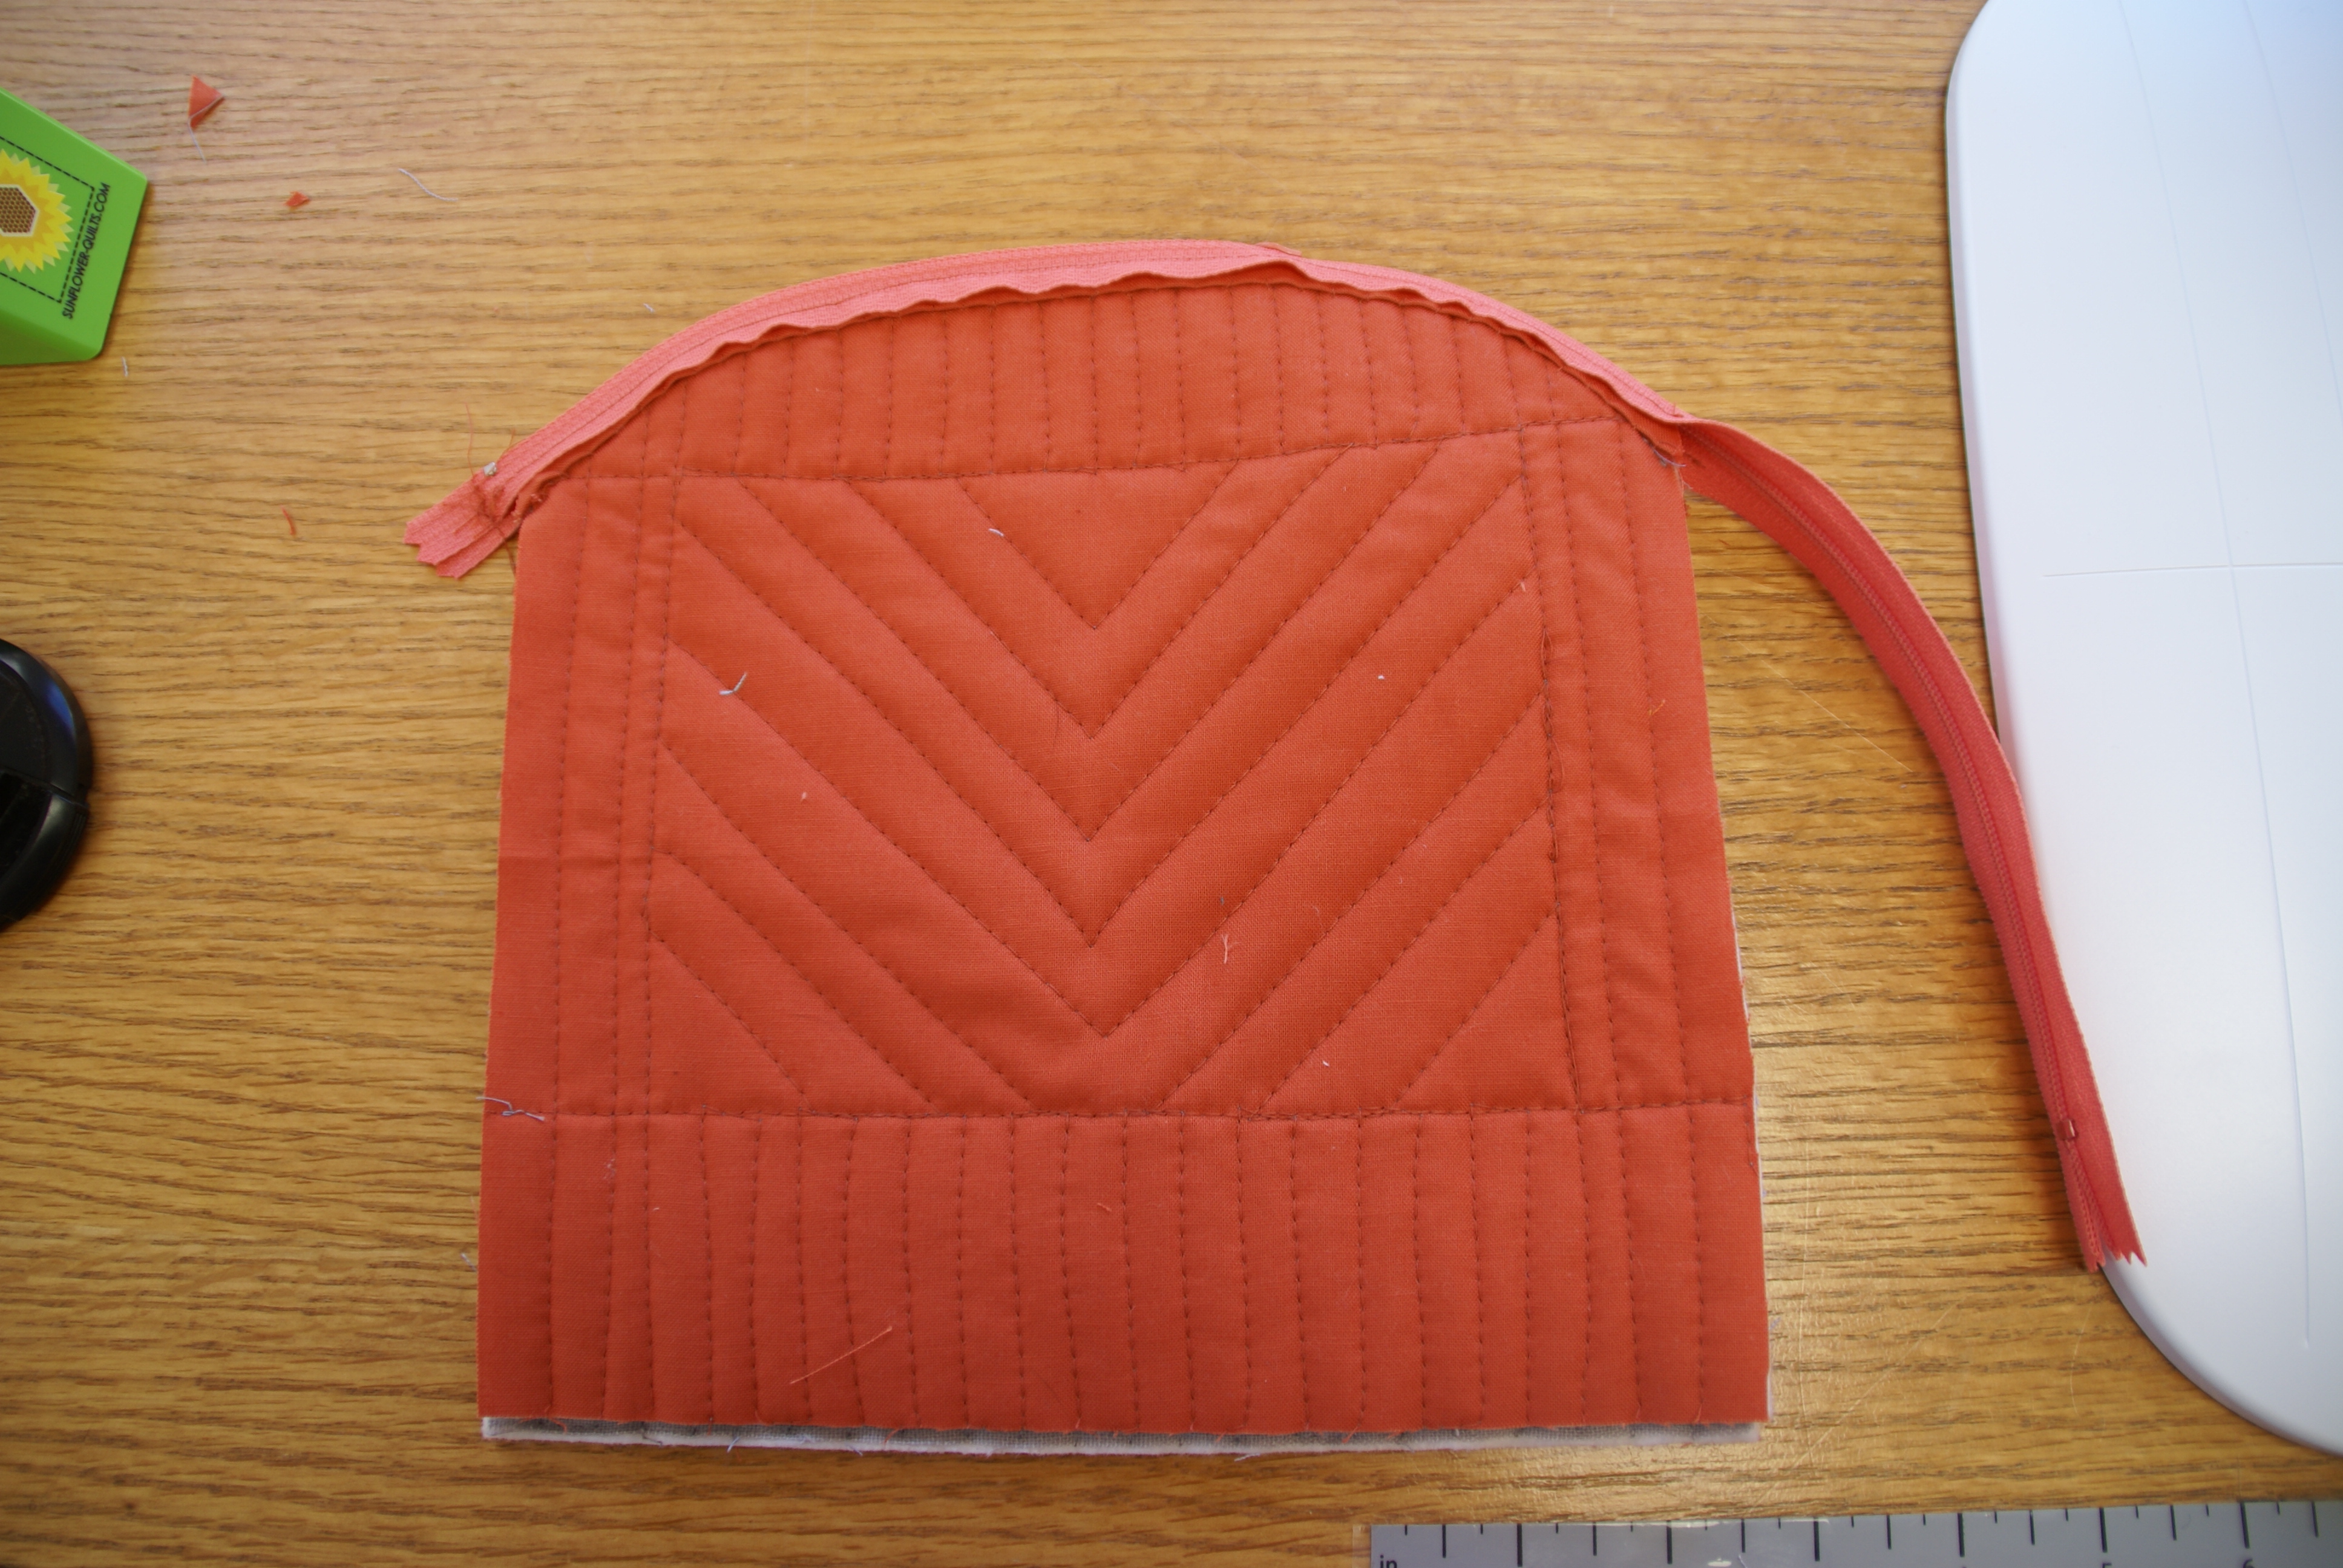
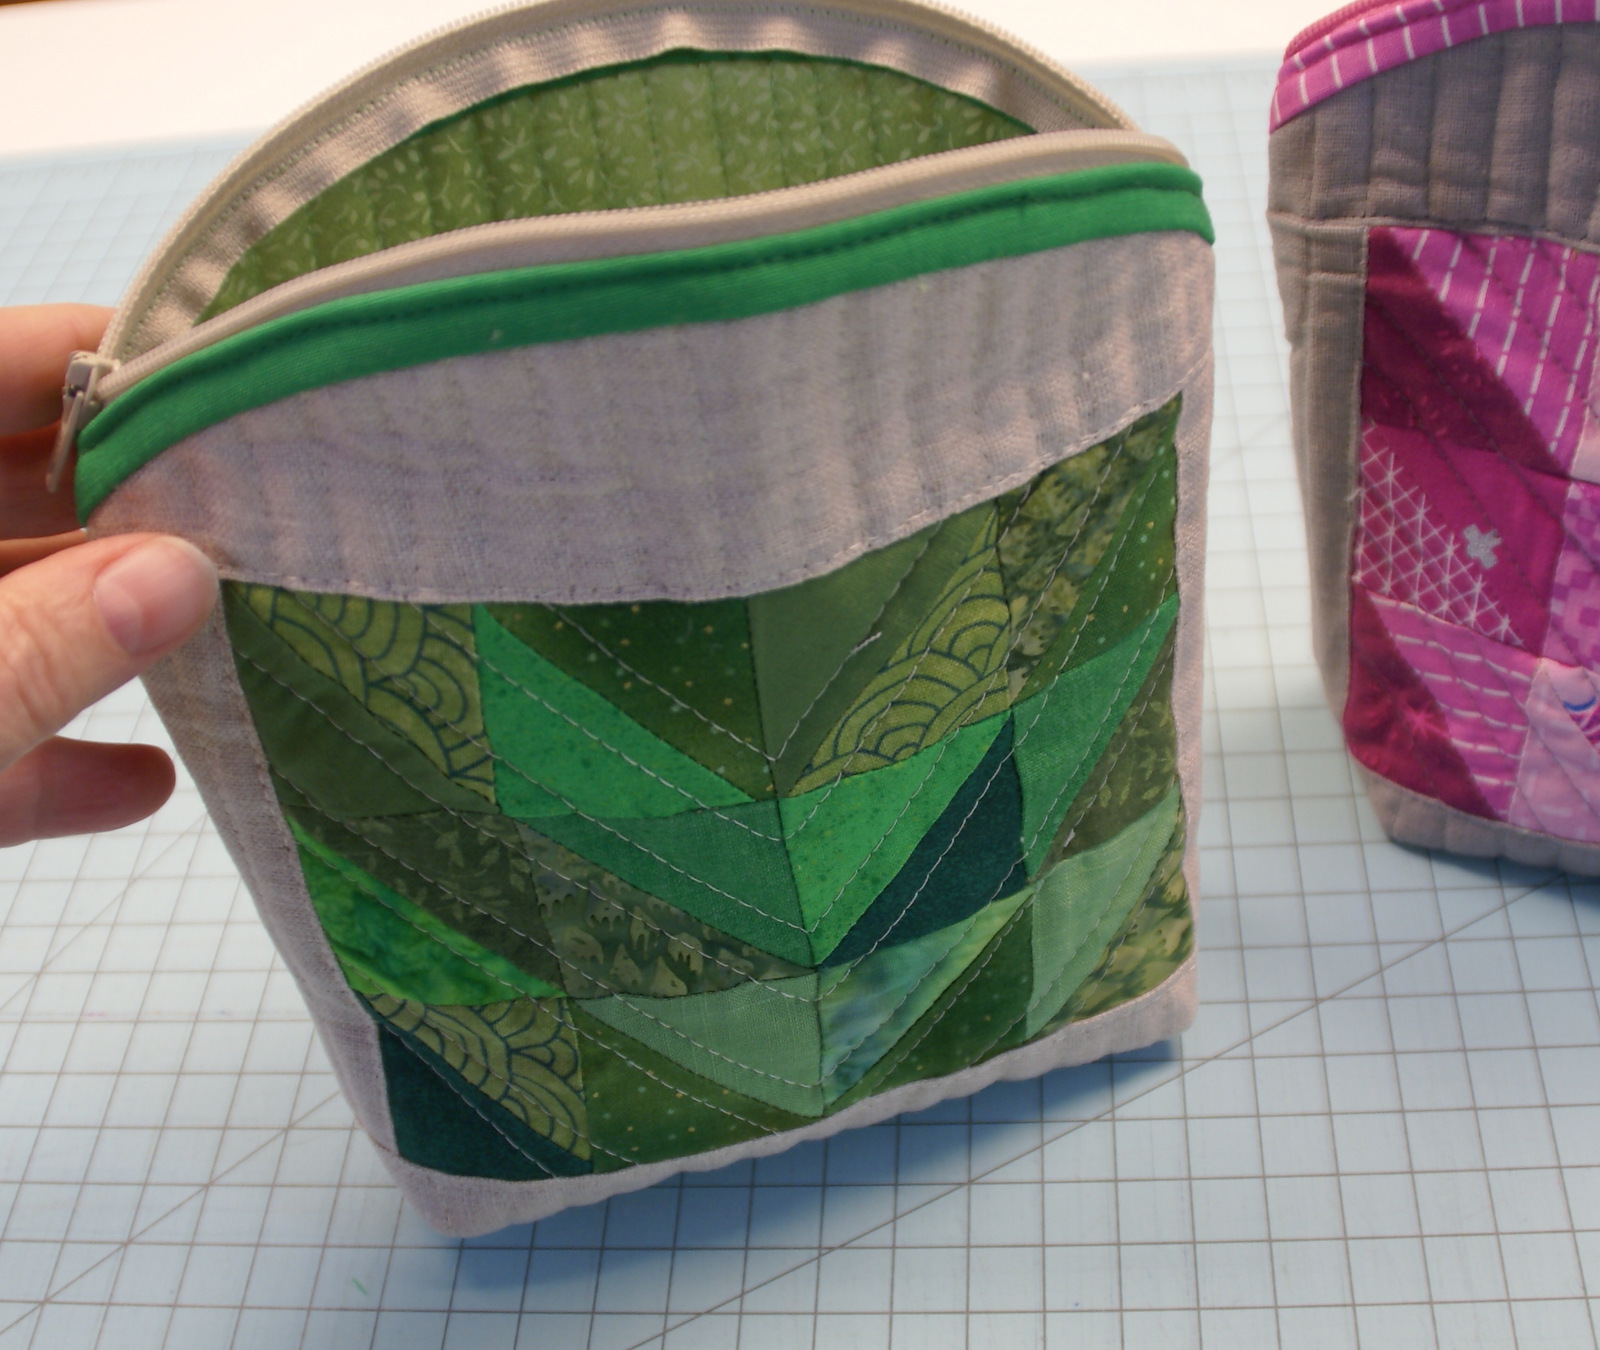
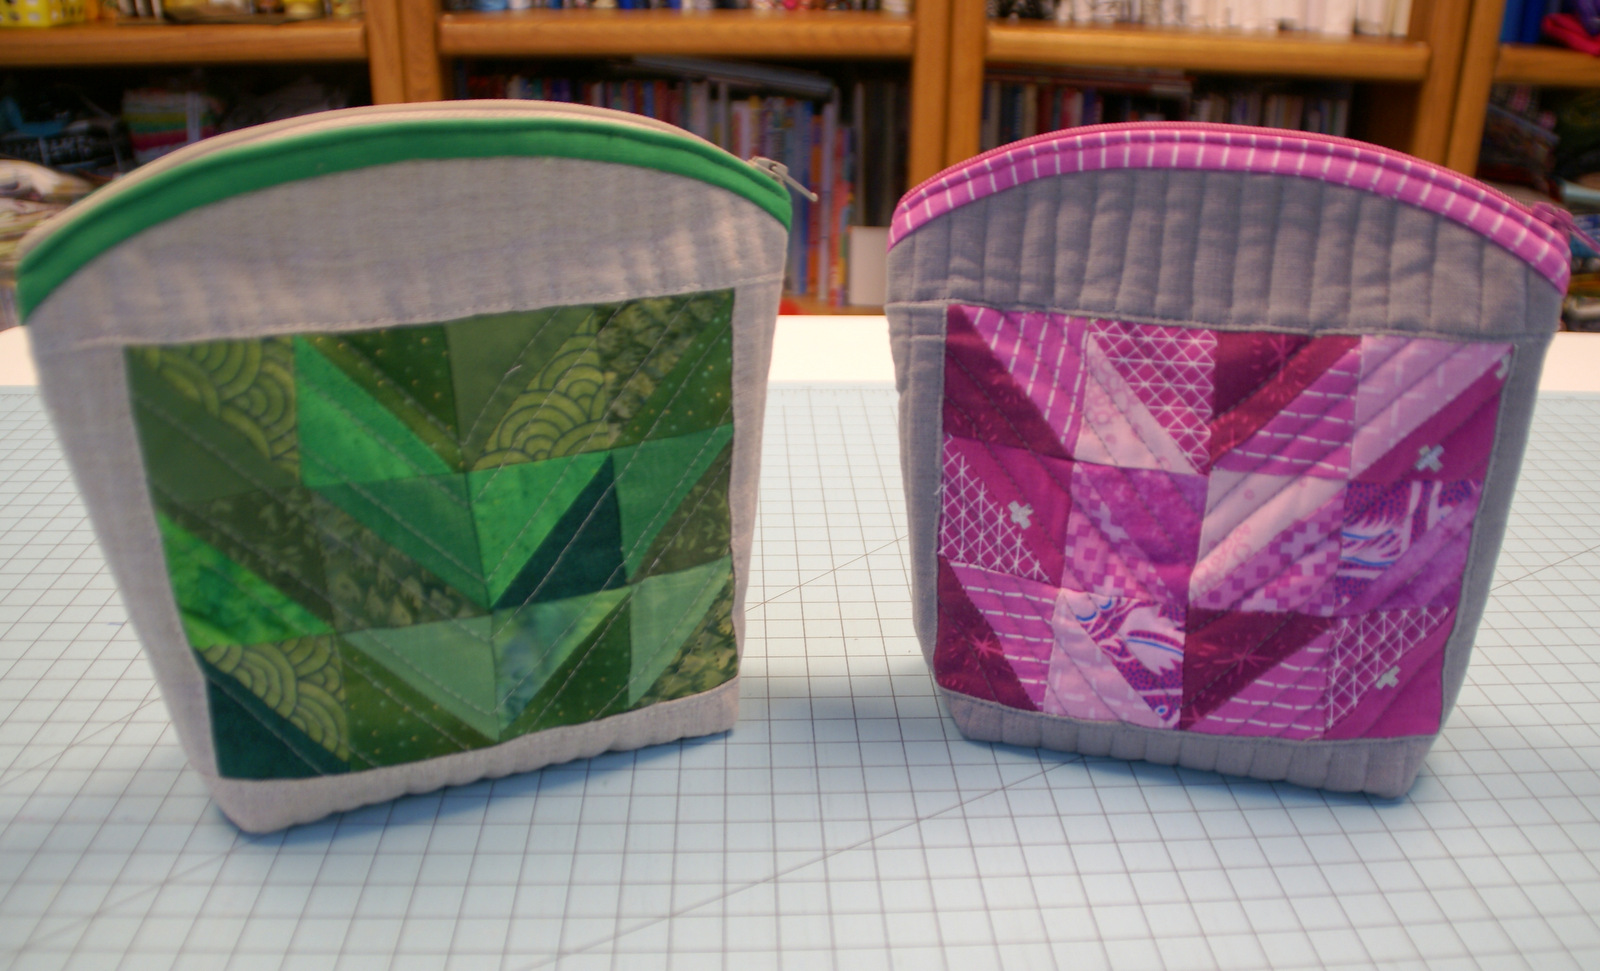
Hot off the Press! I am delighted to share my Scrappy Peabody Pouches! These cute little pouches feature a unique shaped top that opens wide to fill with whatever goodies you like. I used color coordinated scraps from the stash to create these little cuties.
Featured in the July 2021 issue of American Quilter Magazine, this issue is loaded with lots of fun projects…including my Peabody Pouches.
I pieced the scrappy half square triangles and then used scrap linen from the stash for the body of the pouch.
I stitched the zipper right on curved top of the pouch to create the unique shape.
I quilted right through the lining and just used binding to hide the raw edges on the inside.
That curved top helps the bag open wider to really fill it up whether you use for cosmetics, quilting notions or essential chocolate.
You can stitch up a whole group of little Peabody pouches for gifts or just make something special for yourself. They make great assembly line sewing, so make up a pile of them.
Grab a copy of the latest issue or head over to Americanquilter.com to get a digital copy.
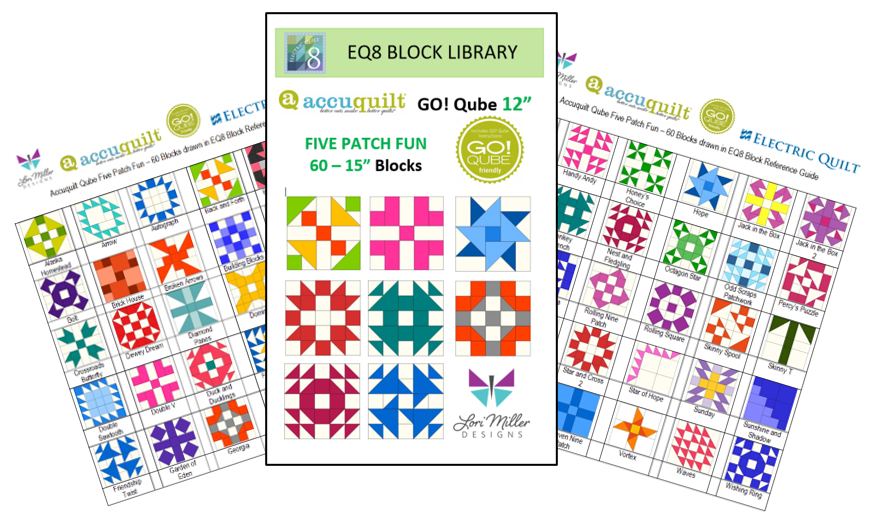
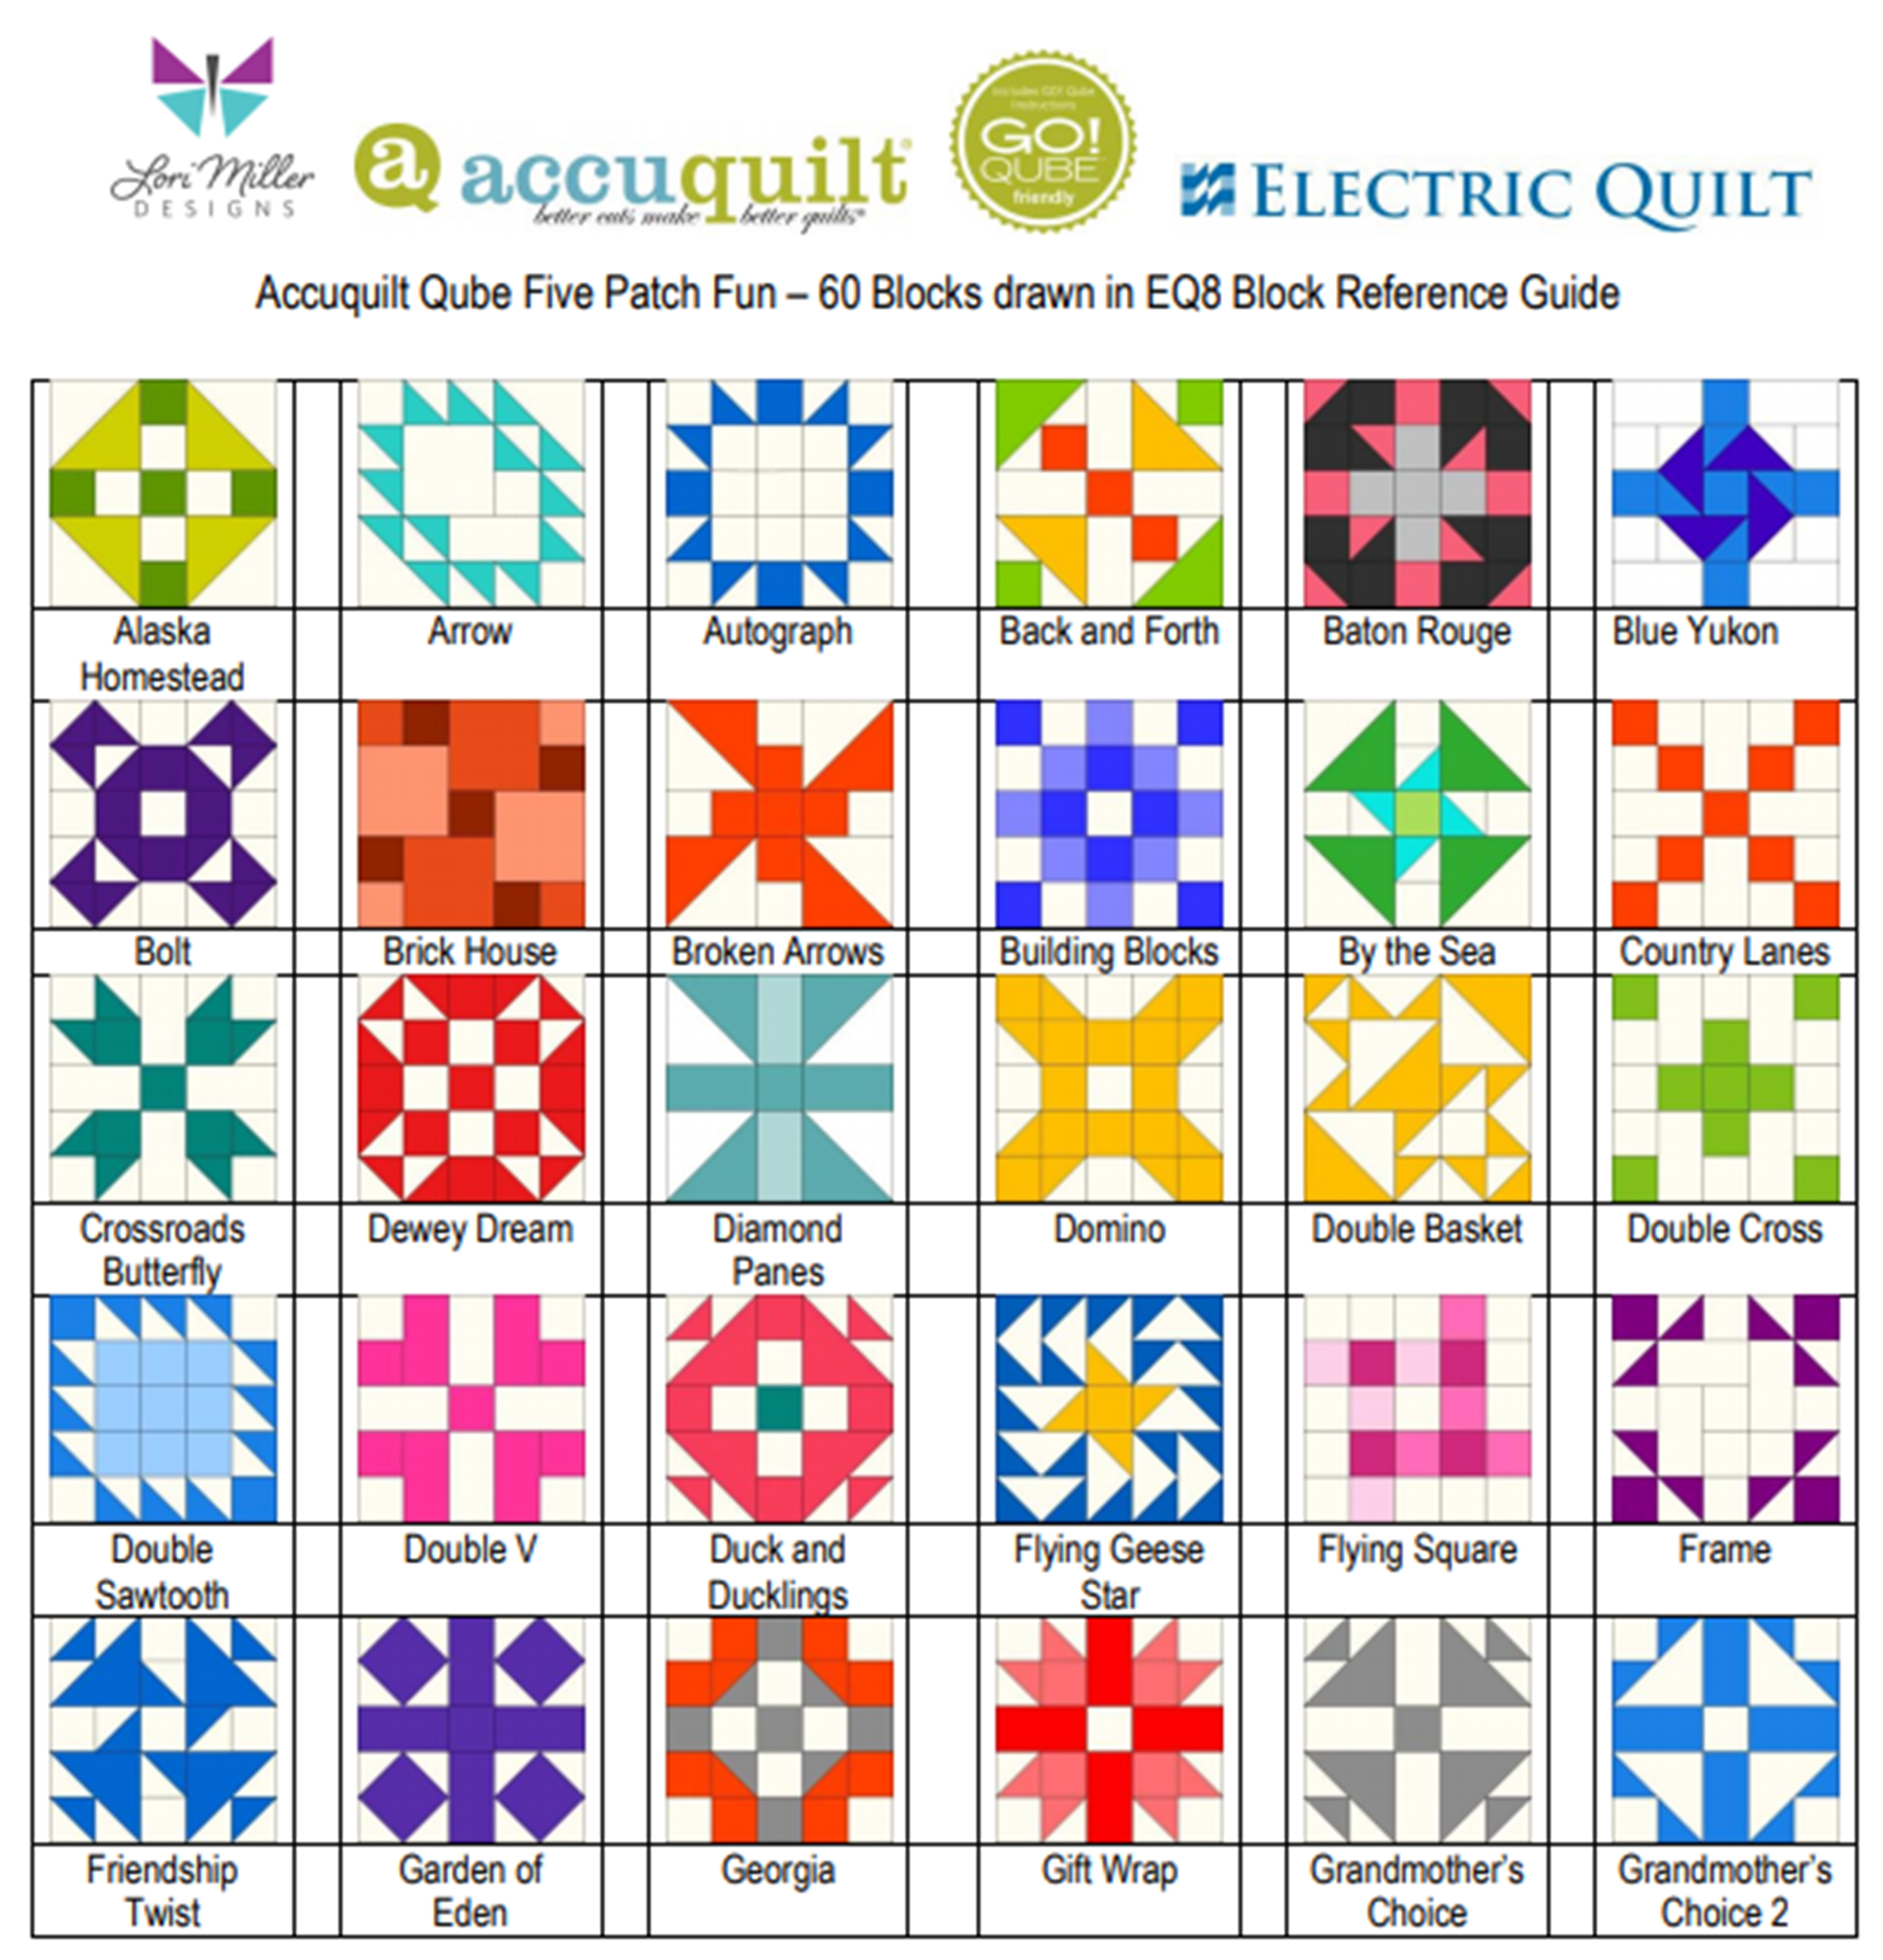
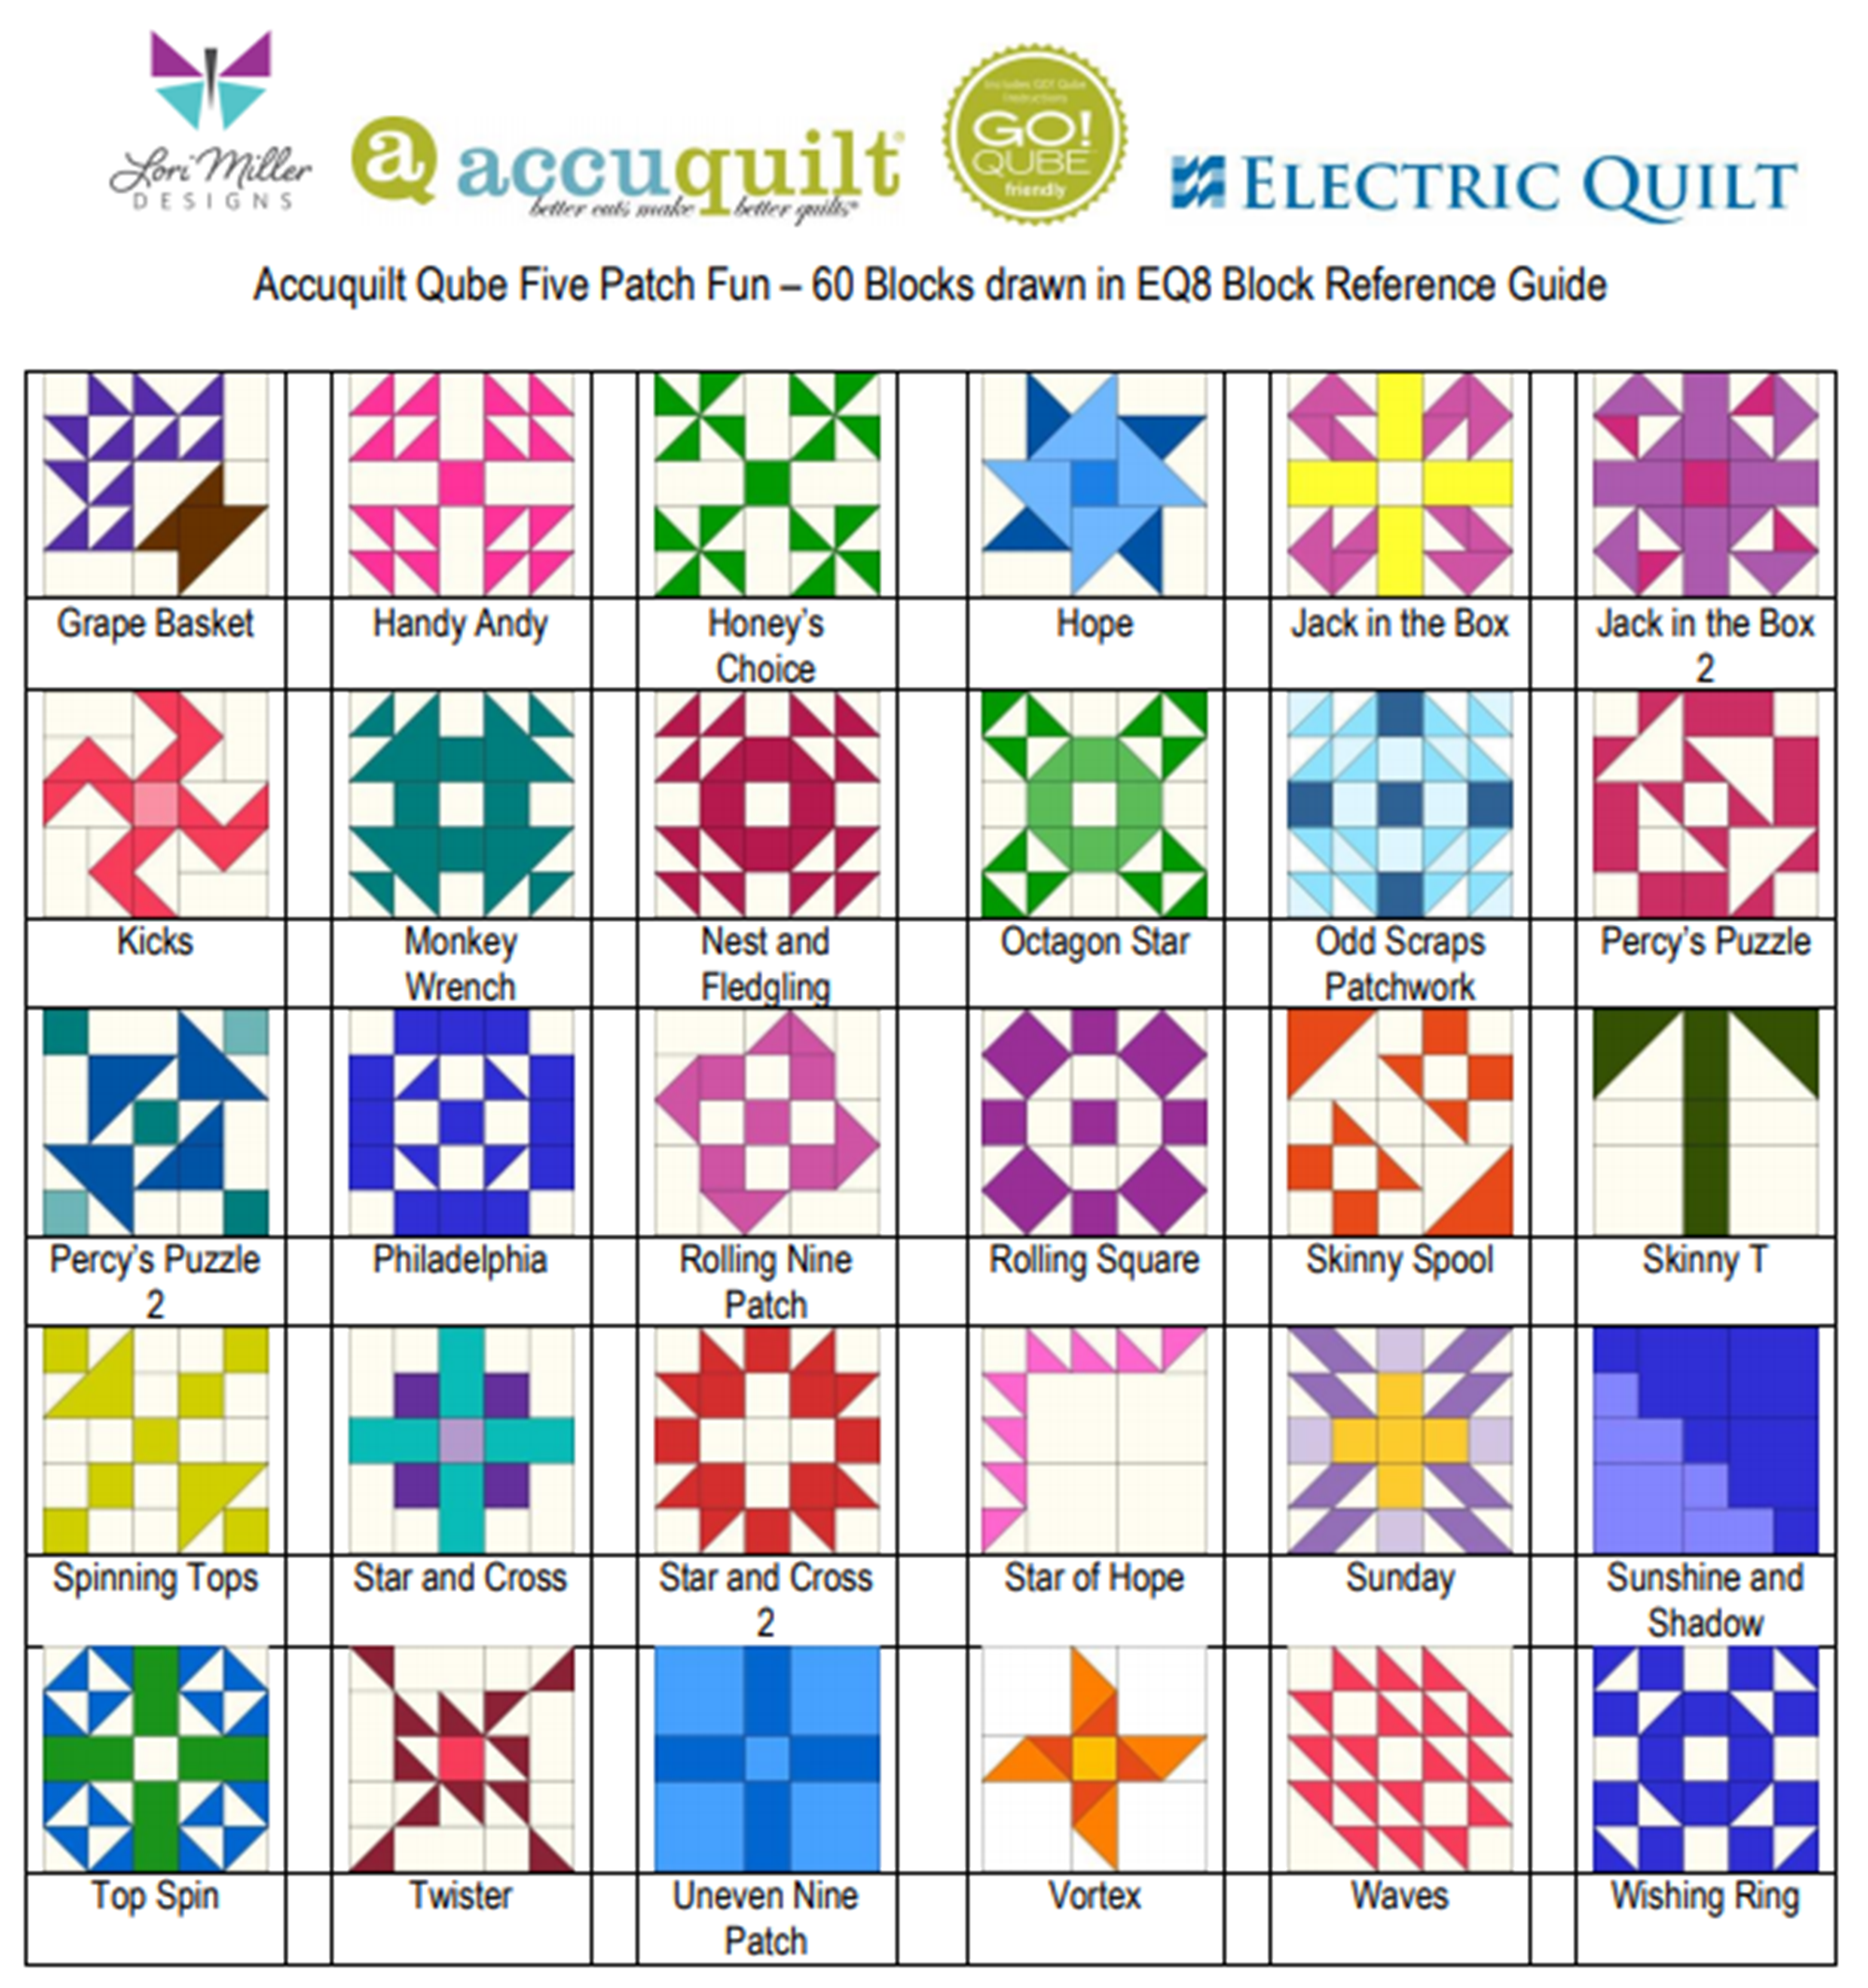
The fun never ends! My newest Add-on EQ8 Block Library file is Five Patch Fun! I am excited to offer the next set of digital EQ8 Block Library files for the AccuQuilt Qubes. These files include 60 gorgeous Five Patch variation block designs that you can load into EQ8 Quilt design software. These convenient blocks make designing a breeze, and they are ready to cut out with speed and accuracy using your GO! Cutter.
EQ8 is Quilt Design Software by The Electric Quilt Company. I design my quilts in EQ8, I teach EQ8 and I use EQ8 in my original patterns. Many of you have found the joy of using EQ8 to design your quilts.
These block designs work with the AccuQuilt GO! Qube Mix & Match Block Die sets. You can use the eight Die Shapes in the GO! Qubes to cut out these blocks.
These EQ8 Block Library files are downloadable digital files that are designed to work with your EQ8 Quilt Design Software. They are only compatible with EQ8. Once you place the block file in your library, you will be able to use it immediately to draw and design quilts.
Required: A running copy of EQ8 Quilt Design Software.
60 Gorgeous Five Patch Blocks!
You receive 60 Five Patch Fun Block designs with new, creative and even familiar blocks. There are so many design possibilities in EQ8.
These blocks are Five Patch Blocks that can be cut out with your Qube Mix & Match Set, no companion dies are needed.
Since the Five Patch design is based upon a 5 x 5 grid, your finished block sizes will finish larger as indicated in the chart below.
The Five Patch Fun files are available in all Qube sizes. They are color coordinated by size in the shop so you can find the size you need. You only need one size of EQ8 Qube files as you can use EQ8 to resize the quilt blocks.
Complete Instructions including Die Cutting Guide!
Each set of library blocks comes with a complete set of Instructions with tips and hints, a color Block Reference Guide and a Die Cutting Guide.
The Die Cutting Guide provides pictures of the Five Patch Fun blocks and which shapes are needed from the Qube to cut out that block similar to the picture above.
Please note: If you have more than one size of Qube, you only need one size of library. Once you have the EQ8 Library for AccuQuilt installed into EQ8, you can easily resize to your other size Qubes as it will scale properly. You can certainly purchase other sizes for convenience, but it is not necessary.
If you like designing and making your own quilts with EQ8 and AccuQuilt, you may like some of my other GO Friendly patterns, EQ8 Block libraries and products.
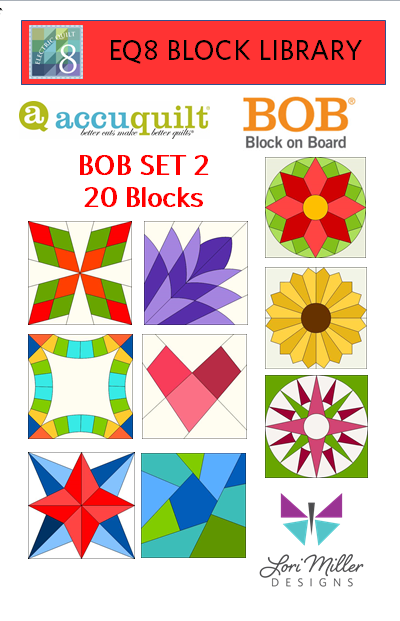
It’s Here! You have been asking for more BOB’s or Block on Board die Quilt Blocks and they are finally here. This Add-on Block Library for EQ8 contains another 19 fabulous BOB blocks. BOB die blocks enable you to create an entire block with one die board. Every piece needed for the block is on the design board. You can design your quilt with EQ8 using these blocks and then use your AccuQuilt GO! cutter to cut it out with speed and accuracy.
This file contains SET 2 of the BOB block designs which includes 20 blocks. The blocks vary in size as indicated to match the BOB die. I have included the size of the block by the name reference.
The ONLY designs included in this set are:
Arkansas Traveler 12”
Blazing Star 12”
Cleopatra’s Fan 12”
Courtyard 10”
Crazy Quilt 6”
Crazy Quilt 10”
Double Wedding Ring 11.5”
Double Wedding Ring 12.5”
Dresden Point 5 – 6”
Dresden Point 20 – 12”
Dresden Round 5 – 6”
Dresden Round 20 – 12”
Flowering Snowball 12”
Kite 4”
Mariner’s Compass 12”
Robbing Peter to Pay Paul 7”
Spider Web 6”
Winding Ways 8”
Wonky Heart 6”
BONUS! Hunter’s Star 12”
I have added a bonus Hunter’s Star 12″ because the first set of BOB’s only had the Hunters Star 6″ piece, so now you can design with both.
Required: A running copy of EQ8 Quilt Design Software from The Electric Quilt Company.
AccuQuilt Block On Board (BOB)
Required: You will need the AccuQuilt BOB die set in the size that matches the EQ8 library file in order to cut out these block designs with the AccuQuilt GO! Cutter. Make sure your cutter is the right size for the BOB die.
This is a downloadable digital file that you will place into your personal block library. Once you place the block file in your library, you will be able to use it immediately to draw and design quilts. I have included all of the instructions to add the files to your EQ8 Design Software. You will receive the EQ8 Block library, a block reference guide and an instruction document. The blocks are all labeled to match the reference guide.
Now you can use the power of EQ8 to recolor and combine blocks to design beautiful quilts.
Once you have designed your quilt, you can use your AccuQuilt GO! Cutter to make it. Be sure to go through my Informational Instructions as I have also included tips and suggestions for determining what dies to use and how to determine fabric requirements.
I hope you enjoy these files as you create your BOB design quilts.
Happy designing with your AccuQuilt Block on Board Set 2 library blocks in EQ8!
If you liked the new AccuQuilt BOB Set 2 EQ8 Block Library Files, check out my other available Add-on Block libraries for EQ8 that work with AccuQuilt as well as GO! Friendly patterns for you to make.


