Free EQ8 Applique – Kitchen Stand Mixer

Homemade gifts are the best.  I wanted to make something fun and useful for my sister and since she enjoys cooking so I decided to make her an apron.  I thought this fun retro style mixer would be the perfect motif to set it off.   I designed the applique motifs using EQ8 quilt design software from The Electric Quilt Company.  Here is how I put it together.

I started out making a picture of my own kitchenaid Stand Mixer.  I got this as a Christmas gift recently, I had been wanting one for years.  Ii takes all the work out of mixing up a batch of cookies or brownies and looks beautiful on my counter.  I have always liked to draw so that is a gift I like to use.
I used my picture to trace the drawing in EQ8.  First, I scanned my drawing and imported it into the quilt design software.  Then I traced and edited the shapes to create the overall Applique motifs.  Electric Quilt allows you to print and mirror the templates so they are perfect for tracing onto fusible applique paper.

I have a super cute Apron pattern with multiple sizes.  It is called More Retro Aprons by Cindy Taylor Oates.  I just love her patterns, she always does a great job and I have a lot of them.  I made the A version of the apron which is the one on the right.

I had these lovely vintage prints from Grandma’s stash to use.

I placed my shapes in order and pressed them on with the fusible backing.  Then I did a straight stitch around each shape.  For this one, I left off the back edge of the mixer and added a little heart.  i just liked the look better.

Here is the top of the Apron, those ruffles are too cute!

There is even a ruffle detail on the bottom.

The whole apron.  There is a cute crisscross way to tie it up on the back as well.  The applique just added that fun retro vibe of the kitchenaid mixer and my sister simply loved it.

Kitchen Stand Mixer Applique

Here are the Applique Motifs for you to download.  I have included a page with a key for the order to lay down the individual motifs.  They go in alphabetical order.

INCLUDES 8″ and 6′ block templates and a key block.

Kitchen Stand Mixer templates

This cute applique would look great on a tea towel or even on a kitchen wall hanging.  What will you make?

Share pictures of your Kitchen Stand Mixer Applique.  Tag me on Facebook or Instagram @lorimillerdesigns

Looking for the EQ8 Design Instructions?  You can find them HERE!

For more projects and tips and techniques on using EQ8, visit my Electric Quilt blog series EQ8 Lessons with Lori.

For more information on EQ8, go to Electric Quilt 8 Software.

I teach EQ8!  I would be happy to teach at your event or Quilt Shop.  Check out my classes page.

Free Tutorial – Anchor’s Away Quilt

Summer’s not over yet!  Make this fun nautical themed throw for your lake house, cottage or just to get in the summer livin’ frame of mind!  This is another design made with EQ8.  For this quilt, you can create those 45 degree diamonds in the interesting inset with a template or with careful rotary cutting OR you can use your Accuquilt GO and the 2 1/2″ strip cutter to whip them out in a flash.

Dies used in this design:

Anchors Away Quilt

Finished size is 48 1/2″ by 60 1/2″”

Materials

  • 2 yd Blue solid
  • 1 yd Red fabric for Anchor and binding
  • 7/8 yd White fabric
  • 1 yd Blue scraps (or use 4 fat quarters or 8 fat eighths)
  • 3 yd Backing fabric
  • 56″ x 68″ piece of batting
  • 1 – 14″ x 14′ light double sided fusible for Anchor applique
  • Anchor and Diamond Applique Templates

Directions

Cut Fabric:

Blue Solid

NOTE: Cut using the length of the 2 yards

  • 1 — 8 1/2″ X 60 1/2″ strip
  • 2 — 20 1/2″ x 60 1/2″ strips

Red Solid

  • 6 — 2 1/2″ X WOF strips for binding
  • 1 — 12 1/2″ square for Anchor applique

White Fabric

  • 100 — 2 1/2″ X 3 1/2′ 45 degree diamonds

Blue Fabrics

  • 100 — 2 1/2″ X 3 1/2′ 45 degree diamonds

Cutting the Diamonds

You can use the template provided to draw around and cut out the diamonds

OR

You can cut 2 1/2″ strips with a rotary cutter and then measure 3 1/2″ on the sides and use your 45 degree angle on your ruler to cut the diamonds

OR

You can use your GO! fabric cutter!

Dies used in this design:

This is the fastest and easiest way to get this done in a jiffy.  Let me show you how.

I have the Accuquilt Ready Set GO! Cutting System generously provided to me by Accuquilt.  I am an Accuquilt Go Getter and I write articles for their blog about quilting and die cutting.  You can see the system in the background of this picture.  I just pulled some blues from my stash to use in the cutter.

I like to press my fabric first for the die cutter so it is nice and smooth so i get more accurate cuts.

Next I fold or cut my fabric to best fit the die I am using, in this case, it is the GO! Strip Cutter-2½” (2″ Finished) 3 Strips Die (55014 or 55017).  When you place your fabric, make sure it is extending beyond the die cutting points.

Once your fabric is arranged, please the cutting mat over the die and fabric and insert into the machine.

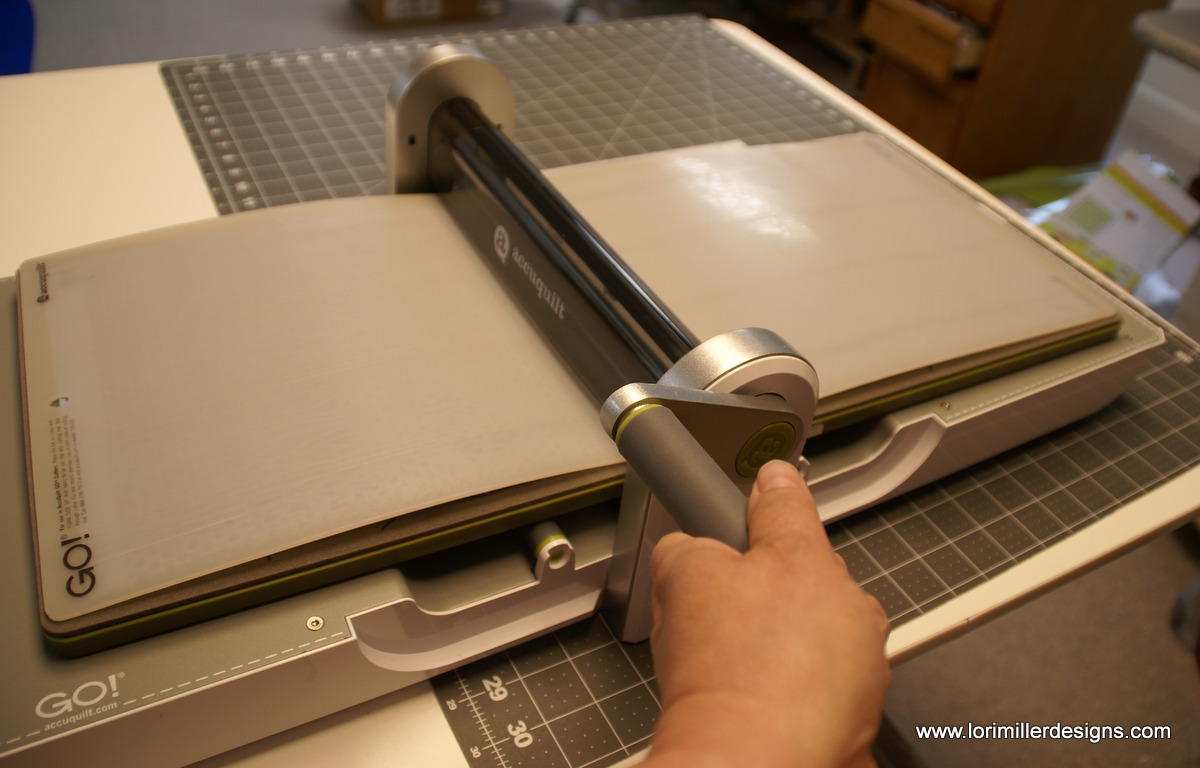
Crank the handle to cut your fabric.

You get perfectly cut 2 1/2″ strips.  I used two layers of fabric, so I have six strips.  You can cut up to six layers of cotton fabric so this will work well.

Find your 45 degree line and carefully line up your strips.

When you line them up, make sure that you have the strip beyond the cutting line.

Now your diamonds are cut.  They measure 2 1/2′ x 3 1/2″.  Continue to cut your blue and white fabrics until you have the number of diamonds that you need.

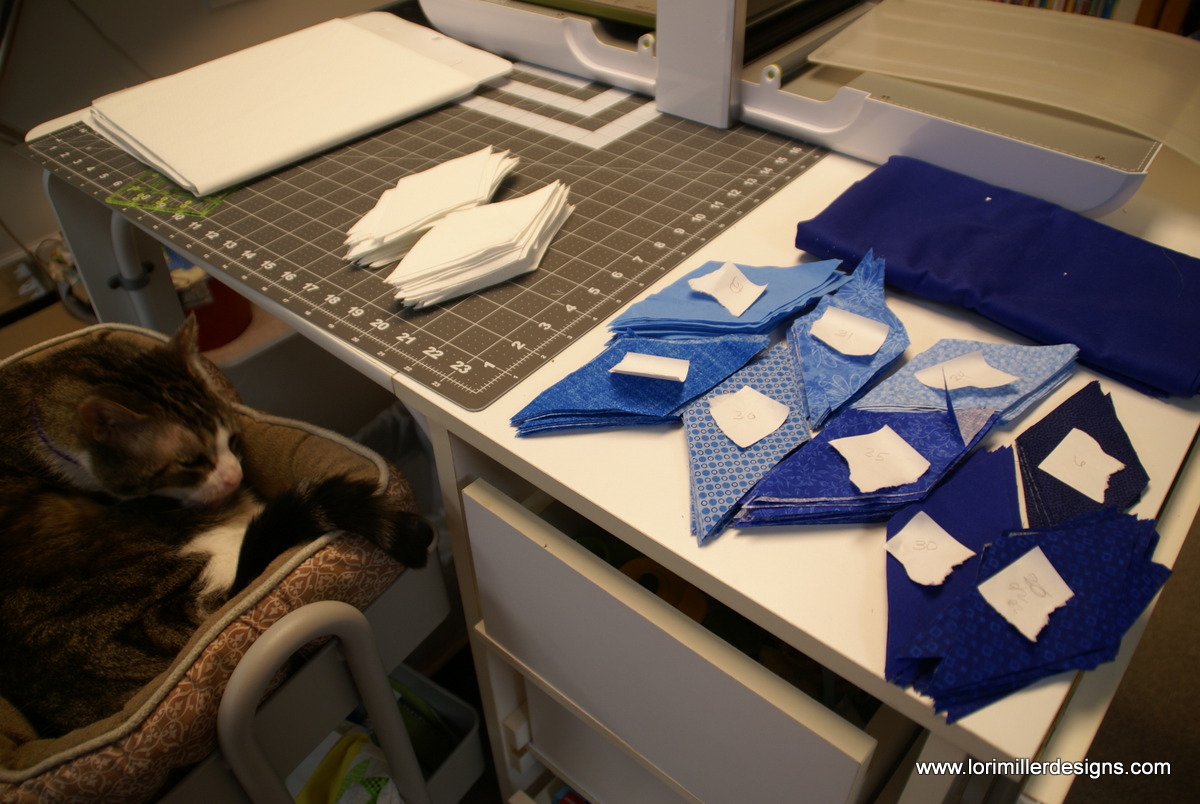
This goes so fast, you will be ready to sit down and sew in no time.  Cookie Cat is helping out.  He likes to sleep in the top of my rolling cart and keep me company.

Assemble the Quilt top:

Start by sewing your diamond inset panel.

Keep in mind which way the diamonds are going for the strip, right or left.  The width of the row will be 2″ finished.  Alternate your blue fabrics with the white fabrics to assemble the striped rope inserts.  There will be nine rows of inserts.


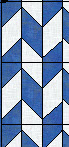
In our EQ8 design, we had a repeating block showing 1/2 diamond blocks at the top and bottom. But when we combine the blocks, we can see how a full diamond is formed by the combined blocks.  We will sew using the full diamond shapes where those form.

I just string pieced the diamonds together until I had the columns completed.

I thought I would share the view out of my studio.  It is a gorgeous sunny day as I sew.

Be sure to align the points, the accurate diamonds really helps keep these together.  You will need to stitch nine columns of diamonds.  You should have 21 diamonds in a column or enough to measure 60 1/2″.  Press flat.

Once you have the diamond inset column together , sew the 8 1/2″ x 60 1/2′ blue panel strip to the left side of the insert.

Sew the 20 1/2″ x 60 1/2″ blue panel strip to the right side of the insert.

Prepare the Anchor applique.  Draw the anchor applique on the paper side of the double sided fusible.  you will need to fold it in half to match the template.  Press the fusible to the wrong side of the red fabric and cut out the Anchor.

Arrange the Anchor where you like it and then press it onto the quilt.

Using a close zig zag stitch, sew around the raw edges of the Anchor applique to secure it.

Finish the Quilt

  1. Create a quilt sandwich with the backing, batting and pieced quilt top.
  2. Baste the quilt layers together.  Quilt as desired.
  3. Add binding and finish.

Were you inspired to try this quilt?  Be sure to let me know your thoughts in the comments and share pictures with me on social media on Facebook or  Instagram.  Be sure to hashtag #LoriMillerDesigns so I see it!  And don’t forget to sign up for my blog updates to you get ideas like these right to your inbox.

Looking for the EQ8 Design Instructions?  You can find them HERE.

For more projects and tips and techniques on using EQ8, visit my Electric Quilt blog series EQ8 Lessons with Lori.

For more information on EQ8, go to Electric Quilt 8 Software.

Easy Holiday Fleece Pillows (free tutorial)

Here are a couple of ideas for some last minute holiday gifts to stitch.  You probably have a stash of fleece somewhere in your sewing room from a sale at JoAnns Fabrics 3 years ago, if not, find yourself a couple of remnants and get sewing.  These are some clever and creative pillows for big and little kids to enjoy. They stitch up in a snap so they are quick and easy for a beginner to make.

Fleece Dog Bone Neck Pillow (For the BIG Kids)

I really wish I had thought up this pattern. My girlfriend Wanda said it was the best little neck pillow ever, great for napping on an airplane, in the car or just drifting off in the lazy chair. I found this pattern at sew4home.com.  It is a free pdf pattern.

You just cut out the pattern and tape it together. Then cut out three of these shapes.

You are going to stitch around 1/2 of two shapes.

Then add the third piece and sew all around leaving only a small opening for turning.

Turn it right side out and stuff it with some polyester stuffing. Then just whip stitch the opening closed.  All done!
Sew4home has the full pattern with instructions. You can whip one up in about 30 minutes. It will use up about 1/2 a yard of 45″ wide  fleece.

Fleece Friendly  Holiday Tree Pillow (For the LITTLE Kids)

This pattern is from me.  I thought it would be a cute accent for the chair or a great little gift for the little ones to get as an early gift before the holiday.

Here is my Free Tree Pattern for the cute little tree pillow.

Finished Size: 10″ x 12″

Materials Needed:

  • 1/3 yard of green fleece
  • Assorted scraps of fleece for the ornaments, eyes, note and mouth.
  • Polyester stuffing
  • Embroidery floss for the mouth
  • Coordinating threads

Directions:

Note: Use a 1/4 ” seam allowance.

  1. Print out the pattern and use it to cut out two pieces of  green fleece placing the center of the tree on the fold.
  2. Embellish the front of the tree.  I cut out little circles for eyes, mouth and ornaments.
  3. Then I pinned them where I wanted them and then used a narrow zig zag stitch in matching thread to sew them all on. It goes pretty fast once you get started, the longest part is changing the thread color. I just used little circles for ornaments, but you can get fancy, add shapes, add rick rack, decorate your tree how you like it!
  4. Embroider the mouth with a large stem or running stitch.
  5. With wrong sides together, stitch ¼ inch from the edge of the fleece leaving an opening at the bottom for stuffing.
  6. Clip the points and turn right side out.
  7. Stuff the tree with polyester stuffing and whip stitch the opening at the bottom closed.

Now you have a cute, washable, and huggable holiday tree!  Enjoy!

Quiltcon 2015 – My Top 10 Favorites

SONY DSC

I am home from Austin and Quiltcon 2015.  It was everything I had hoped for and more.  I don’t think I have ever had this much fun at a Quiltshow.  There was so much going on but I pared it down to my top 10 favorite things.  In no particular order….

quiltcon buttons

#10 Buttons Buttons Buttons

This year there was a button swap.  Folks who wanted to participate made up little metal pin on buttons with their guild logo, or their business logo, or their instagram handle.  It was a great conversation starter and I talked to lots of people I might have been too shy to talk to normally.  Those little buttons gave me a reason to meet a lot of new friends and share a little about ourselves. You could swap them about anywhere, I kept my little bag of buttons with me wherever I went.  I even made the Quilting Daily blog with a picture of me swapping buttons, check it out HERE.

SONY DSC

#9 Stocked up on hard to find goodies

There were some really awesome vendors and I picked up my kitty japanese prints, oohed and aahed over the Oakshot cottons, admired the Doe fabric, and even splurged on some Aurifil thread.  There were some new technology based services like Massdrop, a group buying service and Pattern Jam,  online quilt design software, that I had not been aware of that I now definitely need to look into. There were sewing machine and long arm dealers to try out your dream machine brands.  There was something for everyone in the vendor area.

Nancy Zieman and myself

Nancy Zieman and myself

#8 Met a mentor I admire in person

She may not be officially modern, but she is sewing royalty.  I met Nancy Zieman after her lecture about how Sewing with Nancy came to be.  She was a gracious and genuine speaker and I really enjoyed her inspirational journey.  And she brought Clover goodies for everyone!  The authors, lecturers and teachers were very accessible and you could find them everywhere at the venue.

IMG_2060

#7 Gave a little of my time for others

When I needed a little rest and sit down time, I found the perfect booth.  There I sat and embroidered  and stitched a little outfit for a pig.  It was the cutest little quilt square on fabric printed for you to dress the little characters.  When I finished, I turned him in to be made into a charity quilt.  A very nice way to take a little breather.  Of course, my Detroit Area Modern Quilt Guild had a charity quilt that I worked on displayed in one of the large halls.  It is so nice that the Modern Guilds also give back to our communities.

IMG_2099-001

#6 Gained Loads of Inspiration from the beautiful quilts

There were so many quilts, I think I walked the floor about 3 times and every time saw a quilt I had missed before.  They were beautiful and detailed.  The textures, fabric choices and colors were amazing.  From simple to complicated piecing, they all told exquisite stories.  Here is some of thebeautiful texture, I apologize that I did not get the name and designer of this quilt.

My roomie, Donna A and me

My roomie, Donna A and me

#5 Old friends, New friends

It was hard not to make a new friend at Quiltcon.  Even an old friend that you might have only known before from their instagram pictures or perhaps you had a swap partner you wanted to meet. Even the dear friends that you brought with you to the show was an opportunity to build a deeper friendship.  It was such a friendly atmosphere from the attendees to the people manning the booths, the atmosphere was buzzing.

SONY DSC

 #4 Free Stuff

I do love me some free stuff.  Well, I did spend enough to receive on the conference to receive the MQG swag bag too.  This bag was filled to the brim with patterns, thread, fabric and the cutest little container, book and colored pencils from the MQG.  All around the floor were fabric and thread manufacturers with games, temporary tattoos and freebies for everyone.  Even the demos had prizes.

Donna A, Whatsonemoreproject, HouseofDuke, and Sewtogether Phyllis at dinner

Donna A, Whatsonemoreproject, HouseofDuke, and Sewtogether Phyllis at dinner

#3 Yummy Food

Austin did not disappoint.  There was the expected Tex Mex and BBQ, but just about anything you might desire was there too with lots of fresh ingredients.  I enjoyed delicious fried chicken, some wonderful Italian and a had great Mexican food at some of my favorites.

My blocks from the Patchwork City class

My blocks from the Patchwork City class

#2 I learned something new!

I took two classes by some wonderful teachers.  My first class was Patchwork City with Elizabeth Hartman.  I learned about texture and color and looked at the combination of block parts, colors and patterns so differently than I had before.  Here are three finished blocks all put together.

Donna (dolce-t), Carolyn Friedlander and myself with our aerial grove projects

Donna (dolce-t), Carolyn Friedlander and myself with our aerial grove projects

My second class was Aerial Grove with Carolyn Friedlander.  This class with hand applique on Sunday was the perfect relaxing activity for the end of Quiltcon.  Again I worked with color and scraps.  In both classes, I discovered that less is more and limited the colors for a great effect.  I feel if you learn at least one new thing, the class is always worth it.

RubyThreads and I goofing off in the Moda Photo Booth

RubyThreads and I goofing off in the Moda Photo Booth

#1  Had fun

Whether I was shopping, in class, or hanging out with new or old friends, I had a ton of fun.  I laughed a lot.  Joy makes any adventure memorable.  I had a sweet roomie who made me laugh until I cried.  I caught up with an old friend for lunch and just had fun goofing off with all my pals.  Could it have been any better?

If you were not sure before, start saving up for Quiltcon 2016 in California.

I am home now recovering, napping and doing laundry.  And of course, sewing.  Happy Stitching!


AQS Show – Grand Rapids

(L - R) Me, Loreen, Wanda and Tina

(L – R) Me, Loreen, Wanda and Tina

I joined three of my sit and stitch sisters for a trip to Grand Rapids for the American Quilter’s Society Quilt Show.  This is the third year for the show and it is a fun trip for a group of quilting friends.

295

I also got to meet a wonderful teacher, Kimberly Einmo, and take her Chainsaw Quilt Class.  I had spoken to her on the phone but we had never met.  She is a fun, enthusiastic person and a wonderful teacher.298


You start out making these rotary cut blocks from a layer cake and jelly roll.

SONY DSC

Then you put them together in this way to look like a saw blade.  I used every pink, peach, purpley, salmon colored fabric in my stash and made my own layer cake.  Hopefully it will not be too pink.  I am still working on the squares.

SONY DSC

The pattern was from Kimberly’s book on the left, “Jelly Roll Quilts & More”.  It uses some ingenious rotary cutting to get the shape.

300 - Copy

Here is my first day’s haul from visiting the vendors, there were a lot of cute things but I restrained myself.  I can’t wait to stitch up the thimble blossom mini’s.


In My Studio: Making the best fleece neck pillows ever

I discovered a FREE PATTERN at http://www.sew4home.com for the best little neck pillow ever!    It looks like a big dog bone!

I made one out of some leftover fleece and it sewed up so nice and was sooooo soft.   I dug out a huge bag of fleece scraps and took it up to our cottage in northern Michigan for the weekend.  It was cool and rainy…a perfect day for sewing.  Here is a peek into my weekend of work.

SONY DSC

Here is part of my pile-o-fleece dumped out on the bed.

SONY DSC

I started just cutting out as many pillows as I could.

SONY DSC

Here is my glorious stack of pillows all cut out.  These are my brilliant idea for christmas gifts for everyone this year.

SONY DSC

I wanted to leave one pillow at the cottage, so I stitched up the sides of this cute little sheep that matches my robe.

There are no fabric stores very handy by the cottage, so what to do to stuff my pillow?

SONY DSC

How about a $2 pillow from the only local store, Kmart.  So yes, I cut open that pillow and used the stuffing for my little relaxing neck pillow.

SONY DSC

So I stuffed that little pillow full of my ingenious stuffing.

SONY DSC

Here is my little pillow all stuffed and ready to be stitched closed.

I grabbed the rest of my pillows to take home to sew whenever a need a little break.  I think the family will be delighted with these gifts and I destashed a huge amount of fleece.  I even kept a small pile of the scraps to use just like felt for applique, there were so many colors.

What fun things do you make with your fleece scraps?

Welcome to my Creative World!

Lori Miller Designs  Head shot

I am Lori Miller and this is the official launch of my creative blog.  I finally decided to take the plunge and start to get something out here even though it is not perfect yet.  I have enjoyed sewing for as long as I can remember.  I have been sewing fun little gifts for family, friends and myself.  I took up quilting about 10 years ago, but I really like to make smaller quilted items to get a quicker sense of accomplishment.

I have started making some of my goodies for my shop, Lori Miller Designs, and I thought this blog would be a fun way to document some of my stitching adventures and share the things I love.

I figure this will be a work in progress as I read WordPress for Dummies and check other how to manuals for my blog from the library.  Oh how I love the library!  So much goodness all in one place.  And of course, read all of the goodies on the internet.

Welcome and stay tuned on my blog, definitely a work in progress.