Free Tutorial – Shipmates Bench Pillow

Ahoy!  It is summer and that means sewing projects that are fun, easy and quick to stitch up.  That leaves you plenty of time to soak up the sun and play in the outdoors.  This nautical themed pillow is designed to sit on an outdoor bench or decorate a bench in your home.  It was designed with Electric Quilt 8 using a Horizontal Strip quilt layout.  With some very easy shortcut piecing and machine applique, you can make this pillow up in an afternoon.  Enjoy!

Shipmates Bench Pillow

Finished size is 16″ x 28″

Materials

  • 1/2 yd light blue fabric
  • 1/8 yd navy blue fabric
  • 1/2 white fabric
  • 1 yd backing print
  • 1/4 yd red fabric for binding
  • 1/2 yd muslin
  • 1/2 yd batting or 20″ x 32″ piece

Directions

Cut Fabric:

Light Blue

  • 1 — 16 1/2″ square
  • 2 — 4 1/2″ x 16 1/2″ rectangles

Navy Blue

  • 2 — 6 ” squares

White

  • 2 — 6 ” squares
  • 1 — 16 ” square

Red

  • 3 — 2 1/4″ x  WOF strips for binding

Printed Backing

  • 2 — 18″ x 33″ rectangles

Muslin

  • 1 — 18″ x 30″ rectangle

Batting

  • 1 — 18″ x 30″ rectangle

Water Soluble Marker or Pencil

1 — 16″ square of double sided fusible web

Anchor Template


Piece the Pillow Top

  1. Make the half square triangles to resemble a rope design.  Take the two white 6″ squares and  mark them from corner to corner.
  2. Place the white square right sides together with the navy blue 6″ squares.  Stitch 1/4″ away from each side of the diagonal marked lines.
  3. Carefully cut the squares on the diagonal lines and then in half both ways as in diagram above.  This will create 8 half square triangles for each square for a total of 16.
  4. Press the seams to the darker fabric.  Trim the blocks to 2 1/2″ square.
  5. Stitch the half square triangles together in groups of two to start, then piece them all together to form the rope strips.  I stitched both in the same directions.  Set aside.
  6. Next, print out  the anchor template and tape it together using the guidelines.  Using a light box or a window, trace the anchor outline to one side of the fusible web.  Press the fusible web according to the manufacturers instructions to the wrong side of the white fabric 16″ square.  Carefully cut out your anchor applique.  Peel off any backing.
  7. Position the anchor in the center of the 16 1/2″ light blue square.  One you have it where you like it, press the anchor onto the center of the pillow.
  8. Now applique around the outside edge of your anchor to finish the applique.  You may need to use some stabilizer underneath the design as you stitch so that the background fabric does not pucker.  Use a light tear away or other stabilizer of your choice.  I used  a zig zag stitch that was a little bit larger than a satin stitch.  For the points, I taper the stitch down before I turn.
  9. Next assemble all of the strips to create the pillow top.

Quilt the pillow top

  1. Layer pillow top with the muslin, batting and pillow top, right side up.
  2. Pin baste the quilt layers together.
  3. Quilt as desired.  I used painters tape to mark diagonal lines and then I quilted straight lines diagonally.  Trim the pillow top to 16 1/2″ x 28 1/2″.  It might be slightly smaller depending on how much quilting you did. 

Finish the Pillow

  1. Fold each 18 ” x 33″ background print rectangle in half, wrong sides together, to form two 18″ x 16 1/2″ rectangles. Press.
  2. Top stitch along the folded edge of the pillow about 1/2″ away from the fold.
  3. Place the quilted pillow top, right side down.pillow-back
  4. Place two folded rectangles over each pillow, overlapping the folded edges in the center by about 4″.
  5.  Baste 1/8″ along the outside of the layers.  Trim.  Don’t you love this cute print that matches the applique so perfectly?  I found it in my stash.
  6.  Bind with the red binding strips.
  7.  Finish by inserting a pillow form through the opening.


I would love to see pictures of your Shipmates pillows!  Tag me on Facebook or Instagram @lorimillerdesigns

Looking for the EQ8 Design Instructions?  You can find them HERE!

For more projects and tips and techniques on using EQ8, visit my Electric Quilt blog series EQ8 Lessons with Lori.

For more information on EQ8, go to Electric Quilt 8 Software.

Hexie Pincushion Tutorial

I love pincushions, all kinds and I have a bunch all around my sewing studio.  I first saw a version of these pincushions at Quiltcon 2015.  I was in Carolyn Friedlander’s class and behind me on a table sat a cute hexie pincushion.  I found out later it belonged to Nicole Daksiewicz from Modern Handcraft.  (She has some amazing hexagon quilt projects, check them out on her blog!) I discovered that she had a Hexie Pincushion tutorial and I wanted to make one for myself.  She used a die cutting machine to cut out all those cute 1/2 inch hexies.  I bought a bunch of wool felt and decided I would cut them out by hand.  Fast forward to December 2015 and my hubbie gifted me a Die cutting machine and that little 1/2 inch hexie die. I decided to make some of those pincushions inspired by Nicole but I added my own twist.  Here is how I made it.

I had several colors of wool felt and I ran them through the die cutting machine.  I used a muffin tin to organize all of the colors of hexies.

I cut a 6 inch strip of a linen blend.

I folded the fabric in half with the fold at the bottom.  Then I used a 60 degree triangle and positioned it so that the  top and sides measured 3 1/2 “.  This is an old Kay Wood ruler that I had.  I am thinking I really need to update some of my rulers, but this one still worked.

When you open up the fabric, you have a nice large hexie shape.  I fold it to mark the center and then iron out the fold lines.

Then, using some fabric glue stick, I arrange the hexies in a sort of circle shape.

Once the shapes are all arranged, I get a piece of scrap batting and start to quilt.

First you stitch through the center of each little hexie starting at the edge of the big hexie.  I like to use a large stitch and a walking foot to quilt this part.

Then you just keep quilting across the little hexies from point to point.

This shows the final quilting of the last corners of the little hexagons.

Here is a picture of one trimmed after the quilting.  Now you are ready to stitch on the bottom of the pincushion.

Trim the excess batting from the top of the pincushion.  Using the same method as the linen hexagon top, cut a coordinating bottom for the pincushion.

Stitch a 1/4″ seam all around the hexie leaving an opening for turning on one side.  Trim the corners and turn right side out.

Tuck in the open sides and press.

I stuffed my pincushion with a bunch of batting scraps I had.  You can stuff it with your favorite pincushion filling.  Then just whip stitch the opening closed.

These would make great gifts or be a good project for a sewing group to stitch up together.  Happy Sewing!

New Pattern – Poinsettia Pop Throw Quilt


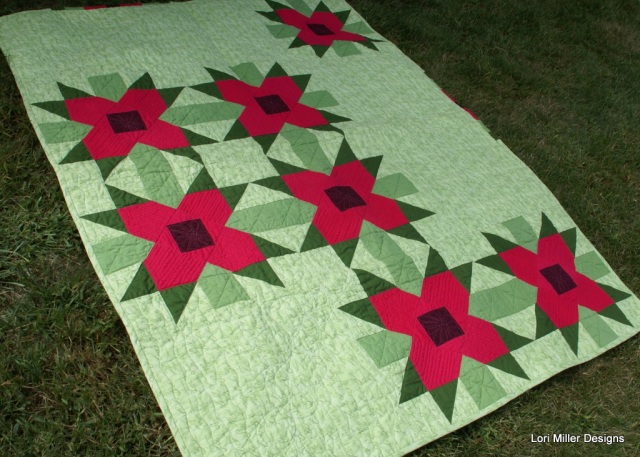
I am excited about my new holiday pattern now available in my shop.  It is called Poinsettia Pop and it is a generous lap size to snuggle under when the weather turns cold.  The bright and cheery poinsettia blocks dance across the quilt bringing cheer to whoever receives it.

This quilt is made using large 15 inch finished blocks that stitch up quickly.  You only need to piece seven Poinsettia blocks so you can whip it up in time for last minute gifts.  I even included some speedy techniques to save you some time.  The bright hot pink fabrics, text print background, and alternate grid pattern give this block a very modern look.

The Poinsettia is actually a variation of the traditional Providence block.  I am not sure if it is named after the city in Rhode Island or has a deeper meaning of the manifestation of divine care, but it is a lovely thought for a holiday gift.poinsettia pop

The layout creates some additional designs and star patterns.  You could use my design as a base and let your imagination run wild.

You can find my Poinsettia Pop Throw Quilt pattern for sale by following the link for My Patterns.

Thanks for checking it out!  Tag me on Instagram, I would love to see your version!