Stitch up some Tailgate Napkins (free tutorial)

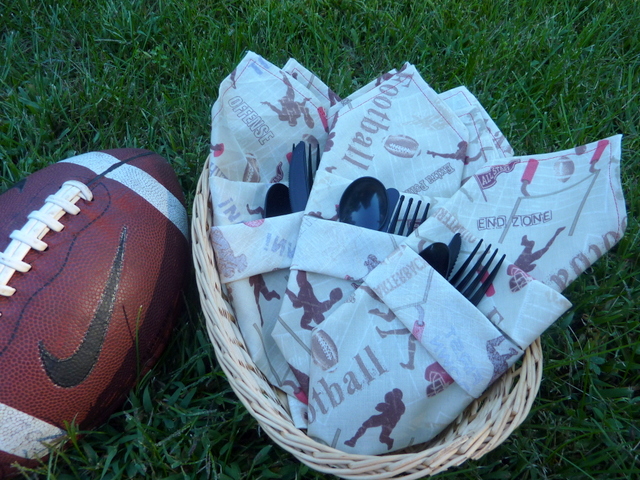
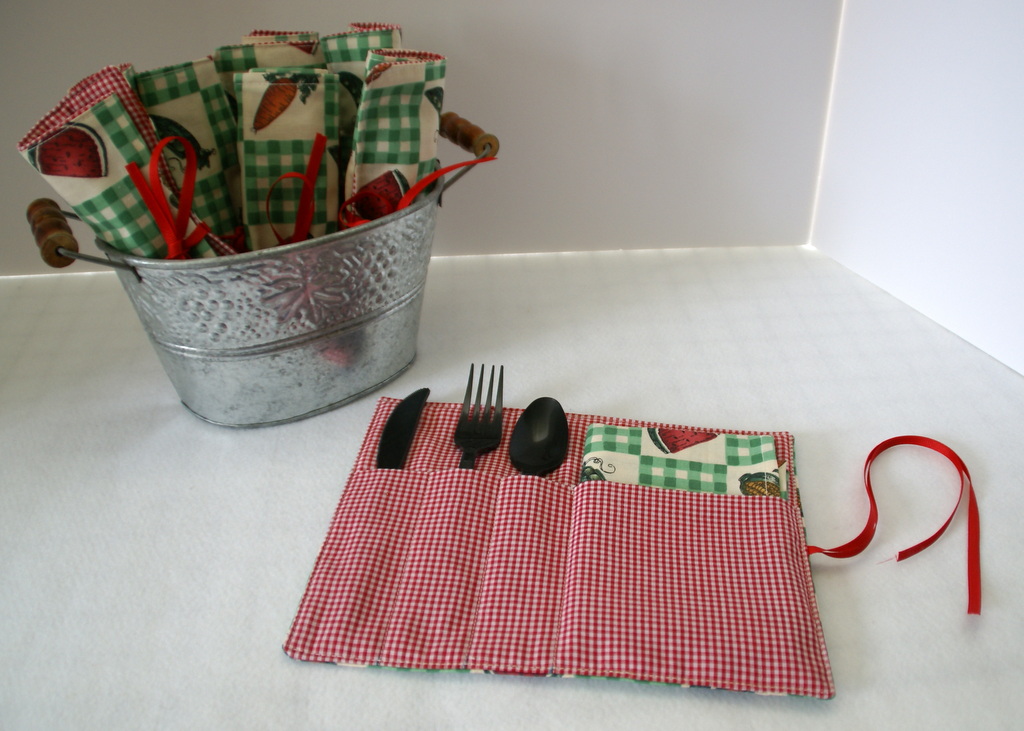
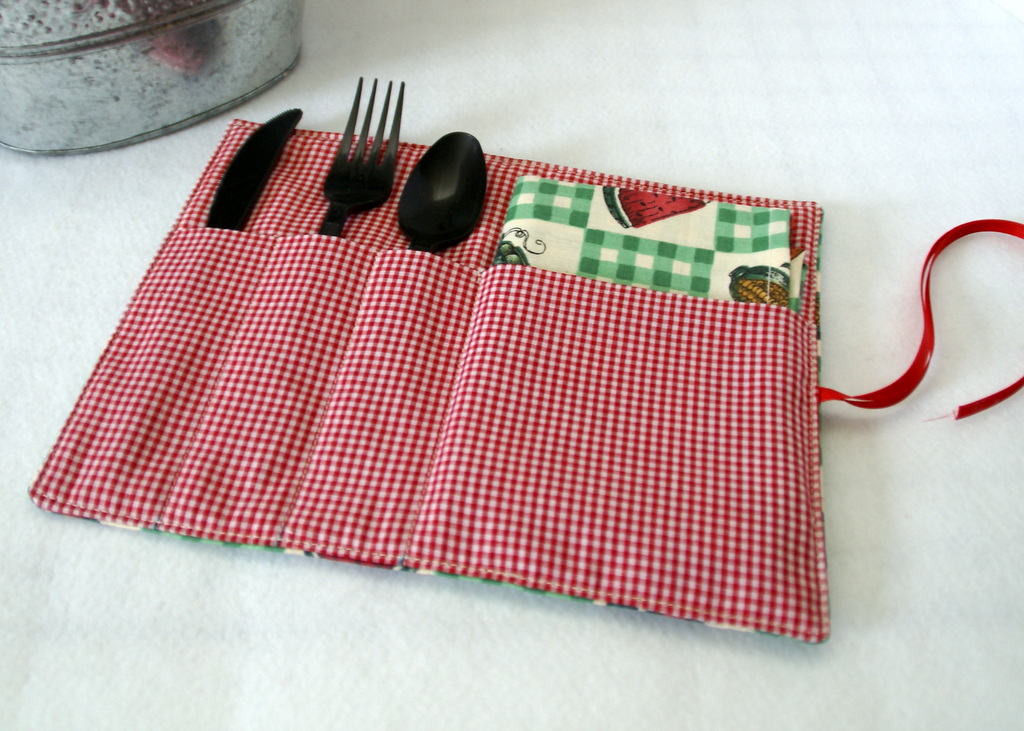
Are you ready for some tailgating? It is football season, and the crisp air and smell of the brats on the grill are here. A little party with friends and good food is in order before the game, so make it easy and fill these cute DIY napkin pockets with silverware, and set them out for your guests. The napkins are super easy to stitch up. Then you just fold ‘em, stuff ‘em and arrange ‘em in a pretty basket or container. Clean up is a snap — just toss them in the washing machine and they are ready to go for the next game.  Below are directions on how to make the hem and how to fold the napkins to hold that silverware.

Materials required:

P1080704

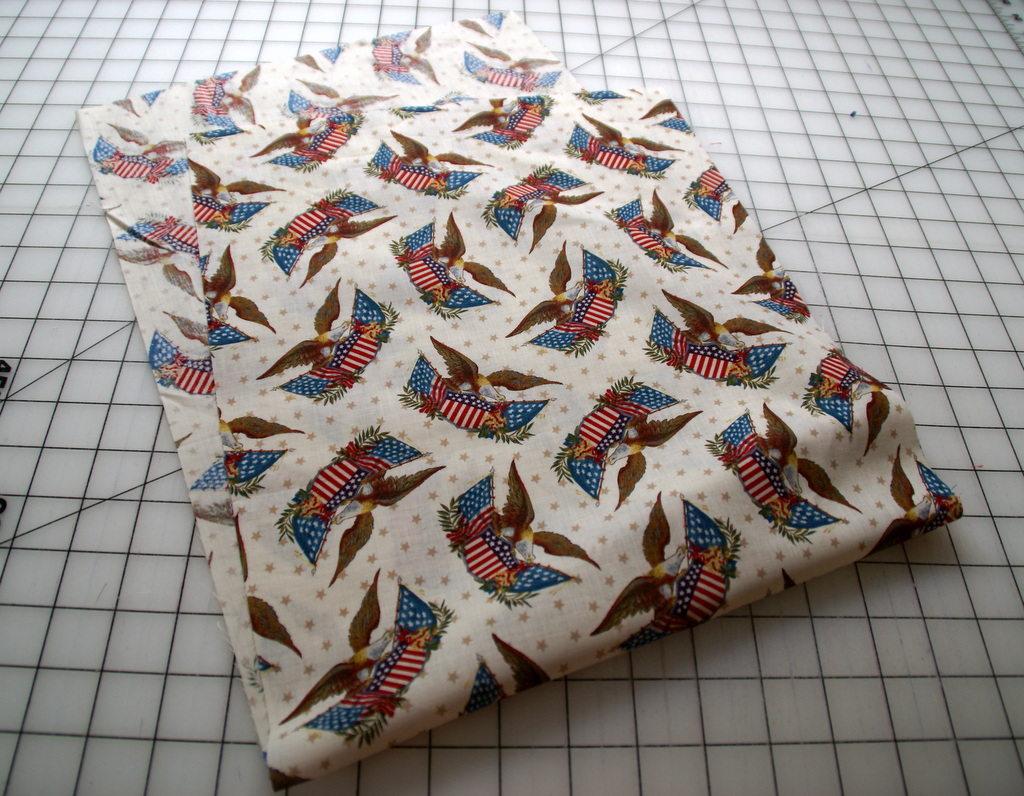
  • 2 yds of a football themed cotton or a mix of your teams colors
  • Coordinating thread

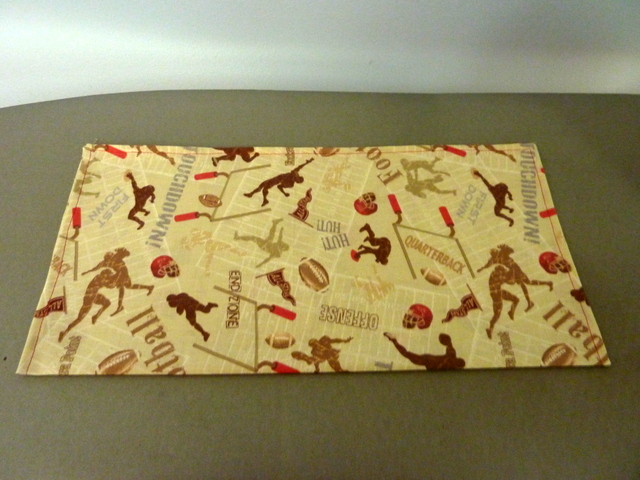
Finished size: 16″ x 16″, 8″ x 8″ folded.  Makes 8 napkins.

Directions:

P1080709

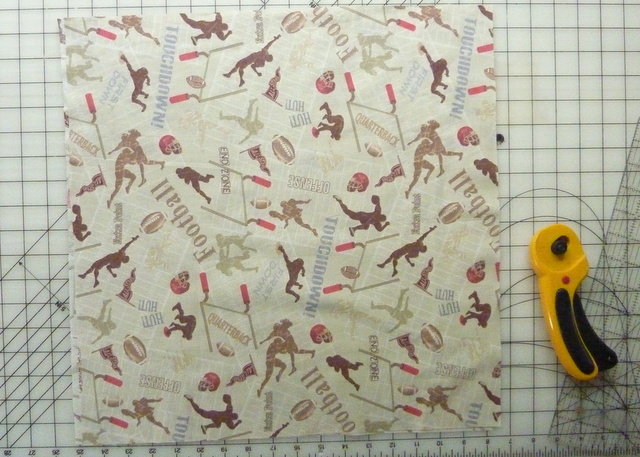
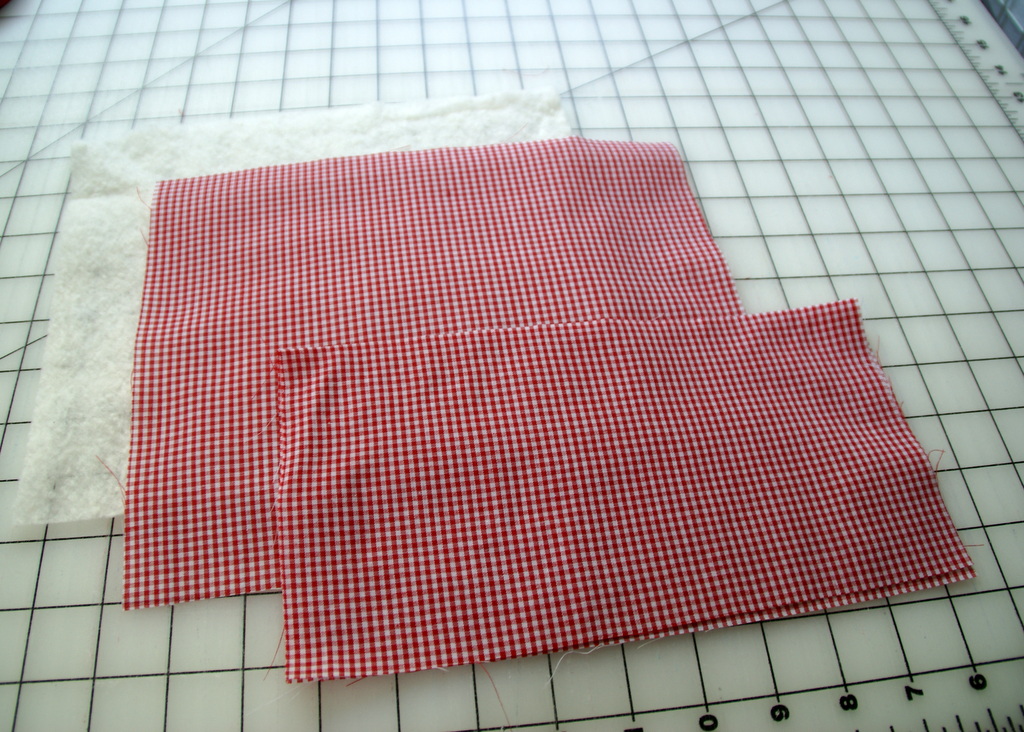
  1. Cut 8 – 17 1/2″ x 17 1/2″ squares.
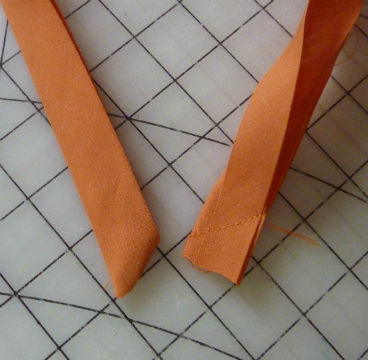
  2. Stitch a 1/4 inch double fold hem all around the fabric to form napkins.  Here is how to make a double fold hem.basics hem 3
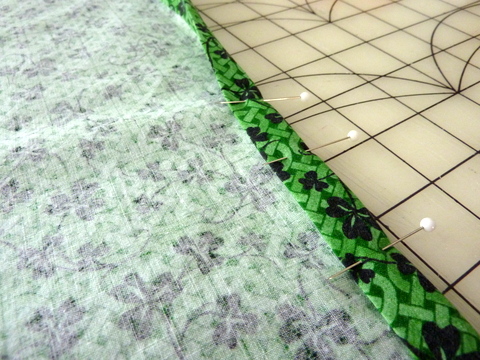
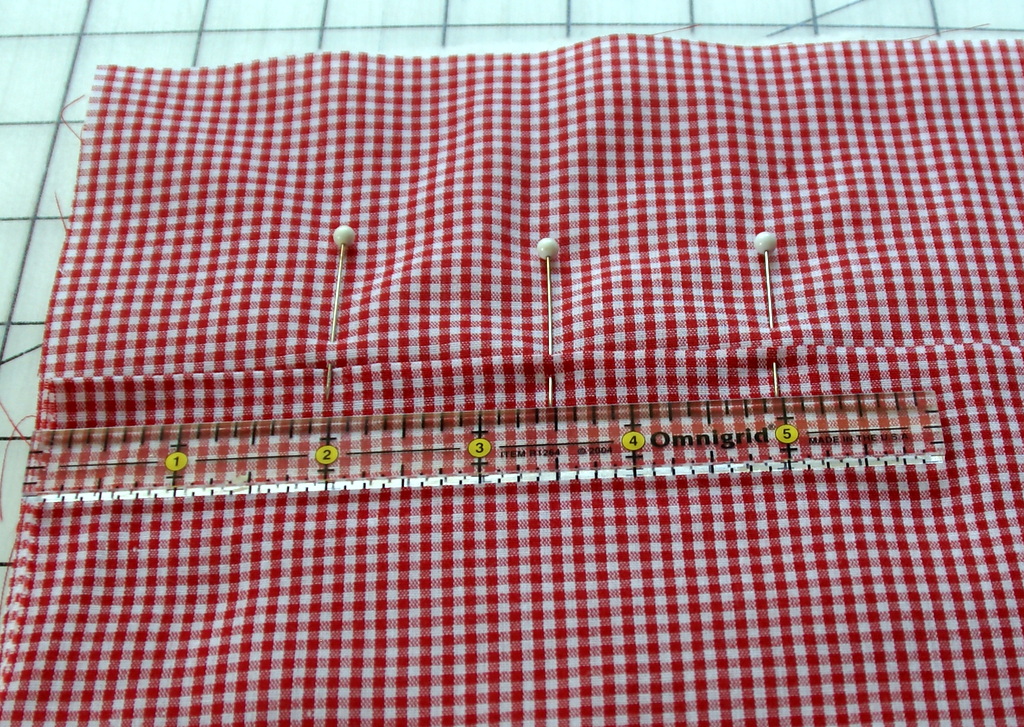
  3. Fold the material over 1/4″ with wrong sides together.  Fold it over 1/4″ again to encase the raw edge inside of the hem; pin in place.basics hem 4
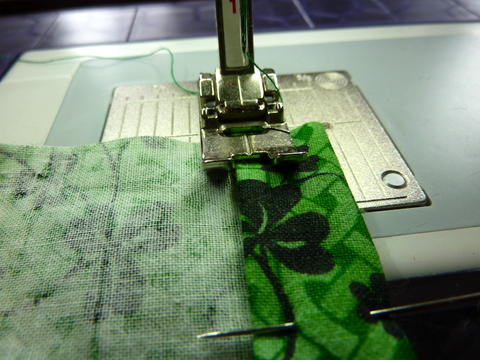
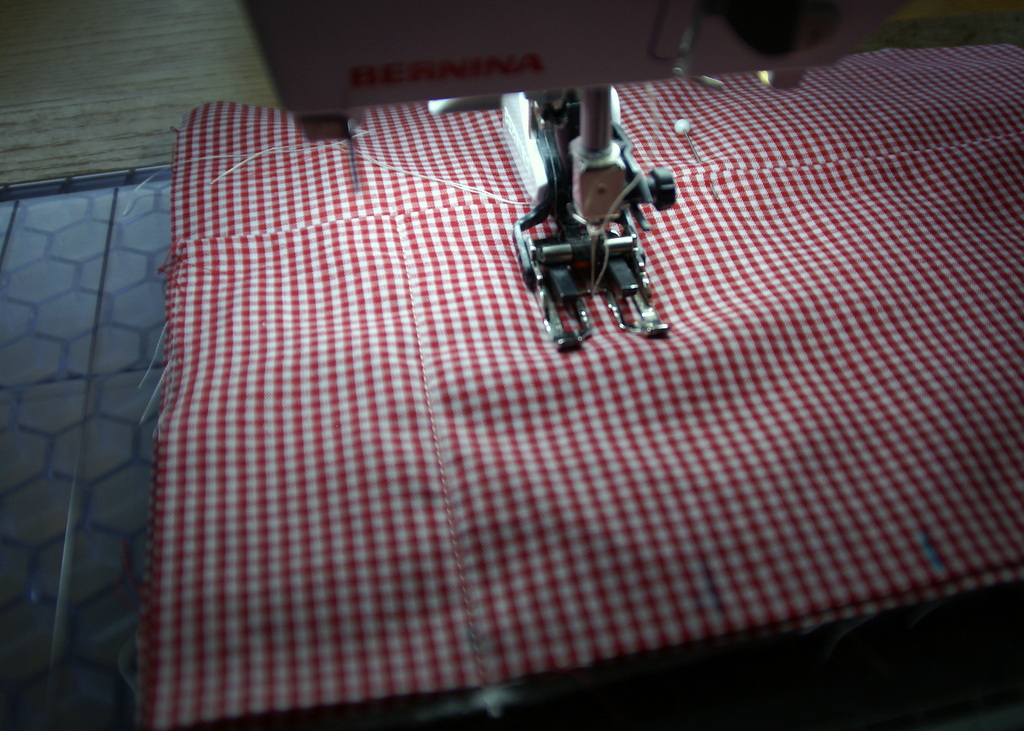
  4. Sew the hem about 1/8 inch from the folded edge of the fabric. Backstitch one or two stitches at each end to secure the threads. Pull out  pins as you go, so you don’t sew over them.basics hem 7
  5. Trim your threads.basics hem 8
  6. Iron the hem flat to finish.

 Here is another way that you can sew the corners on your napkins:

P1080714

Fold the corner up 1/4 inch twice.

P1080715

Then when you fold the sides, it will form a tiny miter that you can sew through.

P1080719

Here is the finish of the corner.

P1080718

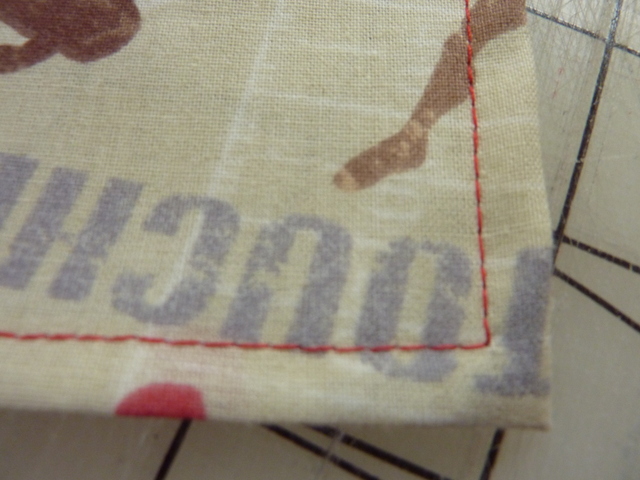
I stitched the top side with red thread for a nice accent.

Here are directions on how to fold your napkins for the tailgate party.

P1080720

Iron the napkin flat, wrong side up.

P1080721

Fold the napkin in half, with the fold on the bottom.

P1080725

Bringing the left edge to the right edge, fold the napkin in half again with a fold on the left.

P1080727

The top right of the napkin will have all the corners.

P1080747

Taking the top right layer, fold down in half and iron a crease.

P1080762

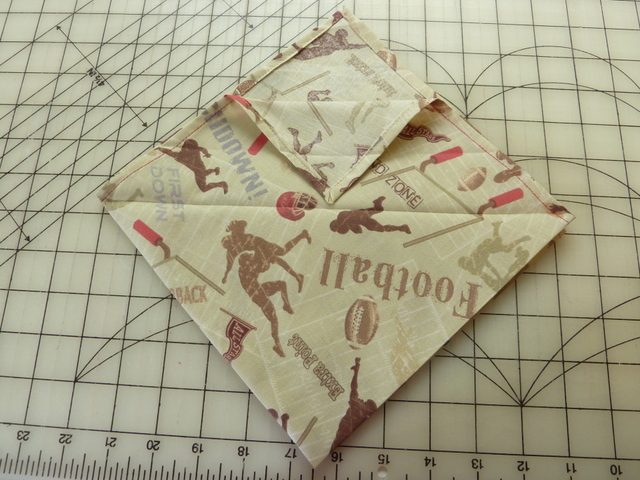
Open back up and fold the corner to the crease.

P1080763

Take the folded top edge and fold down to the crease again.

P1080766

Fold the whole thing down again.

P1080767

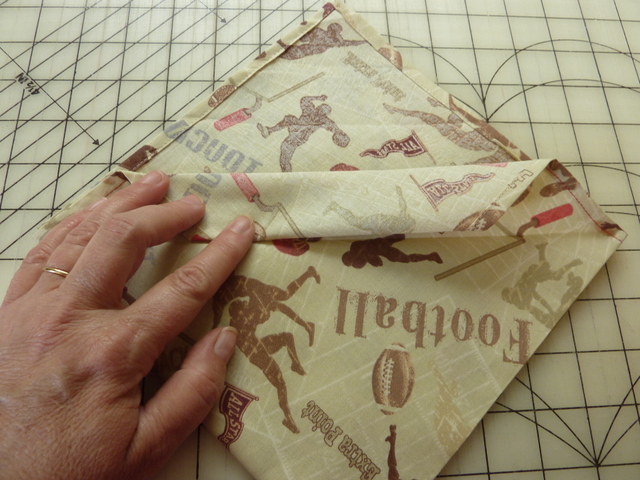
Now, take the next top right layer and fold down the corner about an inch or so.

P1080768


P1080770

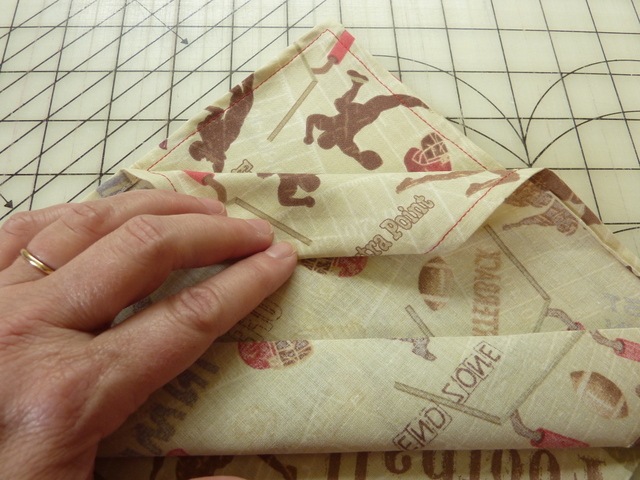
Fold again two more times until it meets the first folded corner.  Iron it all flat.

P1080757

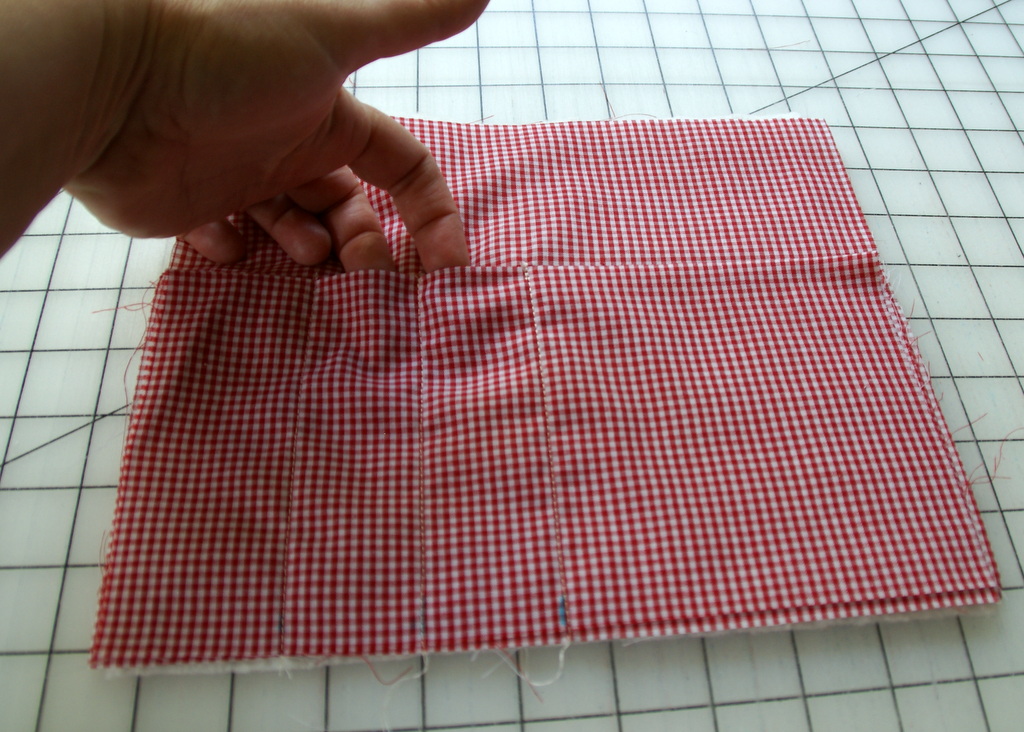
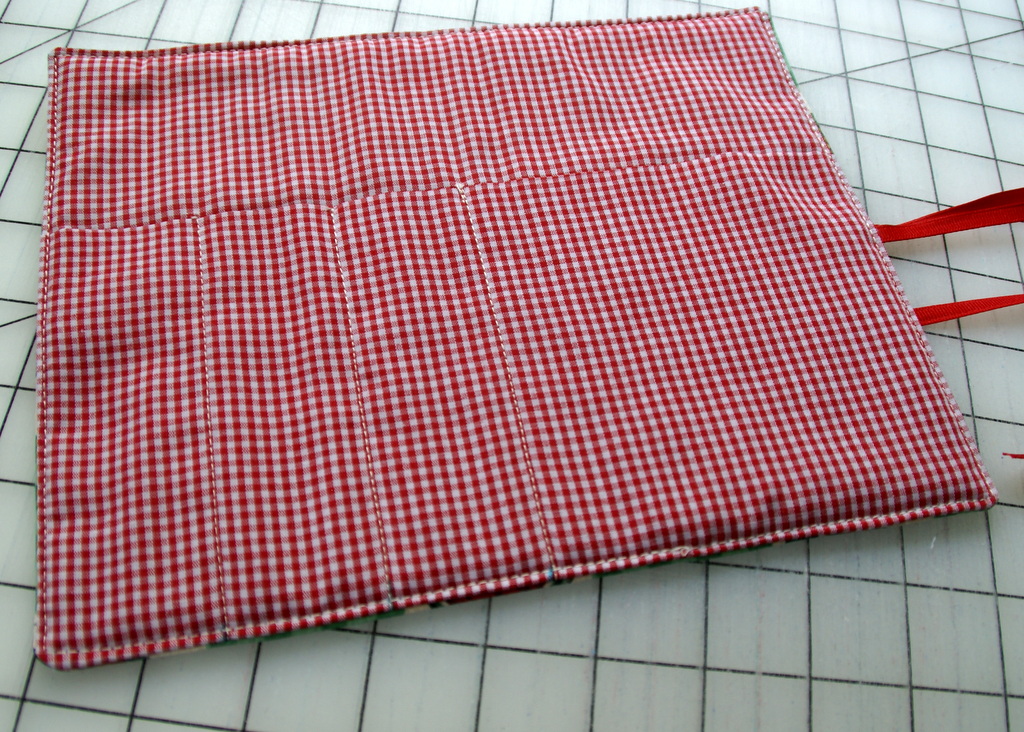
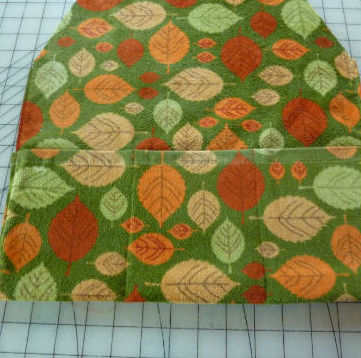
Flip over and fold over each side in thirds to form the pocket on the front side. Iron the napkin flat.

P1080773

Flip it back over and you can see the little pocket on the bottom half your napkin.

P1080759

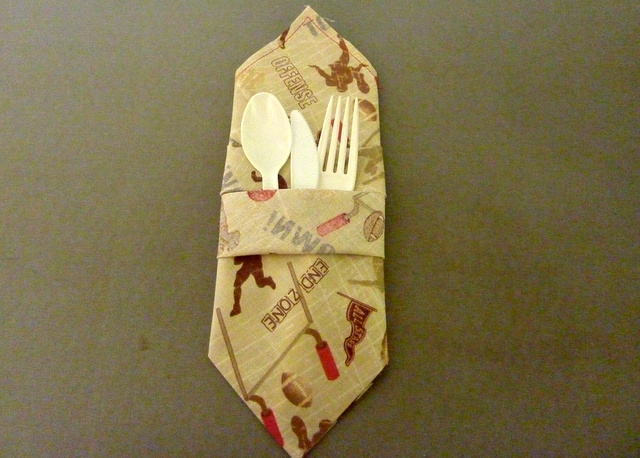
Just tuck your silverware  into the bottom pocket. Make sure you get them in the right place or the silverware will slip out.  Pretty nifty, huh?  You can stack them in a basket or bucket for the tailgating party so everyone can grab them as they go!

Happy Tailgating!

Mod Apple Hotpad (free tutorial)

mod apple hotpad lori miller designs

I am happy to share my Mod Apple Hotpad post that I presented as a guest blogger for the American Quilting Society’s (AQS) OnPoint Newsletter.  I have been an AQS Member for many years. They sponsor wonderful quiltshows and classes.  If you have not checked them out, start with their free newsletter which features free patterns, tips and other quilty information.  You can sign up HERE. And check out their Blog too!  Now, on to my post!

I spent a week at my cottage in northern Michigan and I was able to visit the local farmers market.  I was thrilled to find my favorite early apple, Ginger Gold. They are a cross between an early apple and a yellow delicious: tender skin and tangy flavor. They were the only thing I could eat when I was pregnant many years ago with my son and I still love them. They are the inspiration for this fancy little apple hot pad. This one is a Pink Lady apple, but you could easily make a tasty Red Jonathan, yummy Yellow Delicious or Green Granny Smith. Make your favorite apple to celebrate the arrival of fall.

Materials:

  • 1 – 3 ¼” x 40” strip for apple center
  • 1 – 1 ½” x 40” strip for outer apple skin
  • 1 – 1 ¼” x 40” strip for inner apple skin
  • 1 – 3” x 6” rectangle for leaf
  • 1 – 12” x 12” square for back of apple hotpad
  • 1 – 12” x 12” square of Insul-Bright insulated batting (Note: This batting by The Warm Company reflects energy, hot or cold, back to itself. You can find it with the utility fabrics.)
  • 60 degree ruler or my triangle template

Directions:

Cut:

  1. Print out my FREE Mod Apple Hotpad Templates.
  2. Using the hexagon template, cut out the back of the hotpad.
  3. Using the same hexagon template, but out the insul-bright batting.
    apple hotpad 2

Sew:

  1. Stitch the strips together, one at a time, ironing seams open. Make sure the narrow strip for the inner apple skin is in the center.
    apple hotpad 3
  2. Using a 60 degree ruler, cut six equilateral triangles. If you have a 60 degree ruler, this goes pretty fast. I had an old Starmaker ® 6 ruler from a Kaye Wood class that I had attended. Several companies make them, but if you don’t have one, just use my template, a regular rotary cutter and straight rotary cutting ruler.
    apple hotpad 4
  3. Position the ruler to start cutting with the outside apple skin on the bottom.
    apple hotpad 5
  4. Cut out a triangle.
    apple hotpad 6
  5. Flip the ruler and cut another triangle from the top, Lay these aside and save them for another project or make them into another hotpad.
    apple hotpad 7
  6. Cut six triangles total. There should be enough fabric to cut six apple triangles and six other triangles.  Stitch your triangles together. Be sure to line up the seams on each side so they match.
    apple hotpad 8
  7. Piece them in groups of three and press seams open.
    apple hotpad 9
  8. Stitch the two halves of the apple together, aligning the seams and iron flat
    apple hotpad 10
  9. Fold the leaf fabric right sides together and mark the leaf.
    apple hotpad 11
  10. Layer a small piece of batting underneath and stitch around the leaf leaving a place to turn. Snip curves and turn right side out. Whip stitch the opening closed.
    apple hotpad 12
  11. Quilt the leaf.
    apple hotpad 13
  12. Make a quilt sandwich. Lay the backing right side up, the pieced apple right side down and the Insul-bright batting on the top. Pin and stitch all around, leaving an opening to turn.  Turn the apple right side out and whipstitch the opening closed.
    apple hotpad 14
  13. Quilt the apple. I just used straight line quilting with my walking foot.
    apple hotpad 15
  14. Here is a close up of my quilting from the back.  I made the center of the apple with a couple of seeds.
    apple hotpad 16
  15. Tack on the leaf.  I just stitched a small triangle at the base.

That is it, a bright, cheery apple to decorate your table and a practical hot pad to boot. What is your favorite apple?

New Pattern: Cedar Lake Tote Bag


Introducing my latest pattern, the Cedar Lake Tote Bag.  Designed in two sizes, this cute and versatile tote bag will carry all of your goodies in style.  It is the perfect design to highlight a favorite fabric for the main body of the bag, you can simply add coordinating fabrics to the paper pieced economy block topper to create a sophisticated look.  This lined tote has one or two inside pockets and sturdy handles attached with D rings for the perfect accent.  Cedar Lake has a special meaning because that is where we go to spend our summers in Michigan – up north!


Yes, the economy block is paper pieced, but with my directions and cutting hints, you can easily master this block.  I give you generous pattern pieces to make the piecing so much easier.  You can use scraps or have a coordinated look, but the result is simply stunning.

The design adds a little whimsy with one of the paper pieced blocks by reversing the dominant light and dark prints.

The inside of the large tote features two pockets that you can subdivide to hold pens, pencils or even a cell phone.

The small version of the bag is just as versatile in a more petite shape with only 3 paper-pieced blocks on each side.  I had this great black cat graphic print and loads of black and white scraps for the economy block topper.  I even fussy cat a little kitty for the center block on one side.  Go bold with a lot of color or keep it in a two color simple look like this one.

The small Cedar Lake Tote features just one inside pocket.  It is sized to hold regular size 8 1/2″ x 11″ sheets of paper or a notebook easily.  Just toss in a few things and go.


You can purchase my quilted Cedar Lake Tote Bag pattern as a PDF download by going to MY PATTERNS tab and following the link to My Etsy Shop.

Thanks for letting me share!  Tag me on Instagram at lorimillerdesigns, I would love to see your version!

DIY Seed Packets – free tutorial

seed packets

Even though I am a quilter, I am also a lifelong gardener.  Both fill me with joy and help me to relax.  Now that it is September, the garden is winding down.   I find myself looking for seeds to save for next year, especially flower seeds.  I am gathering zinnia, marigold, four o’clocks and morning glory seeds right now.

seeds

It is time to organize all of the seed packets I have strewn all over the sunroom and find a way to save the seeds.  Here is how I store my seeds and a free tutorial on how make your own seed packets for seeds you might be saving.

Storing your seeds

seed container

I use an airtight container like a glass jar or plastic container with a lid to store my seeds.

P1080701

To keep out moisture, I add a few of those little packets of silica jel saved from pill containers to keep them dry.  Then I put my seeds inside a paper or cloth grocery bag to eliminate any light and I leave them in my sunroom over the winter.  It is not heated, so the seeds get freezing cold.  This simulates being in the cold ground, so when spring comes, the seeds know it is time to be planted.

Can you keep seeds for more than one year?

I say YES, you don’t have to have new seeds each year if you have some left over.  They are too expensive to just throw away!  Many seeds keep for at least two years and often many more years if you store them in a dry, cool place.  I tend to use my seeds for several years as long as they will still germinate.  Some seeds are notorious for not keeping over the season for me, like lettuce and spinach, but almost everything else works.

P1080700

Organizing your seeds

I like to organize mine by alphabetical order, but I am thinking I should switch it up and do it by the timing of when to plant them instead.  I also like to separate vegetables, flowers and herbs into their own groups.

Saving Seeds

I like to save a few seeds for the next year, some things go to seed and it is easy to gather them.  Some of my favorites that are easy to save are zinnia, morning glory, forget me not, and marigold seeds.  I will also save seeds from melons, cucumbers and anything that gets too big before I pick it!  Just remember that if you planted a hybrid seed, the seeds will not grow true.  I like to pick heirloom seeds that you can easily save and get the same plant.  I have some funky heirloom cherry tomato seeds right now that I can hardly wait to plant next year.

P1080699

Make your own seed envelopes

I let the seeds dry and then I make these cute envelopes and labels to store and keep them.  I have found the heavy weight scrapbook paper is perfect for this, but you could recycle junk mail or catalogs too.  Here is the FREE DIY Seed Envelope Pattern in two sizes and a FREE DIY Seed Labels Template  (The labels are in an MS Word file template using Return address labels sized 1″ x 2 5/8″).

Materials:

  • 12″ x 12″ Scrapbook Papers
  • Heavy Cardstock for template
  • Glue Stick
  • Pencil
  • Scissors
  • Return address labels sized 1″ x 2 5/8″ for printer

Directions:

  1. Print out the template and cut it out of heavy cardstock or cardboard to use to trace around.P1080669
  2. Position it on your scrap book paper and use a pencil on the wrong side to trace around it.P1080671
  3. You can fit 2 large and 2 small envelopes on a standard 12 x 12 scrapbook paper.P1080675
    P1080678
  4. Cut out your envelopes.P1080679
  5. First fold the large side flap.P1080680
  6. Use a glue stick to glue the outside edge of the flap.P1080682
  7. Fold the small flap over and crease in place.P1080687
  8. Glue the bottom flap and fold it up into place.P1080690
  9. Let the envelope and glue dry for a bit.P1080693
  10. They are so easy, make a bunch of envelopes.P1080697
  11. Print out your labels and attach one to each  envelope.P1080699-001
  12. Mark the label with the type of seed and date and then fill them up with your saved seeds.  Fold the top flap down and secure with a sticky dot or  a little glue and organize them in your container.

Gift idea!  Make these for Mother’s day or for a garden party for favors.  These would make nice gifts to slip inside a birthday card too.

What seeds do you like to save?

New Pattern – Poinsettia Pop Throw Quilt


I am excited about my new holiday pattern now available in my shop.  It is called Poinsettia Pop and it is a generous lap size to snuggle under when the weather turns cold.  The bright and cheery poinsettia blocks dance across the quilt bringing cheer to whoever receives it.

This quilt is made using large 15 inch finished blocks that stitch up quickly.  You only need to piece seven Poinsettia blocks so you can whip it up in time for last minute gifts.  I even included some speedy techniques to save you some time.  The bright hot pink fabrics, text print background, and alternate grid pattern give this block a very modern look.

The Poinsettia is actually a variation of the traditional Providence block.  I am not sure if it is named after the city in Rhode Island or has a deeper meaning of the manifestation of divine care, but it is a lovely thought for a holiday gift.poinsettia pop

The layout creates some additional designs and star patterns.  You could use my design as a base and let your imagination run wild.

You can find my Poinsettia Pop Throw Quilt pattern for sale by following the link for My Patterns.

Thanks for checking it out!  Tag me on Instagram, I would love to see your version!


Grandma Town BOM #8 – Pie Quilt Block

Pie is a glorious thing.  I choose it over cake or even chocolate.  My Grandma was a master pie maker and she taught me the secret art of a light and flaky crust.  This month’s Grandma Town Block of the Month is a PIE, of course.  My favorite pie is Gooseberry.  It is the green, tart cousin of the red currant.  It is simply heaven.
Grandma Town Pie Grandma always made two pies at a time and I have the recipe memorized.  She taught me how to spin that rolling pin on a giant wooden board that pulled out of an old spice cabinet hutch.  Her pies were the highlight of any meal, made with real lard and served with vanilla ice cream.  I think of her every time I pick gooseberries and make a tasty, sour lip smacking pie.  You can make any kind of pie you like, I made blueberry and cherry.  Are you sewing along?  If you are, post it on Instagram and tag me @lorimillerdesigns and #GrandmaTownBOM so I can see what lovely things you are stitching up. A comprehensive pattern and directions for the Pie block along with the whole BOM is currently in development.

Enjoy! grandma Town Quilt A

Grandma Town Block of the Month

If you are new to the Grandma Town BOM, this row by row quilt was a labor of love to celebrate my Iowa roots.  I spent my childhood visiting my Grandparents on their farm just west of Des Moines in Earlham, Iowa.  It is especially a tribute to my dear Grandma.

When my sisters, brother and I were little and my parents would drive us to my grandparents farm, my brother would yell, “We are going to Grandma Town!”.  It was a loving tribute that stuck.  This little quilt is full of those reminders of the farm and of Grandma, who loved to garden and loved to cook.  Each block is a sweet memory of my youth growing up on that country farm.

I hope you will find some shared love for your family, a cherished farm  or your own grandma in my quilt.  You can make all of these sweet blocks or pick and choose the blocks you like the most to make something special for yourself or a dear loved one.


Released Blocks – 2015

FEB  Block 1 – Forget Me Not Flower

MAR  Block 2 – Sewing Machine

APR Block 3 – Nine Patch and Color Block Rows

MAY Block 4 – Ear of Corn

JUN Block 5 – Sweet Hearts

JUL  Block 6 – Canning Jar

AUG Block 7 – Barnyard Double Block

State Fair Winning Ribbon (free tutorial)


With all of the delicious fruit available, all I can think of is making pies and jam.  It reminds me of the Iowa State Fair of my youth.  Everyone went to the state fair and my family always had a few entries.  My Dad was a beekeeper and he always entered some honey or an observation hive of bees.  He won many ribbons and this cute and quick ribbon gives me fond memories of those days.  This ribbon would also be good to make for quilt shows, your own contests or to decorate for a party, wedding or shower. How about red, white and blue?  They feature raw edges and just a little bit of sewing so you can make several very quickly.

Materials:

  • Scraps of coordinating cotton fabrics or use one color (1/4 yd is generous)
  • A 5 x 5 piece of wool felt
  • large button
  • coordinating thread

Directions:

Print out my FREE State Fair Winning Ribbon Pattern.

fair ribbon

Cut

  • 1 – Small circle pattern A from the wool felt for the base of the ribbon
  • 2 – Side ribbons from pattern B (Be sure to flip the pattern so you have one going each way.)
  • 1 – Middle ribbon from Pattern C
  • 4 – Large circles with Pattern D
  • 4 – Small circles with Pattern E

Assemble and Sew

P1080251


  1. Take one of the side ribbons B and take a small pleat or tuck to gather the top.P1080252
  2. Using a pin, pin the tuck to one side of the middle ribbon C at a slight angle.P1080253
  3. Take the other side ribbon B and make a tuck and pin to the other side of the middle ribbon C.P1080257
  4. Make two tucks in the center of the middle ribbon.  Start with one side and pin it and then tuck the other side.P1080260
  5. Place your streamer ribbons over the bottom of the felt circle base.  Stitch across all of the ribbon streamers and tucks, backstitching each side to hold it in place.P1080264
  6. Fold the centers of the ribbon.  Take a large circle D.
    P1080265
  7. Fold it in half, wrong sides together.  Next, you will need to make two pleats in the fabric but leave a point making it into a quarter pie shape.  I will talk you through it.
    P1080266
  8. Pleat and tuck one side.
    P1080267
  9. Fold the tuck to the back like the picture above and pin.
    P1080269
  10. Make another pleat and pin it too.  Pleat and fold each circle into a quarter triangle shape. You don’t have to be too accurate but you will need the center point.
    P1080270
  11. Places the circles together on the felt base.
    P1080272
  12. Continue until you have all four pleated circles in place.
    P1080276
  13. Starting about 1/2 inch from the center on one side of a triangle point, stitch across the end point of each folded circle.
    P1080277
  14.  You will stitch in a square, pivoting to stitch over each edge of the folded circles.
    P1080281
  15. Fold the small circles for the center of the ribbon using the small circle E.
    P1080283
  16. Fold the small circle in half, wrong sides together.
    P1080284
  17. Make one pleat to create a triangle that is about 1/4 size of the full circle and pin it.
    P1080287
  18. Begin laying the small pleated circles so that they cover the stitched seam from the large folded circles underneath.
    P1080292
  19. Slightly overlap the points on this layer of folded circles.
    P1080293
  20. Stitch a tiny triangle shape through the center of these points, catching all of them and stitching through the felt backing.
    P1080294
  21. Using a button large enough to hide your stitching, sew it in place in the center of your ribbon.  That completes the ribbon.

P1080332

Make it scrappy style to create a multi-colored state fair style ribbon.

P1080327

Make it modern in pink and grey.  I think the freshly picked zinnias from my garden make it special.

I hope you use your ribbons to celebrate in style!

Published – Fancy Cat Pillow


I have the good fortune to again be published in the Quilting Arts Holiday issue.  This time I am sharing my design for a little modern fancy cat pillow.  Whether you want to make a nice pouf for your kitty or a fun pillow for a kitty lover, this pattern fits the bill.  This fancy cat features cute coral bow ties, this coral color is so fun and I found some fabric with metallic accents.  This would be also look pretty stitched up with red bow ties for the holidays too.

quilting arts holiday 2015

This issue is always filled with lot of inspiration and ideas for handmade gifts for the holiday season.  I think the striped trees on the cover by Jennifer Heynen are just adorable.

Pillows are a great way to try out your quilting skills too.  I used straight stitch walking foot quilting as seen here as well as free motion quilting.  This pillow is an envelope style, so you can just cover a pillow form you already have if you want.


Even Cookie Cat approves of this fancy cat pillow.  He is always helpful like that when I am trying to take pictures. 🙂

Check out this issue, it should be available now in US stores.  Happy Stitching!


Sunburst Strip Piecing

Sunburst strip piecing Lori Miller Designs

In July, the Detroit Area Modern Quilt Guild hosted Lynn Harris from  The Little Red Hen for a class on strip piecing using techniques from her new book.  She also gave a wonderful trunk show of all of her scrappy quilts which were just beautiful.  I grabbed my box of orange scraps and a nice heathery grey fabric to work with.

Every Last Piece cover for blog


Lynn’s book is called Every Last Piece and she showcases 12 wonderful quilts that will use up your scrap stash.

2lynn harris class 1

Here are the strip pieces that we made in class using Lynn’s technique.  Make sure you have a lot of starch on hand!  Mine are the obvious orange ones.

lynn harris class 1

Here is our wonderful group of quilters.  Lynn is second from the left in the back and I am second from the right in the back.  The rest are all of my DAM girls.

I grabbed all of my orange strip pieced squares and decided to make half square triangles withe the heathery grey fabric.

I decided to make a runner for the Library Table I inherited from my Mother-in-Law.  It needs some love and care on the finish, so until I can make that happen, a pretty little runner should cover those up nicely.  I started to put them together in rows.

Using my trusty Bernina 630, I put on my BSR foot and started free motion quilting lines through the orange strips keeping them parallel to the seams and kind of even.  You don’t have to be perfect with this stitch and it still looks good.

P1100232

Here you can see all of the lines quilted in the orange strips, the texture is just amazing.  Then I wanted to put something in the triangle.  I wanted a design that was a bit more modern than feathers but was not having much luck finding what I wanted.  Then I found inspiration from Lori Kennedy of The Inbox Jaunt.  She had some sun and stars patterns that I adapted to the triangle.  She has tons of wonderful quilt designs and tutorials on her blog and I really love her name :).

Sunburst strip piecing Lori Miller Designs

Here is the sun pattern up close.  It is perfect to go with the orange rays in the strip piecing.  I also liked that it was a continuous design, I just quilted from triangle to triangle in a row without stopping.  Everyone is just a bit different, I did not even mark or plan too much, just quilted.  I really like it.

P1100234

Here is my finished runner, all quilted, washed and crinkly with texture.  I think it makes my library table look fabulous too.  I used a bunch of orange scraps but why does the box seem just as full when I was done as when I started?? HA HA  Happy scrap quilting!

MQG Riley Blake Fabric Challenge 2015 – My Quilt


The Modern Quilt Guild, of which I am a member, has been holding fabric challenges which I have been participating in for a couple of years.   This year the Spring Challenge was to use Riley Blake Cottage Garden Fabrics by Amanda Herring.  All you had to do was make something fantastic that is quilted, something you’ve never done before, challenge yourself to learn something new, and use the provided fat eighths of fabric and coordinating Riley Blake Solids.   I completely forgot about it until I got a reminder note from The Modern Quilt Guild saying we had 11 days left to make something.  Yikes!  I have been sewing for the past six days straight!


I participated in the last Riley Blake Challenge too.  I made this super awesome duffle bag with quilt as you go techniques.  I use it all the time.

rbchallenge2015-sThese were the fabrics that we received.  Lovely prints in aqua and grey, even included a text print.

I had actually been thinking about some kind of pattern to include the birds and trees.  When I laid out the fabrics, my idea just came together.  It needed a little color so I tried to find fabric to match and ended up with the yellow and the red which sort of matched the birds legs.  I purchased some extra solids in aqua and grey as well.  The left side you can see in the picture, I just stacked most of the fabrics and added the pops of color.  Not seen in this picture, the entire right side was a big strip of an aqua solid.  I placed the grey solid over the whole thing and sketched a tree shape with a water soluble marker.

Then I basted by hand, (Yes, just like my Grandma Mabel would have done!), I basted using a running stitch over every line of the tree.  Once I had it all basted, I cut away the fabric leaving a 1/4 of an inch to turn under.

Here is a picture a little more close up so you can see it better.  I did not worry too much if the 1/4 inch was perfect, the tree would just look more natural.

Then I hand appliqued that entire tree to the pieced top.  I also added some leaves in a darker grey and a little bird.  I used one of the gray flowers for his body.

I handquilted using big stitches on the tree branches and the leaves.  I also embroidered some yellow legs and a beak on my little red bird.  Here, I am getting ready to machine quilt the other parts of the quilt.  I just used a random swirl pattern around the tree on the right side of the quilt.

I just got going well with my machine quilting when the Quilt Inspector arrived.  How does he know every time that I am quilting??  He usually does not show up when I am piecing, only quilting.  Apparently this quilt passed the inspection, HA.  Love you, Cookie Cat.


My DH volunteered to hold this up so I could get some pictures and get them loaded on the MQG website before my time ran out.  You can see the whole quilt here.  After I washed it, it was so lovely and crinkly with texture.  I managed to hide the center seam with a tree branch all the way up.  I also added my little extra pieced on the right side of the binding for some interest.

Here is a picture of the back, I used some of the leftover fabric to put it together, you an really see my quilting from the back.


 Here is a closeup of my little bird before and after quilting and embellishment.  He just adds a little something.I will be taking to my Detroit Area Modern Quilt Guild meeting next week for show and tell.

Happy Stitching!


Picnic Silverware Rolls – free tutorial

These sunny summer days are perfect for picnics and spending time outdoors.  Here is a cute, washable silverware holder that you can make up to have stocked and ready to grab for an impromptu lunch in the park or a weekend outing with the family. These little picnic silverware rolls stitch up with sleeves to fit silverware and it even features a spot for a napkin.  It is pretty easy sewing, so lets get started!

Materials Needed:

This will make 8 silverware rolls.

  • 1 yd gingham fabric for lining and pocket
  • 1/2 yd print fabric for outside
  • 1/2 yd of batting
  • 5 -6 yards of grosgrain ribbon
  • Coordinating thread

Directions:

Cut

  • 1 — 8″ x 10″ rectangle of print fabric
  • 1 — 8″ x 10″ rectangle of batting
  • 1 — 8″ x 10″ rectangle of gingham fabric for lining
  • 1 — 10″ x 10″ rectangle of gingham fabric for pocket
  • 22″ of grograin ribbon for the tie

Stitch

  1. Take the 10″ x 10″ pocket and fold in half and iron flat.
  2. Layer the batting, the lining and the pocket all facing up as shown.
  3. From the left side of the pocket, measure 2 inches, 3 1/2″ and 5″ at the top and bottom of the pocket.  These will mark the stitch lines to make the channels for the silverware.
  4. Stitch down from the markings on the pocket to make the silverware channels.  You will have three stitch lines.  Do a couple of back stitches at the top to secure the channels.
  5. This is what the pocket channels will look like.
  6. Next, take your 22 inch grosgrain ribbon and fold almost in half leaving one end about one inch longer than the other.  Pin the ribbon flat on the right side of the pocket about halfway down the side of the roll.  Make sure that you will catch the ribbon when you stitch the side seam.  Tuck the ends out of the way so that you do not catch them in the side seams.
  7. Layer the rectangle from the print fabric over the pocket, right sides together and pin in place.
  8. With a 1/4″ seam, stitch all the way around the roll leaving an opening for turning on the bottom.  Clip corners.
  9. Turn the roll right side out and tuck in the raw edges on the opening.  Iron the silverware roll flat.
  10. Top stitch close to the edge of the roll all the way around being sure to catch the edges of the opening and sew them shut.
  11. Your first silverware roll is completed, now just make seven more!  These really do stitch up fast, sew them assembly line style!

Variations!

A friend used this pattern but wanted to quilt the outside.  Just Piece or quilt the outside fabric or block with the batting instead of including the batting with the lining.  Then assemble according to the directions.

If you use regular silverware instead of plastic, the roll may be too short, add an inch and cut it 9″ x 10″ for the outside fabric, batting and lining and stitch up using the same directions.

Published – Mod Selvedge Cushion


I am thrilled to share my Mod Selvedge Cushion published in the first anniversary issue of Make Modern Magazine.  No, I did not spell it wrong, Selvedge Cushion is how you spell Selvage Pillow in Australia where Make Modern is published.  This online quilt magazine is created by Jane, Lara and Kristy and is filled with delightful modern quilt and sewing patterns.  Make Modern is a digital magazine put together by quilters for quilters who are passionate about modern quilting and sewing.

I have been saving my selvages for a while, I even have a few friends saving them for me.  I don’t know if I will ever use them all.  This whole large bin is full of them.

I pulled just the black, white and cream ones strips of selvage for this pillow.  You create the selvage fabric by sewing them together in an overlapping fashion.

After you have sewn together a bunch of them, you start to see the cool fabric.  I alternated with lighter and denser pieces of black and white selvage.

I used a bright solid red for the accent.  Then I started quilting.  I think you could use multicolored selvages and use a neutral gray or white for the accent for another cool take on it.

Here is a picture of the pillow top up close. Don’t you love the striped accent? That was a last minute bit of whimsy.

Back of pillow

Here is the back of the pillow, I used a large newspaper print to play off the black and white.


Issue 6 cover


There are 14 great creative modern projects in this issue including my Mod Selvedge Cushion.  You can easily purchase the downloadable issue of Make Modern Issue Six online HERE for a very reasonable price.  There is also a free newsletter that you can sign up for.

My Modern Selvage Pillow is now available FOR SALE as a pattern in My Shop for instant PDF download.


Quick and Easy Kids Dishcloth Apron (free tutorial)

Here is a quick and easy project for that special little one in your life — a cute kid’s apron that assembles in a jiffy using only a dish towel and bias tape. My son always loved to help in the kitchen, and I made this little apron for him when he was a tot. He liked to feel grown up and wear his apron right along with mom while we made dinner or a yummy batch of cookies. The dish towel was thick and absorbent for any spills and he loved the little pockets too.

Materials Needed:

P1050036-001 apron

  •  Dish towel (preferably not a directional print or design)
  • 1 package of double-fold bias tape/quilt binding (7/8 inches wide) to coordinate
  • Coordinating thread

 Measure and Mark

  1. Open up and iron your dishtowel flat.
  2. Mark the center point of the top of the dish towel
  3. Measure and mark 4½ inches to the left and right of the center point.
  4. Measure down 7 inches from the top on each side of the towel and mark it.
  5. Measure up 7 inches from the bottom of the towel and mark it on each side and in the center.

apron-a

apron b

Cut

Now you are ready to cut the towel. (see diagrams above). Cut the top corners off of the towel according to your markings. Cut the 7 inch strip off the bottom of the towel, this will become the pockets.

Sew

apron-3a

apron-3b

  1. With right sides up and raw edges even, layer the 7-inch pocket strip and the towel.
    Sew them together with a ½-inch seam. Flip the pocket strip to the top of the towel and iron it in place.
  2.  Measure 5 inches from each side and mark them to sew the pockets.apron-4a
    apron-4b
  3. Sew each side close to the edge. Sew each of the pockets at the 5 inch measurement.  Double stitch the top of each pocket.
    apron ties
  4. Now sew the ties. Measure 68 inches of the bias tape.  Open up each end of the tape and stitch diagonally at a 45-degree angle from the open edge to the fold ending in a point. Trim and flip back around to form a neat point at the end of the tie.
    apron-6aapron-6b
  5. Find the center of the bias strip length and measure down 8 inches on each side. Mark with a pin. Using the pin as a guide, pin the bias tape along the slanted raw edges carefully covering them with both sides of the bias tape. Pin together.

apron 1

Starting with one end of the tie, top stitch close to the open edge of the bias tape. Stitch all around the tie, through the towel and back to the other side to the end. Trim threads.

apron 2

Now you have a very cute, quick apron for all your little helpers. It was so easy, I put together another one with this adorable blue daisy dish towel too. Wouldn’t this be a great holiday gift idea for your children or your grandchildren?  With so many dishtowel patterns, you could tailor them to every personality or to every holiday season!

Happy Stitching!

Modern 4th of July Table Runner (free tutorial)

Here is a modern patchwork table runner to stitch up just in time to celebrate Independence Day.  It looks improvisational, but it is really cleverly cut strips that give that illusion.  It is easy to piece and you can quilt with a free motion design or straight stitching.  I wanted something festive for the holiday for my table at the cottage when we have company and this fits the bill.  Fat quarter friendly too!

Finished size is 12” x 30”.

Materials needed:

  • 2 fat quarters of different red cotton fabric
  • 2 fat quarters of different blue cotton fabric
  • 1 fat quarter of white cotton fabric (I found a white star on white, perfect!)
  • 1/3 yd batting
  • 1/3 yd backing, cotton patriotic print
  • 1/4 yd red cotton for binding
  • Coordinating thread
  • Walking foot (optional)

Directions

Cut the Fabric

  1. From first red cotton fabric, cut 1 strip 4” x21”
  2. From 2nd red cotton fabric, cut 1 strip 4 ½” x 21”
  3. From first blue cotton fabric, cut 1 strip 4” x 21”
  4. From 2nd blue cotton fabric, cut 1 strip 5 ½” x 21”
  5. From white fabric, cut 1 strip 6” x 21” and 1 strip 4” x 21”
  6. Cut batting 12” x 31”
  7. Cut backing 12” x 31” (I found this great patriotic print with an eagle for the back.)
  8. Cut the binding.  3 strips – 2 1/2″ x wof (width of fabric)

Sew the table runner

  1. Sew the strips together.  The first 3 strips are the 4” red, 6” white, 4” blue.
  2. The second set of 3 strips are the 4 ½” red, 4” white, 5 ½” blue.
  3. Iron seams to one side and iron flat.
  4. Place one combination strip over the other strip, aligning the edges.  Cut 2” strips across them, you should have 10 – 2 “ strips.
  5. You will sew 5 sets of strips together with the 4” blue on the left top, and the 5 ½” blue on the left bottom.
  6. You will sew 5 sets of strips together with the 4” red on the top left, and the 4 ½” red on the left bottom.
  7. Now sew 1 of each set together to form a quilt block.  See picture above.
  8. Carefully remove lovey dovey kitty who thinks you should be petting him instead of sewing.
  9. Sew 5 of these blocks together.
  10. Then sew all the quilt blocks together in the same pattern.
  11. Make a quilt sandwich with the backing face down, then the batting, then the pieced top face up.
  12. Pin baste the table runner.
  13. Quilt it as desired.  I tried using a free motion design with stars, but you could also just do straight line quilting.  Use a stitch length of 4.0 mm and use your free motion foot for the straight line quilting if you have one to keep the fabric from slipping.
  14. Sew the binding pieces together and iron them  in half.
  15. Stitch the binding to the front of the table runner.  Then fold it over to the back and whip stitch it down.  Or use your favorite binding method.

The perfect modern 4th of July Table Runner in red, white and blue to brighten up your holiday table, foyer or side table.


Happy Stitching!

More Charity Quilts and Facebook

SONY DSC

I am catching up on a few projects and sharing some updates for Lori Miller Designs.

First, I have a new business page for Lori Miller Designs on facebook.  I would love for you to visit and like my page.  You can get updates on when I post new quilty blog articles or when a new block is ready for my Grandma Town Block of the Month.  If you have a moment,   Won’t you stop by and LIKE my page?

More Charity Quilting

My quilt guild, the Detroit Area Modern Guild, makes quilts for charity.  This year our quilts are going to a childrens critical care unit at Beaumont Hospital.  I finished up three quilts to donate.

SONY DSC

This first quilt is a stunner.  Can you believe I made it with scraps from another project?  These are the squares I cut off from my Kimberly Einmo’s Chainsaw Quilt.  You can see and read about that quilt on my blog HERE.  One of our guild members, Barb DeVilbiss, quilted this one on her longarm machine.  Doesn’t her design really make the half square triangles look interesting?

SONY DSC

This small baby size quilt is just strips of flannel with the raw edges out to fray and fluff up.  Super simple to make and so soft.

SONY DSC

This quilt I made a little larger in hopes of having something to give to an older boy who might be in need.  This is the Ballerina pattern from JayBird Quilts.  This setting happened because I did not have enough of one basketball fabric to do the whole thing.  It really makes the quilt look special to have a basketball border at the top and bottom.  Barb DeVilbiss quilted this one as well.

SONY DSC

Here is a picture of the tag we put on our quilts.  I really think it is a nice touch to add when we donate the quilts.

What kinds of quilts are you making for charity?