DIY Seed Packets – free tutorial

seed packets

Even though I am a quilter, I am also a lifelong gardener.  Both fill me with joy and help me to relax.  Now that it is September, the garden is winding down.   I find myself looking for seeds to save for next year, especially flower seeds.  I am gathering zinnia, marigold, four o’clocks and morning glory seeds right now.

seeds

It is time to organize all of the seed packets I have strewn all over the sunroom and find a way to save the seeds.  Here is how I store my seeds and a free tutorial on how make your own seed packets for seeds you might be saving.

Storing your seeds

seed container

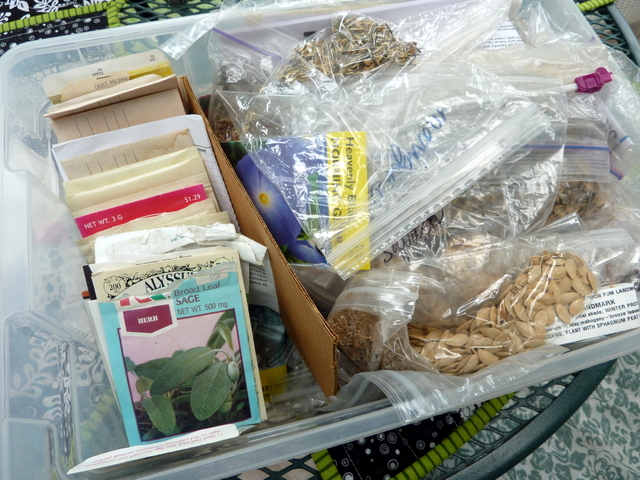
I use an airtight container like a glass jar or plastic container with a lid to store my seeds.

P1080701

To keep out moisture, I add a few of those little packets of silica jel saved from pill containers to keep them dry.  Then I put my seeds inside a paper or cloth grocery bag to eliminate any light and I leave them in my sunroom over the winter.  It is not heated, so the seeds get freezing cold.  This simulates being in the cold ground, so when spring comes, the seeds know it is time to be planted.

Can you keep seeds for more than one year?

I say YES, you don’t have to have new seeds each year if you have some left over.  They are too expensive to just throw away!  Many seeds keep for at least two years and often many more years if you store them in a dry, cool place.  I tend to use my seeds for several years as long as they will still germinate.  Some seeds are notorious for not keeping over the season for me, like lettuce and spinach, but almost everything else works.

P1080700

Organizing your seeds

I like to organize mine by alphabetical order, but I am thinking I should switch it up and do it by the timing of when to plant them instead.  I also like to separate vegetables, flowers and herbs into their own groups.

Saving Seeds

I like to save a few seeds for the next year, some things go to seed and it is easy to gather them.  Some of my favorites that are easy to save are zinnia, morning glory, forget me not, and marigold seeds.  I will also save seeds from melons, cucumbers and anything that gets too big before I pick it!  Just remember that if you planted a hybrid seed, the seeds will not grow true.  I like to pick heirloom seeds that you can easily save and get the same plant.  I have some funky heirloom cherry tomato seeds right now that I can hardly wait to plant next year.

P1080699

Make your own seed envelopes

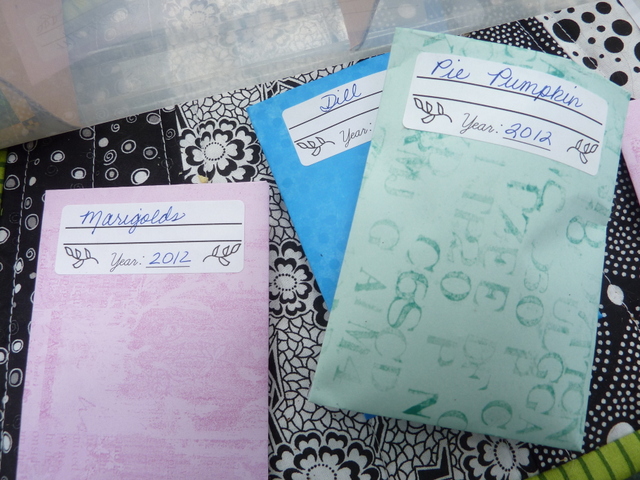
I let the seeds dry and then I make these cute envelopes and labels to store and keep them.  I have found the heavy weight scrapbook paper is perfect for this, but you could recycle junk mail or catalogs too.  Here is the FREE DIY Seed Envelope Pattern in two sizes and a FREE DIY Seed Labels Template  (The labels are in an MS Word file template using Return address labels sized 1″ x 2 5/8″).

Materials:

  • 12″ x 12″ Scrapbook Papers
  • Heavy Cardstock for template
  • Glue Stick
  • Pencil
  • Scissors
  • Return address labels sized 1″ x 2 5/8″ for printer

Directions:

  1. Print out the template and cut it out of heavy cardstock or cardboard to use to trace around.P1080669
  2. Position it on your scrap book paper and use a pencil on the wrong side to trace around it.P1080671
  3. You can fit 2 large and 2 small envelopes on a standard 12 x 12 scrapbook paper.P1080675
    P1080678
  4. Cut out your envelopes.P1080679
  5. First fold the large side flap.P1080680
  6. Use a glue stick to glue the outside edge of the flap.P1080682
  7. Fold the small flap over and crease in place.P1080687
  8. Glue the bottom flap and fold it up into place.P1080690
  9. Let the envelope and glue dry for a bit.P1080693
  10. They are so easy, make a bunch of envelopes.P1080697
  11. Print out your labels and attach one to each  envelope.P1080699-001
  12. Mark the label with the type of seed and date and then fill them up with your saved seeds.  Fold the top flap down and secure with a sticky dot or  a little glue and organize them in your container.

Gift idea!  Make these for Mother’s day or for a garden party for favors.  These would make nice gifts to slip inside a birthday card too.

What seeds do you like to save?

New Pattern – Poinsettia Pop Throw Quilt


I am excited about my new holiday pattern now available in my shop.  It is called Poinsettia Pop and it is a generous lap size to snuggle under when the weather turns cold.  The bright and cheery poinsettia blocks dance across the quilt bringing cheer to whoever receives it.

This quilt is made using large 15 inch finished blocks that stitch up quickly.  You only need to piece seven Poinsettia blocks so you can whip it up in time for last minute gifts.  I even included some speedy techniques to save you some time.  The bright hot pink fabrics, text print background, and alternate grid pattern give this block a very modern look.

The Poinsettia is actually a variation of the traditional Providence block.  I am not sure if it is named after the city in Rhode Island or has a deeper meaning of the manifestation of divine care, but it is a lovely thought for a holiday gift.poinsettia pop

The layout creates some additional designs and star patterns.  You could use my design as a base and let your imagination run wild.

You can find my Poinsettia Pop Throw Quilt pattern for sale by following the link for My Patterns.

Thanks for checking it out!  Tag me on Instagram, I would love to see your version!


State Fair Winning Ribbon (free tutorial)


With all of the delicious fruit available, all I can think of is making pies and jam.  It reminds me of the Iowa State Fair of my youth.  Everyone went to the state fair and my family always had a few entries.  My Dad was a beekeeper and he always entered some honey or an observation hive of bees.  He won many ribbons and this cute and quick ribbon gives me fond memories of those days.  This ribbon would also be good to make for quilt shows, your own contests or to decorate for a party, wedding or shower. How about red, white and blue?  They feature raw edges and just a little bit of sewing so you can make several very quickly.

Materials:

  • Scraps of coordinating cotton fabrics or use one color (1/4 yd is generous)
  • A 5 x 5 piece of wool felt
  • large button
  • coordinating thread

Directions:

Print out my FREE State Fair Winning Ribbon Pattern.

fair ribbon

Cut

  • 1 – Small circle pattern A from the wool felt for the base of the ribbon
  • 2 – Side ribbons from pattern B (Be sure to flip the pattern so you have one going each way.)
  • 1 – Middle ribbon from Pattern C
  • 4 – Large circles with Pattern D
  • 4 – Small circles with Pattern E

Assemble and Sew

P1080251


  1. Take one of the side ribbons B and take a small pleat or tuck to gather the top.P1080252
  2. Using a pin, pin the tuck to one side of the middle ribbon C at a slight angle.P1080253
  3. Take the other side ribbon B and make a tuck and pin to the other side of the middle ribbon C.P1080257
  4. Make two tucks in the center of the middle ribbon.  Start with one side and pin it and then tuck the other side.P1080260
  5. Place your streamer ribbons over the bottom of the felt circle base.  Stitch across all of the ribbon streamers and tucks, backstitching each side to hold it in place.P1080264
  6. Fold the centers of the ribbon.  Take a large circle D.
    P1080265
  7. Fold it in half, wrong sides together.  Next, you will need to make two pleats in the fabric but leave a point making it into a quarter pie shape.  I will talk you through it.
    P1080266
  8. Pleat and tuck one side.
    P1080267
  9. Fold the tuck to the back like the picture above and pin.
    P1080269
  10. Make another pleat and pin it too.  Pleat and fold each circle into a quarter triangle shape. You don’t have to be too accurate but you will need the center point.
    P1080270
  11. Places the circles together on the felt base.
    P1080272
  12. Continue until you have all four pleated circles in place.
    P1080276
  13. Starting about 1/2 inch from the center on one side of a triangle point, stitch across the end point of each folded circle.
    P1080277
  14.  You will stitch in a square, pivoting to stitch over each edge of the folded circles.
    P1080281
  15. Fold the small circles for the center of the ribbon using the small circle E.
    P1080283
  16. Fold the small circle in half, wrong sides together.
    P1080284
  17. Make one pleat to create a triangle that is about 1/4 size of the full circle and pin it.
    P1080287
  18. Begin laying the small pleated circles so that they cover the stitched seam from the large folded circles underneath.
    P1080292
  19. Slightly overlap the points on this layer of folded circles.
    P1080293
  20. Stitch a tiny triangle shape through the center of these points, catching all of them and stitching through the felt backing.
    P1080294
  21. Using a button large enough to hide your stitching, sew it in place in the center of your ribbon.  That completes the ribbon.

P1080332

Make it scrappy style to create a multi-colored state fair style ribbon.

P1080327

Make it modern in pink and grey.  I think the freshly picked zinnias from my garden make it special.

I hope you use your ribbons to celebrate in style!

Published – Fancy Cat Pillow


I have the good fortune to again be published in the Quilting Arts Holiday issue.  This time I am sharing my design for a little modern fancy cat pillow.  Whether you want to make a nice pouf for your kitty or a fun pillow for a kitty lover, this pattern fits the bill.  This fancy cat features cute coral bow ties, this coral color is so fun and I found some fabric with metallic accents.  This would be also look pretty stitched up with red bow ties for the holidays too.

quilting arts holiday 2015

This issue is always filled with lot of inspiration and ideas for handmade gifts for the holiday season.  I think the striped trees on the cover by Jennifer Heynen are just adorable.

Pillows are a great way to try out your quilting skills too.  I used straight stitch walking foot quilting as seen here as well as free motion quilting.  This pillow is an envelope style, so you can just cover a pillow form you already have if you want.


Even Cookie Cat approves of this fancy cat pillow.  He is always helpful like that when I am trying to take pictures. 🙂

Check out this issue, it should be available now in US stores.  Happy Stitching!


Picnic Silverware Rolls – free tutorial

These sunny summer days are perfect for picnics and spending time outdoors.  Here is a cute, washable silverware holder that you can make up to have stocked and ready to grab for an impromptu lunch in the park or a weekend outing with the family. These little picnic silverware rolls stitch up with sleeves to fit silverware and it even features a spot for a napkin.  It is pretty easy sewing, so lets get started!

Materials Needed:

This will make 8 silverware rolls.

  • 1 yd gingham fabric for lining and pocket
  • 1/2 yd print fabric for outside
  • 1/2 yd of batting
  • 5 -6 yards of grosgrain ribbon
  • Coordinating thread

Directions:

Cut

  • 1 — 8″ x 10″ rectangle of print fabric
  • 1 — 8″ x 10″ rectangle of batting
  • 1 — 8″ x 10″ rectangle of gingham fabric for lining
  • 1 — 10″ x 10″ rectangle of gingham fabric for pocket
  • 22″ of grograin ribbon for the tie

Stitch

  1. Take the 10″ x 10″ pocket and fold in half and iron flat.
  2. Layer the batting, the lining and the pocket all facing up as shown.
  3. From the left side of the pocket, measure 2 inches, 3 1/2″ and 5″ at the top and bottom of the pocket.  These will mark the stitch lines to make the channels for the silverware.
  4. Stitch down from the markings on the pocket to make the silverware channels.  You will have three stitch lines.  Do a couple of back stitches at the top to secure the channels.
  5. This is what the pocket channels will look like.
  6. Next, take your 22 inch grosgrain ribbon and fold almost in half leaving one end about one inch longer than the other.  Pin the ribbon flat on the right side of the pocket about halfway down the side of the roll.  Make sure that you will catch the ribbon when you stitch the side seam.  Tuck the ends out of the way so that you do not catch them in the side seams.
  7. Layer the rectangle from the print fabric over the pocket, right sides together and pin in place.
  8. With a 1/4″ seam, stitch all the way around the roll leaving an opening for turning on the bottom.  Clip corners.
  9. Turn the roll right side out and tuck in the raw edges on the opening.  Iron the silverware roll flat.
  10. Top stitch close to the edge of the roll all the way around being sure to catch the edges of the opening and sew them shut.
  11. Your first silverware roll is completed, now just make seven more!  These really do stitch up fast, sew them assembly line style!

Variations!

A friend used this pattern but wanted to quilt the outside.  Just Piece or quilt the outside fabric or block with the batting instead of including the batting with the lining.  Then assemble according to the directions.

If you use regular silverware instead of plastic, the roll may be too short, add an inch and cut it 9″ x 10″ for the outside fabric, batting and lining and stitch up using the same directions.

Quick and Easy Kids Dishcloth Apron (free tutorial)

Here is a quick and easy project for that special little one in your life — a cute kid’s apron that assembles in a jiffy using only a dish towel and bias tape. My son always loved to help in the kitchen, and I made this little apron for him when he was a tot. He liked to feel grown up and wear his apron right along with mom while we made dinner or a yummy batch of cookies. The dish towel was thick and absorbent for any spills and he loved the little pockets too.

Materials Needed:

P1050036-001 apron

  •  Dish towel (preferably not a directional print or design)
  • 1 package of double-fold bias tape/quilt binding (7/8 inches wide) to coordinate
  • Coordinating thread

 Measure and Mark

  1. Open up and iron your dishtowel flat.
  2. Mark the center point of the top of the dish towel
  3. Measure and mark 4½ inches to the left and right of the center point.
  4. Measure down 7 inches from the top on each side of the towel and mark it.
  5. Measure up 7 inches from the bottom of the towel and mark it on each side and in the center.

apron-a

apron b

Cut

Now you are ready to cut the towel. (see diagrams above). Cut the top corners off of the towel according to your markings. Cut the 7 inch strip off the bottom of the towel, this will become the pockets.

Sew

apron-3a

apron-3b

  1. With right sides up and raw edges even, layer the 7-inch pocket strip and the towel.
    Sew them together with a ½-inch seam. Flip the pocket strip to the top of the towel and iron it in place.
  2.  Measure 5 inches from each side and mark them to sew the pockets.apron-4a
    apron-4b
  3. Sew each side close to the edge. Sew each of the pockets at the 5 inch measurement.  Double stitch the top of each pocket.
    apron ties
  4. Now sew the ties. Measure 68 inches of the bias tape.  Open up each end of the tape and stitch diagonally at a 45-degree angle from the open edge to the fold ending in a point. Trim and flip back around to form a neat point at the end of the tie.
    apron-6aapron-6b
  5. Find the center of the bias strip length and measure down 8 inches on each side. Mark with a pin. Using the pin as a guide, pin the bias tape along the slanted raw edges carefully covering them with both sides of the bias tape. Pin together.

apron 1

Starting with one end of the tie, top stitch close to the open edge of the bias tape. Stitch all around the tie, through the towel and back to the other side to the end. Trim threads.

apron 2

Now you have a very cute, quick apron for all your little helpers. It was so easy, I put together another one with this adorable blue daisy dish towel too. Wouldn’t this be a great holiday gift idea for your children or your grandchildren?  With so many dishtowel patterns, you could tailor them to every personality or to every holiday season!

Happy Stitching!

Modern 4th of July Table Runner (free tutorial)

Here is a modern patchwork table runner to stitch up just in time to celebrate Independence Day.  It looks improvisational, but it is really cleverly cut strips that give that illusion.  It is easy to piece and you can quilt with a free motion design or straight stitching.  I wanted something festive for the holiday for my table at the cottage when we have company and this fits the bill.  Fat quarter friendly too!

Finished size is 12” x 30”.

Materials needed:

  • 2 fat quarters of different red cotton fabric
  • 2 fat quarters of different blue cotton fabric
  • 1 fat quarter of white cotton fabric (I found a white star on white, perfect!)
  • 1/3 yd batting
  • 1/3 yd backing, cotton patriotic print
  • 1/4 yd red cotton for binding
  • Coordinating thread
  • Walking foot (optional)

Directions

Cut the Fabric

  1. From first red cotton fabric, cut 1 strip 4” x21”
  2. From 2nd red cotton fabric, cut 1 strip 4 ½” x 21”
  3. From first blue cotton fabric, cut 1 strip 4” x 21”
  4. From 2nd blue cotton fabric, cut 1 strip 5 ½” x 21”
  5. From white fabric, cut 1 strip 6” x 21” and 1 strip 4” x 21”
  6. Cut batting 12” x 31”
  7. Cut backing 12” x 31” (I found this great patriotic print with an eagle for the back.)
  8. Cut the binding.  3 strips – 2 1/2″ x wof (width of fabric)

Sew the table runner

  1. Sew the strips together.  The first 3 strips are the 4” red, 6” white, 4” blue.
  2. The second set of 3 strips are the 4 ½” red, 4” white, 5 ½” blue.
  3. Iron seams to one side and iron flat.
  4. Place one combination strip over the other strip, aligning the edges.  Cut 2” strips across them, you should have 10 – 2 “ strips.
  5. You will sew 5 sets of strips together with the 4” blue on the left top, and the 5 ½” blue on the left bottom.
  6. You will sew 5 sets of strips together with the 4” red on the top left, and the 4 ½” red on the left bottom.
  7. Now sew 1 of each set together to form a quilt block.  See picture above.
  8. Carefully remove lovey dovey kitty who thinks you should be petting him instead of sewing.
  9. Sew 5 of these blocks together.
  10. Then sew all the quilt blocks together in the same pattern.
  11. Make a quilt sandwich with the backing face down, then the batting, then the pieced top face up.
  12. Pin baste the table runner.
  13. Quilt it as desired.  I tried using a free motion design with stars, but you could also just do straight line quilting.  Use a stitch length of 4.0 mm and use your free motion foot for the straight line quilting if you have one to keep the fabric from slipping.
  14. Sew the binding pieces together and iron them  in half.
  15. Stitch the binding to the front of the table runner.  Then fold it over to the back and whip stitch it down.  Or use your favorite binding method.

The perfect modern 4th of July Table Runner in red, white and blue to brighten up your holiday table, foyer or side table.


Happy Stitching!

My version of the Noodlehead zip bag – Gold Kitties

P1100147-001

I am going to visit my friend Ann, and I thought she needed a cute little gift.  I have made a lot of zip bags, but I had not tried the Open Wide Zippered Pouch by Noodlehead.  I figured this was a great time to try it out.  And I have to say I think this is my new favorite zipper bag.  The design is super easy to sew and the zipper is even easier!  If you have not tried making one, it is time you did.  She has a great tutorial with lots of pictures on her blog.

P1100129

I started out with this adorable japanese kitty head fabric that I picked up at Quiltcon.  The gold kitties are nice and I simply love the bow ties.  It is called Trefle by Kokka Fabric.  I used a quarter yard for two small zip bags.

P1100130

I got this perfectly matching fat quarter in my Quiltcon goodie bag, it was the perfect size for two bag linings.

P1100132

I had some vintage coral cotton that matched and I gathered up the rest of my materials.

P1100137

I really wanted my bag to have some quilting, so I quilted it.  I just made a sandwich of muslin, batting and the outside of the bag and started quilting some straight lines.

P1100136

I used straight lines about 1/4 inch apart for the top of the bag.

P1100139-001

Then I quilted the base of the bag about an inch apart using my trusty walking foot.

P1100143-001

I should have gotten a few more pictures for you of the zipper.  You don’t include it in the side seams, so the bag can literally open wide.  A little pinning and measuring and you just sew a straight seam right through it.  This picture shows me turning it right side out just before I tuck the lining inside.

P1100148-001

Here is what it looks like WIDE OPEN.  So versatile.

P1100145-001


Two super cute bags, one for me and one for Ann.

It is a perfect girlfriend gift.  I am filling it with small samples of lotions and lip balm.  Hope she likes it.

Have you made one of these wide open zip bags?  What do you use it for?

Easy Shamrock Door Decoration – Free Tutorial


Finished Size  12″ x 12″

Materials:

  • 1/8 yard of green for shamrock
  • 1/8 yard of black for background
  • 1/2 yard of green print for back, binding and hanger
  • 1/2 yard of batting
  • Coordinating thread

Directions:

shamrock fabric Lori Miller Designs

Cut Fabric:

Green for Shamrock

  •  8 — 2  1/2″ x 4  1/2″ strips

Black

  • 8 — 2  1/2″ x 2  1/2″ squares
  • 2 — 2  1/2″ x 8  1/2″ strips
  • 2 — 2  1/2″ x 12  1/2″ strips

Green Print

  • 2 1/2 x 60″ strip for binding
  • 2 1/2″ x 20″ strip for hanger
  • 12 1/2″ x 12 1/2″ square for back

Batting

  • 12 1/2″ x 12 1/2″ square

 Sew

SONY DSC

  1. Place black square on the top of each of the shamrock strips matching the edges.  Mark four strips with a diagonal line to the left and four strips with a diagonal line to the right.Shamrock cut Lori Miller Designs
  2. Stitch on the lines. Trim.
    SONY DSC
  3. Iron the flaps out.  Sew two strips together to form a point with the shamrock material.SONY DSC
  4.  Continue to sew three more.  Arrange the four squares so that each point of each square rotates clockwise and stitch together. Press.shamrock sew borders
  5. Sew the black 8 1/2″ strips to each side. Press.SONY DSC
  6. Sew the black 12 1/2″ strips to the top and bottom. Press.

Quilt

quilt shamrock Lori Miller Designs

  1. Layer the back of the quilt right side down, the batting and the top of the quilt, right side up,  in a quilt sandwich.shamrock quilting Lori Miller Designs
    shamrock
  2. Baste together with quilting safety pins and quilt as desired.  I used straight line quilting with a walking foot at about 1/4″ intervals.

Finish

SONY DSC

  1. Fold the binding in half, wrong sides together, and press.  Attach the binding to the little quilt.SONY DSC
  2. Fold the hanger fabric strip in half, right sides together and stitch down the long edge.
  3. Turn the hanger right side out and iron flat with the seam on the back.SONY DSC
  4. Tie a bow in the hanger, centered at the top.  Tuck in the ends and stitch closed.shamrock hanger
  5. Attach the ends to the back side of the quilt about 3″ from each side.  I just used a whip stitch.SONY DSC
  6. That finished up your decorative door hanger.  Hang it on your door or as a wall hanging for decoration!May the luck of the Irish be with you!


New Pattern – Dizzy Daisy Threadcatcher, Needlebook and Mini Pincushion

P1090937

I have been making this cute little dizzy daisy pincushion and threadcatcher for my friends for years and they have been asking for the pattern.  I added a Needlebook and Mini Pincushion for some cute bonus items to go with it.  You use a threadcatcher to well…catch the threads and little snips and bits as you are sewing.  It helps keep your sewing area neat and it is simple to carry to the trash can to empty it out when it is full.  The little daisy on the attached pincushion is pretty and clever – you can park your needles here so they are easy to find.

Dizzy Daisy Threadcatcher

I have several.  One is perched on my sewing table next to my machine where it is handy but I won’t knock it off.  I have one in my travel bag for sew-in days and retreats.  And I have one to carry with me to my recliner.  I have it hanging off the arm of the chair when I am doing hand sewing and watching tv.  I like to think I am being productive while I watch my favorite shows.

Dizzy Daisy Needlebook

I added this cute little Needle book too.  I have several of these too.  One for embroidery needles, one for applique needles, and one for quilting betweens.  I even have a special one with my big eye needles for Big Stitch Quilting.  It makes it easy to grab what you need for any project.

P1090943

Use it for pins or regular needles too when you are sewing on your quilt binding if you do it by hand like me.  I find it to be relaxing to do it by hand.

Dizzy Daisy Mini Pincushion


Finally, there is this tiny mini pincushion.  It is a 3″ x 3″ 9 patch.  I even tried to fussy cut the center square on this one.

This tiny size is easy to throw in a hand sewing bag or for a travel pincushion.  It is so simple and quick to make.  I stitched up a bunch of them for stocking stuffers this past Christmas.  I think they would be a fun gift to make for your sewing group too.

P1090848

Here is an example of another set I stitched up with a natural linen.  I embellished the items with embroidery floss in a running stitch and some twill tape.

P1090847

 I even changed up the little pincushion but it is still a petite 3″ x 3″.  Once you have the pattern, you can explore your own creativity to create something that is one of a kind.

Thanks for letting me share my new pattern with you.

You can purchase this Dizzy Daisy Threadcatcher pattern as a PDF download by going to MY PATTERNS tab and following the link to My Etsy Shop!

P1080584


Easy Crochet Valentine Hearts

Yes, I usually am sewing or quilting.  But every now and then I like to do a little crochet.  I found this great pattern for easy crochet valentine hearts that I made into a fun holiday garland.  Perfect for a beginner, this pattern would be great to teach someone new how to crochet, as it has several basic stitches including chain, single, double, half double and triple crochet!  It also works very fast with only 3 rounds to make a heart.

crochet valentine heart - Lori Miller Designs

I made this whole garland in an evening of watching tv and I just used my leftover red, white and pink yarn stash!

Cindy first shared this pattern on her website Skip to My Lou.  Find her free crochet directions here.

Note: Definitely use the alternate directions for round 3.  It really helps the valentine to lay flat.

Round 1

crochet valentine heart - Lori Miller Designs

Round 2

crochet valentine heart - Lori Miller Designs

Round 3

crochet valentine heart - Lori Miller Designs

Here are my hearts all strung together.  I alternated red and pink valentine hearts, they really brighten things up.

crochet valentine heart - Lori Miller Designs

You just use a chain stitch and single crochet to the tops of the valentine hearts to form the garland.  They hang very nicely like this.

crochet valentine heart - Lori Miller Designs

What a great little decoration to create for valentines day.  A truely perfect afternoon project to teach your little ones to crochet in this cold, snowy weather. Why don’t  you make the little valentine hearts and slip them in a letter, lunchbag or on a pillow for your sweetheart for a surprise?

Happy Valentines Day!

Make a skinny selvage scarf

lmdesigns selvage scarf 1

Do you save your fabric selvages?  I started doing it just over a year ago because I kept seeing lots of clever items made with them.  I never used to pay attention to the selvages on my fabric.  They were just things to cut off so that the fabric did not shrink funny or have a little stiff edge.  I never cut them off first, I just cut them willy nilly when I needed to. I now cut them at least an inch wide so I have something to work with on selvage projects.  The giant pile is growing, so here is a fun scarf that I sewed together with some of my selvages.  It is just a little skinny thing, but it can sure dress up a top.  I think you could even make it really long, sew the ends together and make it into an infinity scarf.    Why not be frugal and use every scrap of fabric in your projects?

Skinny Selvage Scarf

Materials:

lmdesigns selvage scarf 2

  • colorful fabric selvage scraps (I used about 10-12 strips at least 18 inches long and about 1 inch wide)
  • backing fabric
  • flannel for the batting
  • coordinating thread

Directions:

Note: All seams are 1/4 inch.

lmdesigns selvage scarf 3

Pick out your selvages and arrange them in a pleasing order.  Then stitch them together to make your fabric.

lmdesigns selvage scarf 4

You just overlap the selvage edge and stitch it down.

lmdesigns selvage scarf 5

Then, I used my rotary cutter to cut my selvage “fabric” into strips.

lmdesigns selvage scarf 6

Then I joined the strips end to end to get the length I needed.  It also made a nice repeating pattern of fabrics.

lmdesigns selvage scarf 7

I then layered my selvage strip, backing fabric and flannel for the filler and stitched around the whole thing.

lmdesigns selvage scarf 8

I turned it right side out and slip stitched the turning opening closed.

lmdesigns selvage scarf 9

I just added some topstitching to finish it off.  Now you have a funky, frugal and colorful skinny scarf to liven up a solid t-shirt or snazz up a plain white shirt.

lmdesigns selvage scarf 10

lmdesigns selvage scarf 11


This was so much fun, that I made two more!

Do you save your selvages?  What are you making with them?

Sweet Baby Burp Cloth (Free Pattern)

burp cloth - lori miller designs

A good friend is having a baby boy and her baby shower is next week.  I wanted to stitch up something useful and I decided to make these super cute little sweet baby burp cloths.  They are soft and absorbent using soft flannel and diaper cloth.  I remember these were really handy when my son was born and you always needed a bunch of them.  I was so glad you could just throw them in the wash to be ready for another day.  This shape is what I remembered having long ago.  It is a very quick project.  Read on for my tutorial and a free pattern.

This will make four burp cloths.

Materials

  • 1/2 yd of baby print flannel
  • 1  yd of diaper cloth

Directions

P1090930

  1. Using my free Sweet Baby Burp Cloth Pattern, Cut out 4 flannel panels and 8 diaper cloth panels.P1090936
  2. Layer the flannel right side up, and the diaper cloth, right side down.  Use two layers of diaper cloth.P1090948
  3. Using a 3/4″ seam, to catch all the layers, and leaving an opening for turning, stitch around the entire burp cloth.P1090949
  4. Clip the curves.P1090950
  5. Turn it right side out.P1090952
  6. Iron the burp cloth flat making sure to fold in the edges of the opening.P1090953
  7. Topstitch closely to the outer edge of the burp cloth, being sure to stitch the opening closed.P1090954
  8. Topstitch again 1/4″ away from the edge stitching.P1090955
  9. Finished!  A very cute and quick little gift.  Now to just sew a few more.  They really stitch up in a jiffy.

Do you have a “go to” handmade gift for new babies that you like to make?  Let me know.


Finish it Up Friday: Personalized Gifts

personalized stitched gifts Lori Miller Designs


This year I decided to make personalized gifts for almost everyone.  I made a Peekaboo Pencil Case with a pattern by Pickle Pie Designs and embroidered names and picked out fun fabrics to match personalities if I could.

P1090830

Here are a few of the last ones I made.  I used the fun watch print for my guys.  Now, you don’t have to use the pencil pouch for pencils. I think it would be a great idea to corrall all of those chargers and cords you have for phones and tablets and readers.  Great for traveling or just being able to find them in one place or to make sure someone doesn’t steal your charger.

P1090832

This one is for the daughter of my friend, Candy.  I love this cute Japanese print with all kinds of office supplies on it.

P1090828

I found this print this summer in Grand Rapids, Michigan.  It is an adorable print of sheep knitting, I knew I had to have it for my friend, Jennifer.

P1090827

I started making her a Sew Together Bag by Sew Demented.  I love this very versatile bag and have made six or seven of them.  I used headliner fabric for the “batting” and it really gave a nice shape to the bag.  If you have not tried making the Original Sew Together Bag, you need to put this on your list of ones to try.  I have one for my sewing supplies I take to Sew in Days or for Quilt Retreats.  But it is very adaptable, it would be a great make up bag or gadget carryall too.

P1090837

Here is the inside with the three different colored zippers.  I have cute sheep fabric and polka dots inside.

P1090839

I just did a little crosshatch quilting on the bottom part.

P1090841

I still had fabric left, so I made the Pencil case.  Maybe she can put small knitting needles or stitch markers in there.

P1090844


Finally, I had to make a little name tag for her to wear when she goes to her knitting group meetings.  The sheep was too cute not to highlight and I added her name in embroidery too.  I used a red print with silver polkadots for a little bling that I picked up at JoAnn Fabrics.

I have a Bernina 630E, it stitched up the names like a charm.  I think I am learning more about my machine now after about 10 years than when I first got it.  Maybe it is because I have more time now.

What are you finishing up stitching for the holiday?

Handmade Holiday: Mini Tissue Holder Tutorial

Mini tissue cover Lori Miller Designs 1


Here is a cute quick gift you can stitch up in multiples for holiday party favors, stocking stuffers or just a little something for someone special.  I used holiday and Christmas fabric but you could tailor them for boys or girls with masculine prints, sporty fabric or another cute novelty print.  There is really very little sewing so it is perfect for a beginning stitcher.  It doesn’t take much fabric either, so use up some of your scraps or stash.

Materials Needed:

  • Fabric Scraps in coordinating colors (fat quarters are more than enough)
  • Coordinating thread
  • Mini Tissue packages

P1090771

Cutting:

Solid fabric:

  • Cut 1 — 4″ x 5 3/4″ rectangle
  • Cut 2— 4″ x 4″ squares

Print Fabric:

  • Cut 2 — 4″ x 5 3/4″ rectangle

Sewing:
P1090776

  1. Iron the two solid squares and the two print rectangles in half the long way, wrong sides together.P1090778
  2. Layer the first print piece over the solid rectangle piece, right sides together.  The fold should be facing the center and the raw edges should be aligned with the solid rectangle.P1090780
  3. Next, layer the solid piece on the end with the fold facing the center and the raw edges aligned with the solid rectangle.P1090782
  4. Continuing to work clockwise, layer the other printed piece on the solid rectangle laying on top of the previous piece and with the raw edges aligned to the bottom rectangle.P1090784
  5. Layer the final solid square and the end with the fold facing the center.  Lift up the other print piece and tuck it under aligning the raw edges with the bottom rectangle.P1090787
  6. The pieces will look like this all layered together.  Pin the layers together.P1090793
  7. Stitch around the entire outside of the cover with a 1/4″ seam.P1090795
  8. Clip the corners and turn it right side out.P1090788
  9. Take one of the mini tissue packs.  I just snip the upper plastic package down the middle so you can get to the tissues.  You can maybe just open them and put the little sticky closer out of the way too.P1090790
  10. Tuck it into the little cover.P1090798
  11. Now you have a cute small tissue cover to tuck in your bag, purse or car.